

Dec 5, 2023
Accessibility Inspector and UIAutomatorViewer

Frank Moyer
Read More
Navigating the intricate landscape of mobile app testing requires a discerning eye and adept tools. Among those tools, Appium Inspector stands out as a pivotal force. With the latest advancements in Appium 2.0, the Inspector tool has become even more powerful and customizable. Let’s dive into how to use Appium Inspector for enhanced mobile app testing experiences, including the latest features and best practices.
Inspector tools allow engineers to confirm the proper operation of mobile app elements. The most common element inspectors in use today are:
With Appium 2.0, the modular architecture lets users choose which drivers and plugins to install, making it easier to customize your testing setup. This means you can tailor Appium Inspector to work specifically with your testing needs, whether it’s Android, iOS, or even both.
To get the most out of each tool, it’s important to have expert guidance, which Kobiton offers — supporting both tools and processes.
Appium is an open-source mobile automation testing framework that supports multiple programming languages. Its primary purpose is to combat device/ platform fragmentation when automating for both Android and iOS apps.
Like the element inspectors mentioned, Appium Inspector allows automation engineers to inspect both Android and iOS applications’ DOM (Document Object Model) in one ecosystem. With Appium 2.0, this capability is more flexible than ever, thanks to its plugin-based system. Whether you’re working with native apps, web apps, or hybrid apps, you can use the Inspector with customized drivers that suit your testing goals.
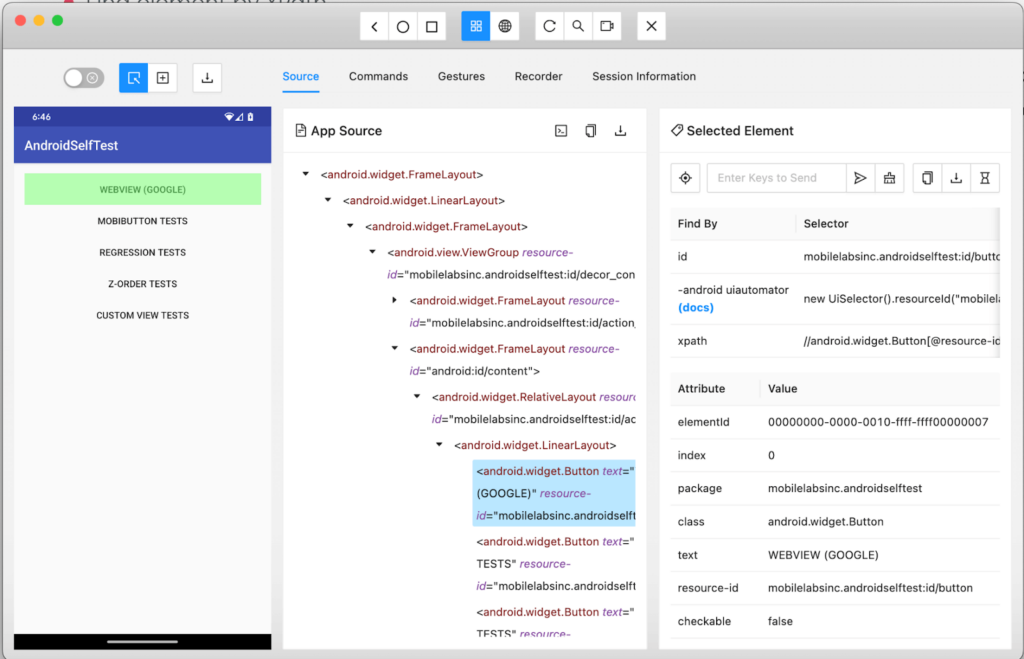
Appium Inspector is a key utility in Appium’s ecosystem, enabling developers and automation engineers to inspect a mobile app’s UI for both Android and iOS devices. It facilitates mobile automation by allowing engineers to select the Appium server, then start a session to inspect and interact with UI elements in real-time.
With Appium 2.0, you now have greater control over which components of the Inspector you use. The plugin-based architecture makes it easy to extend or modify Appium’s functionality. For instance, you can install only the iOS or Android drivers you need and even add custom plugins for enhanced inspection capabilities like optimizingelement locators.
UI Automator is a framework for functional testing on Android, while XCUITest is Apple’s official IDE for iOS. Both tools offer rich capabilities for element inspection, but Appium Inspector provides a unified cross-platform solution. It can handle both iOS and Android app testing within the same session, leveraging Appium 2.0’s multi-driver support, making it the go-to choice for automation engineers who need flexibility across platforms.
Appium is an open-source mobile automation framework that provides diverse programming language and platform support options. Appium Studio, an IDE created by Experitest, delivers additional features such as a better GUI and enhanced device management. However, it is a commercial extension more suited to large-scale, enterprise-level deployments.
| Feature | Appium | Appium Studio |
|---|---|---|
| License | Open-source | Commercial (paid) |
| Customization | High (via plugins, drivers) | Limited (pre-set enterprise features) |
| Ease of Use | Requires more technical knowledge | User-friendly GUI, more suitable for less technical testers |
| Cross-Platform Support | Supports iOS, Android, and Windows | Supports iOS and Android |
| Device Management | Requires third-party solutions or cloud providers | Built-in device management and easy access to device farms |
| Programming Languages | Supports multiple languages | Primarily focused on GUI-based testing |
| Support | Community-driven support | Dedicated customer support from Experitest |
| Suitable For | Smaller teams, individual testers, or companies with custom requirements | Larger enterprises with the need for enhanced management and advanced features |
Visit the Appium Inspector GitHub releases page and choose the correct version for your operating system (e.g., .dmg for macOS or .exe for Windows). Download and install it.
This tool is most helpful for:
With Appium 2.0, these tasks become even more efficient, thanks to the introduction of custom plugins that enhance core functionalities like element searching or session management.
Element Identification & Attribute Verification: Appium Inspector’s GUI helps users identify and verify element properties such as text, color, and position. With Appium 2.0, you can leverage enhanced XPath and Accessibility ID performance through newly available plugins, ensuring faster and more stable element location.
Script Creation: Use Appium Inspector to create cross-platform automation scripts, reusing them for both Android and iOS apps. Appium 2.0’s streamlined architecture makes this even easier by allowing parallel script execution across devices, ensuring greater efficiency in test automation.
Debugging Capabilities: The improved debugging tools in Appium Inspector include video recordings, screenshots, and device logs, which help troubleshoot failed tests more effectively. With Appium 2.0, debugging can be further customized using plugins tailored for capturing detailed logs and error reports.
XPath and Accessibility ID Generation: Appium Inspector helps generate precise XPath expressions and Accessibility IDs for stable element targeting. In Appium 2.0, XPath generation can be optimized using custom plugins, providing a more robust way to handle dynamic elements.
To begin,install Appium 2.0 and the necessary plugins or drivers. This modular approach allows you to only install what’s needed for your specific testing requirements, making your setup lighter and more efficient.
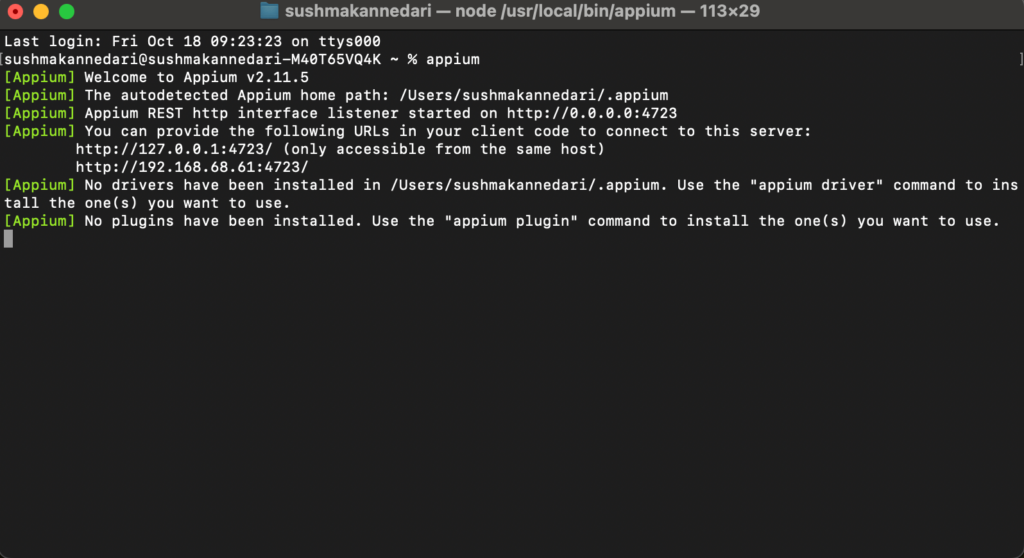
Open a terminal and launch Appium 2.0 using the appium command. The modular nature of Appium 2.0 lets you start the server with only the relevant drivers, ensuring faster performance.
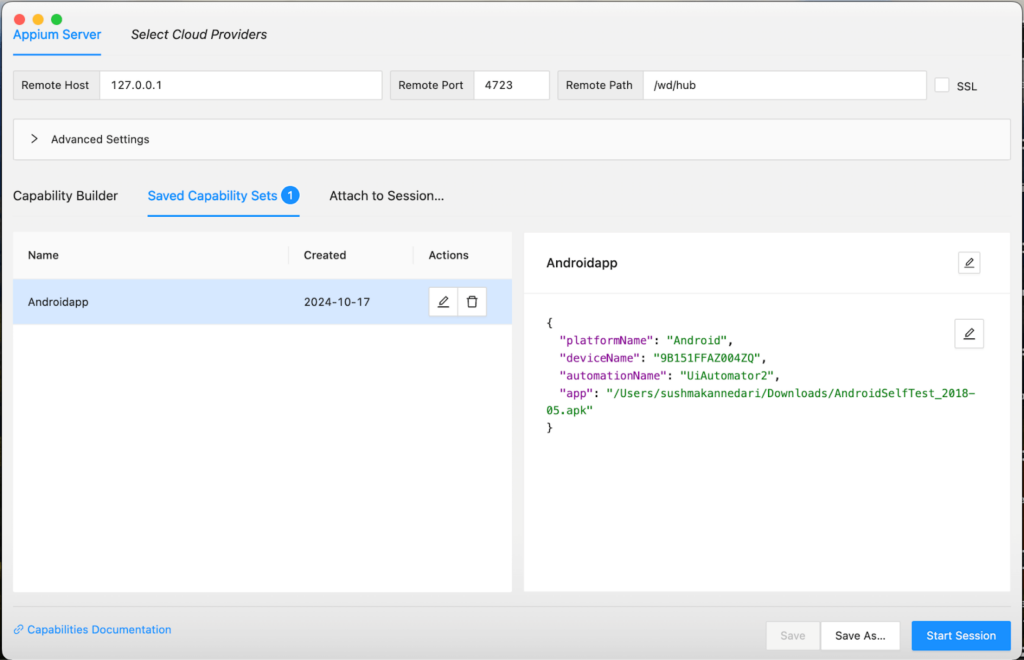
Open Appium Inspector and Set the Remote Host to 127.0.0.1 and the Remote Port to 4723. You can customize this further by connecting to remote servers or cloud services like Kobiton.
Desired capabilities define the device on which tests will run. With *Appium 2.0*, saving and reusing these capabilities is easier than ever. Here’s an updated example:
{
"platformName": "Android",
"deviceName": "device name",
"automationName": "UiAutomator2",
"app": "apk path"
}*Tip*: Save your desired capabilities for future sessions to streamline testing, especially when switching between devices or apps.
Click ‘Start Session’ to begin your connection and start inspecting app elements. You’ll quickly begin identifying issues and optimizing your app’s performance in real-time.
Use Appium Inspector’s locator strategies such as ID,XPath, or Accessibility ID to find elements in your app. With Appium 2.0, the improved Selector plugin allows for even more efficient element identification, reducing errors and speeding up the test creation process.
While Appium Inspector offers robust capabilities for mobile app testing, there are some limitations:
With Appium 2.0, many of these limitations can be mitigated by utilizing custom plugins. For example, hybrid app support can be enhanced through third-party plugins or drivers, and performance on older devices can be improved by using optimized configurations.
Appium Inspector works on Windows, but ensure you have Appium 2.0 installed, along with the relevant drivers for your platform (Android/iOS). You can customize your setup using Appium’s plugin system, making it easier to switch between platforms.
Yes, Appium Inspector is compatible with several cloud-based services like Kobiton, SauceLabs, and BrowserStack. Appium 2.0’s plugin system makes it even easier to integrate with these services by allowing seamless connection and session management with minimal setup.

Appium Inspector, especially with the added flexibility of Appium 2.0, is a must-have tool for mobile automation. Whether you’re inspecting elements, generating scripts, or debugging, Appium’s new modular approach makes it easier to scale your testing and adapt to the latest technologies. Teams should always choose the framework that best fits their needs, and with Appium 2.0, the choice has never been clearer.
Our clients run the testing tool gamut using Appium, Espresso, and XCTest / XCUITest frameworks. Kobiton enhances Appium Inspector’s functionality by providing seamless cross-platform testing, making it easier for you to deliver top-notch mobile experiences. Experience this difference for yourself by trying Kobiton today with a free demo. Streamline your testing efforts and optimize your mobile apps with ease.