If you use Appium, you probably have used the Appium Desktop app. With the latest release of the desktop, Appium has Kobiton devices integrated and accessible directly from the app.
From Appium’s site:
“Appium Desktop is an app for Mac, Windows, and Linux which gives you the power of the Appium automation server in a beautiful and flexible UI. It is a combination of a few Appium-related tools:
A graphical interface for the Appium Server. You can set options, start/stop the server, see logs, etc… You also don’t need to use Node/NPM to install Appium, as the Node runtime comes bundled with Appium Desktop.
An Inspector that you can use to look at your app’s elements, get basic information about them, and perform basic interactions with them. This is useful as a way to learn about Appium or as a way to learn about your app so you can write tests for it.”
Kobiton integration with Appium Desktop allows you to inspect your app elements remotely using the Kobiton device cloud and Kobiton In-House device. Download the latest release of Appium Desktop from the Appium release page on GitHub.
A·K
Appium Desktop + Kobiton Setup
Interactive workflow to connect Appium Desktop with the Kobiton device cloud
Step 1 of 60% complete
📋
Step 1 · Prerequisites
Get the tools you need
Before connecting Appium Desktop with Kobiton, make sure you have everything in place. Check off each item as you complete it.
Download the latest Appium Desktop from the official GitHub releases page
Have a Kobiton account (free trial works) — sign up takes a few moments
Install Appium Desktop on your Mac, Windows, or Linux machine
Have your app file (.apk / .ipa) or web URL ready to test
💡 Good to knowAppium Desktop bundles its own Node.js runtime — you don’t need to install Node or NPM separately.
🔑
Step 2 · Credentials
Find your Kobiton credentials
You’ll need your Kobiton username and access key. Enter them below — we’ll keep them in this session so we can prefill them later.
Sign in to your Kobiton account at portal.kobiton.com
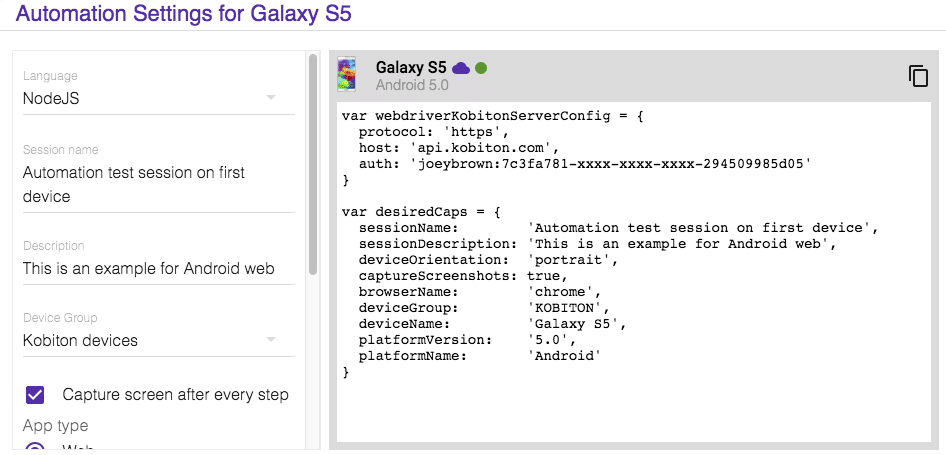
On the Devices page, hover over any device and click Show automation settings
Copy your Username and Access Key from the panel
⚠️ Keep it safeTreat your access key like a password. Don’t commit it to public repos or share it in screenshots.
🪟
Step 3 · Open Session Window
Launch the New Session Window
Inside Appium Desktop, you’ll open a new session window where the Kobiton tab lives.
Launch the Appium Desktop app
From the menu bar, choose Appium → New Session Window
In the new window, click on the Kobiton tab
🎯 What this doesThe Kobiton tab is the integration entry point — it tells Appium Desktop to route your session to the Kobiton cloud instead of a local server.
⚙️
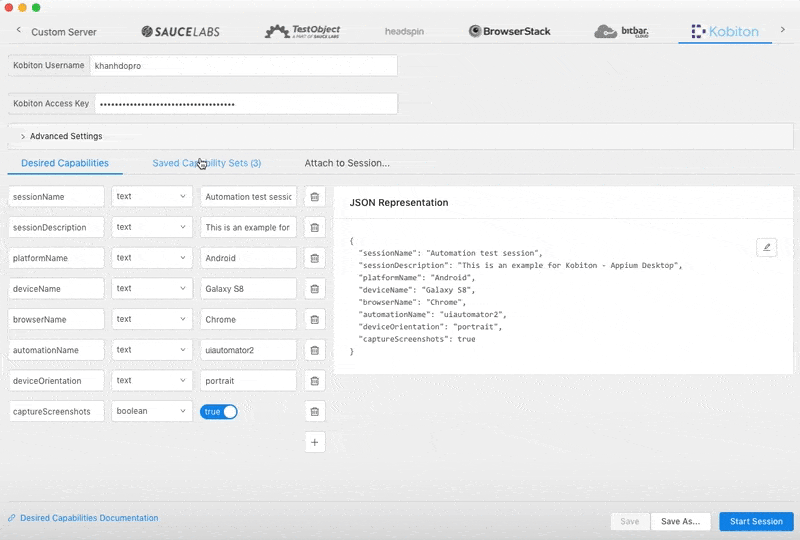
Step 4 · Desired Capabilities
Configure Desired Capabilities
Desired Capabilities tell Kobiton which device, OS, and app to use. Here’s a starter template — customize the values for your test.
{“deviceName”:“Galaxy S5”,“platformName”:“Android”,“platformVersion”:“6.0.1”,“app”:“https://your-app-url.apk”,“deviceOrientation”:“portrait”,“captureScreenshots”:true,“sessionName”:“My Appium Session”,“sessionDescription”:“Inspecting elements via Appium Desktop”}
Paste/enter your Desired Capabilities in the JSON editor
Click the Save button to store this configuration
💡 Pro tipYou can save multiple capability sets for different devices. Switch between them quickly during testing.
▶️
Step 5 · Start Session
Start your Appium session
With credentials and capabilities set, you’re ready to connect to a real Kobiton device and start inspecting.
Click the Start Session button
Wait for the device to provision — usually 10–30 seconds
The Inspector window opens showing your app on the live Kobiton device
Tap, swipe, or inspect any element to view its attributes and selectors
🎬 What you can do nowInspect elements remotely, record interactions, generate selectors for your test scripts, and capture the full session for replay.
📊
Step 6 · Review Results
Review your test session
After ending your session, head to the Kobiton portal to dig into logs, HTTP commands, and metadata.
End the session from Appium Desktop when you’re done
Open portal.kobiton.com/sessions
Click your latest session to see duration, status, and device info
Browse the HTTP COMMANDS and LOGS tabs for full visibility
🚀 You’re set up!Once you click Finish, you’ll see a summary of your configuration that you can copy or share.
✓
Setup Complete! 🎉
You’ve successfully configured Appium Desktop with Kobiton. Here’s a summary:
If you do not have a Kobiton account yet, go ahead to create a free trial account and sign in. It takes just a few moments.
After signing in, you should be on the Devices page. Hover over the device you want to test and select Show automation settings, as shown below.
After connecting with a Kobiton device, you will be able to inspect elements of your app/web and record the session using the Kobiton device.
Now you’ll be able to inspect an app or website with tghe new Appium Desktop.
Test Results
After ending your test session, you can access https://portal.kobiton.com/sessions to view test results. And, then clicking on the latest session, you can see its detailed information such as execution duration, status, and device, etc… You can also view all HTTP requests by selecting the HTTP COMMANDS tab and logs in LOGS tab.
With the Kobiton integration in the Appium Desktop App, you now have the convenience and flexibility that Appium desktop provides, with a seamless experience to test your app on real-devices using the Kobiton device cloud.
Interested in Learning More?
Subscribe today to stay informed and get regular updates from Kobiton