
")
Nov 4, 2024
What are the Key Strategies for Optimizing Hospitality Mobile Apps?

Brittney Lawrence
Read More

In the realm of automation testing, mastering the art of Appium Element Locators is paramount for building effective automation scripts. These locators serve as the compass, guiding testers to precisely locate and control UI elements within mobile apps or websites. By referring to the Appium documentation, testers can leverage strategies like accessibility id and xpath to identify elements efficiently. The automation journey typically comprises two fundamental steps: identifying these UI elements and executing actions upon them.
In this article, we’ll dive unto understanding how to properly use Appium Element Locators. This is key to building your automation scripts. After all, if you’re unable to “find” the UI element, you cannot control it (such as clicking a button).
In Mobile (or Web) Automation Testing automating any scenario follows these 2 steps:

What is an Element Locator?
An Element Locator is nothing but an address that identifies a UI Element on a Mobile App (or Website). As there are many UI elements present on a single mobile application screen, there can be a chance that same (generic) address can refer to more than one element. This means that we need to find a unique address for the element. As you will see, sometimes this is easy, and other times you have to do some further exploration to uniquely identify your UI element. The way you uniquely identify the element is called an element locator strategy. Appium makes many different strategies available.
Our previous Appium Android example used the following code for identifying the Textview:
driver.findElement(By.id("Login Screen")).click();Here id is the Locator strategy and Login Screen is the unique id(address). Think of reading it as “Finding the element by <locator strategy> <element unique id>”. So in this example we’re telling Appium to use the “id” strategy (used for finding elements by unique ID) and the ID we’re using is “Login Screen”.
The below image describes how can you find the Textview element for any android application (in Java).

Figure-1:Locator Strategy(Java Example).
As you may expect, there are many different element locator strategies available to you, including:
Learning which type of Locator Strategy in Appium to use is part of the learning process of becoming comfortable with Appium. We will go through all Element Locator Strategies and discuss them in detail. Don’t worry about memorizing all of them. At this stage in your journey, you just need to become familiar with them and eventually, you’ll understand which are best to use in which scenarios. In fact, there are some tricks coming up later that will automatically suggest which strategy to use! Often during your script development, you’ll wrestle with trying to identify a UI element. When that happens, refer back to these different locator strategies to see which might best fit your needs.
NOTE: All of the above Locator Strategies can be inspected using the Appium Inspector Tool (for Android and iOS both). We will learn about that tool in the next article. The screenshots that follow are using this Inspector to illustrate the locator. The mobile app is depicted in the leftmost pane and when clicking an element we see the attributes in the rightmost pane.
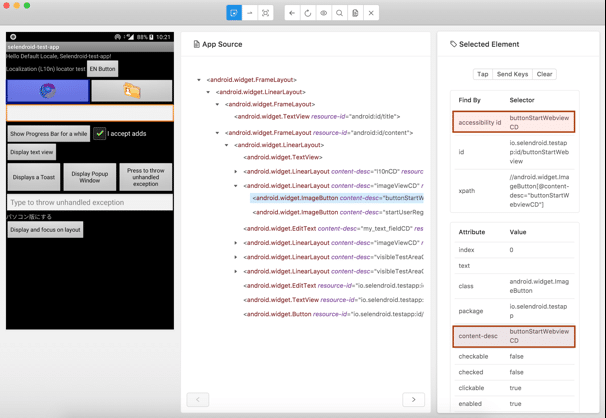
Figure-2:Locator Type: Accessibility Id on Android Sample Application.
Appium example usage in different programming languages:
WebElement chromeButtonElement = driver.findElementByAccessibilityId(“buttonStartWebviewCD”);
MobileElement mobileElement = (MobileElement)chromeButtonElement;element = self.driver.
find_element_by_accessibility_id(“buttonStartWebviewCD”)let element = await driver.
elementByAccessibilityId(“buttonStartWebviewCD”);@driver.find_element(:accessibility_id, "~buttonStartWebviewCD")$els = $this->element($this->using('accessibility id')->value(‘buttonStartWebviewCD’));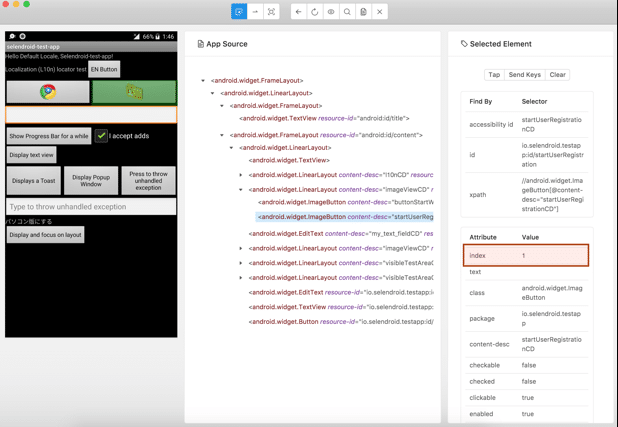
Figure-3: Index of class Name: android.widget.ImageButton
List<MobileElement> mobileElements = (MobileElement) driver.findElementsByClassName(“android.widget.ImageButton”);
MobileElement mobileElement = mobileElement.get(1);Using Selenium Methods: NOTE: Actually You can get locators by two ways in Appium (for id, name, className, and xpath).
WebElement element = driver.findElement(By.className(“android.widget.ImageButton”));
// OR
WebElement element = driver.findElementByClassName(“android.widget.ImageButton”);Using Appium (Selenium Wrapper) Methods:
MobileElement mobileElement = (MobileElement)
driver.findElement(By.className(“android.widget.ImageButton”));
// OR
MobileElement mobileElement = (MobileElement)
driver.findElementByClassName(“android.widget.ImageButton”);In Mobile Application Automation id is are in form of Native context, it is not similar to Selenium WebDriver’s CSS id.
driver.findElementById("IntegerA");
// ORdriver.findElementById("TextField1");
Figure-4:Locator Type:Id on iOS Sample Application.
You can use either that full string (ex. io.selendroid.testapp:id/startUserRegistration) or only <id-name> (startUserRegistration). So in the below code both options are valid
driver.
findElementById("io.selendroid.testapp:id/startUserRegistration");
// OR
driver.findElementById("startUserRegistration");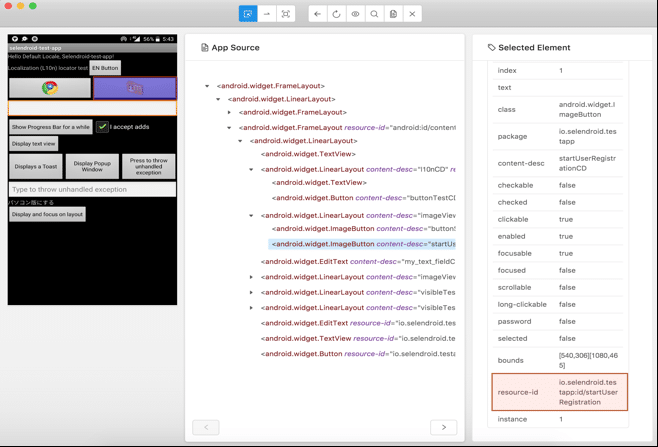
Figure-5:Locator Type:Id on Android Sample Application.
MobileElement element = driver.findElementByName("IntegerA");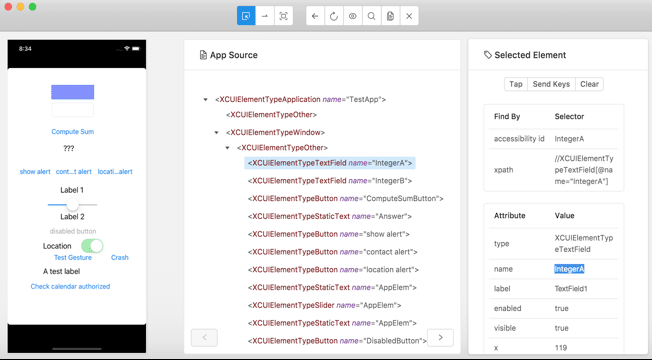
Figure-6: Locator Type:Name on iOS Sample Application.

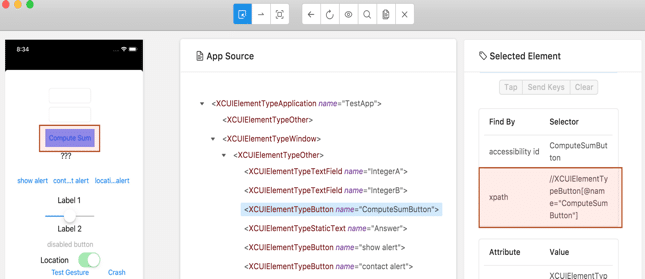
Figure-7: Locator Type:XPath on iOS Sample Application.
MobileElement computeSumButton = driver.findElementByXPath
("//XCUIElementTypeButton[@name="ComputeSumButton"]");
// OR
MobileElement computeSumButton = driver.findElementByXPath("(//XCUIElementTypeButton)[1]");
// OR
MobileElement computeSumButton = driver.findElementByXPath
("//XCUIElementTypeButton[@label='Compute Sum']");You can learn more about how you can find the Xpath from: https://www.w3schools.com/xml/xpath_syntax.asp, and from this link, you can learn more about how you can properly use XPath with Appium here.
String base64Image = //Code which will to convert Image file to Base-64 String
WebElement element = driver.findElementByImage(base64Image);
String selector = "new UiSelector().text(“Cancel”))
.className(“android.widget.Button”))";
MobileElement element = (MobileElement) driver.findElement(MobileBy.AndroidUIAutomator(selector));String selector = "**/XCUIElementTypeCell[name BEGINSWITH "P"]/XCUIElementTypeButton[4]";
MobileElement element = (MobileElement)
driver.findElement(MobileBy.iOSClassChain(selector));Hopefully, you’re starting to get an idea of when to use which locator. Don’t worry if it isn’t immediately clear. The more you start building Appium scripts and the more you keep reviewing these, it will become more intuitive.
Generally speaking you’ll find you should mostly likely use Accessibly Id and Id automation strategies. XPath is incredibly flexible as a fallback when no ID exists, but tends to be brittle. Your best option is to work with the developers to add unique IDs if they don’t exist. This will make for far more robust test scripts.
Interested in learning more? Demo Kobiton Today!

")

