

Jun 15, 2026
Introducing Appium AI: AI Mobile Testing Inside Appium
Chris Faulhaber
Read More
Today, we’re diving into end to end testing with Appium, helping you apply all your knowledge in an “end-to-end” test. At times, we’ll reference previous articles, and we’ll also rehash some information we’ve previously covered. Seeing coverage from another angle will help solidify your knowledge.
This article is divided into 4 sections:
This is a section we won’t repeat here as it was covered extensively in a previous article. Setting up environments isn’t ever any fun, but once it’s setup, you’re good to go. We’re going to assume you have everything setup – and refer to the previous article if you need some help.
As the expression goes – “Measure twice, cut once”. Some planning up-front is going to save you a lot of headache later on. And good test planning means a little experimentation with manual testing before starting automation. Specifically:
In order to perform automation using Appium, you need to:
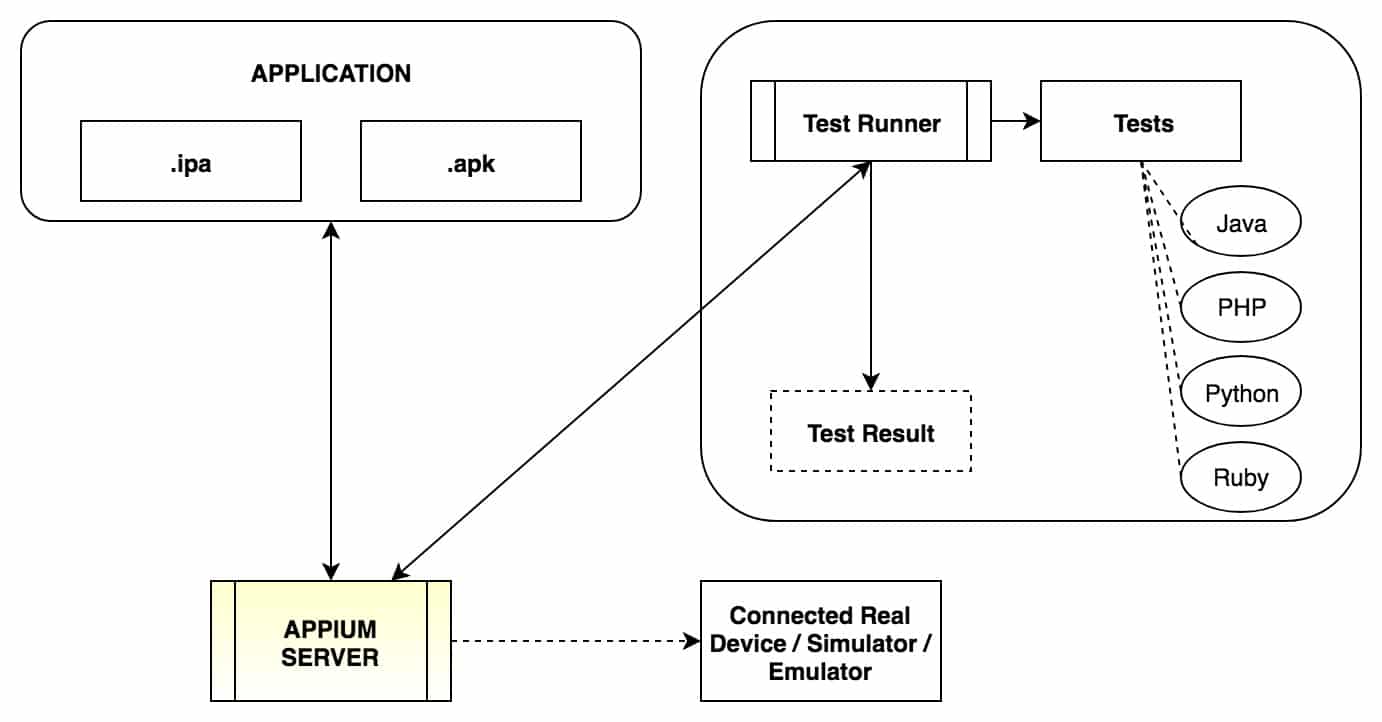
After designing the test cases and setting up the test environment, you can start writing the test cases. For illustrative purposes, we will be automating the Android messaging app from Google. To reemphasize best practices, we will utilize the page object model to create a cleaner and more modular solution. Because we already discussed the page object model framework in detail previously, we can save time by cloning the automation framework project we used previously, which you can find on github here.
Now, let’s discuss the scenario which we want to automate. We have taken Google message application(v 3.9.039) for the automation.
But before starting the automation, we will need to plan our test. So as per our above discussion, we need to take care of 2 things.
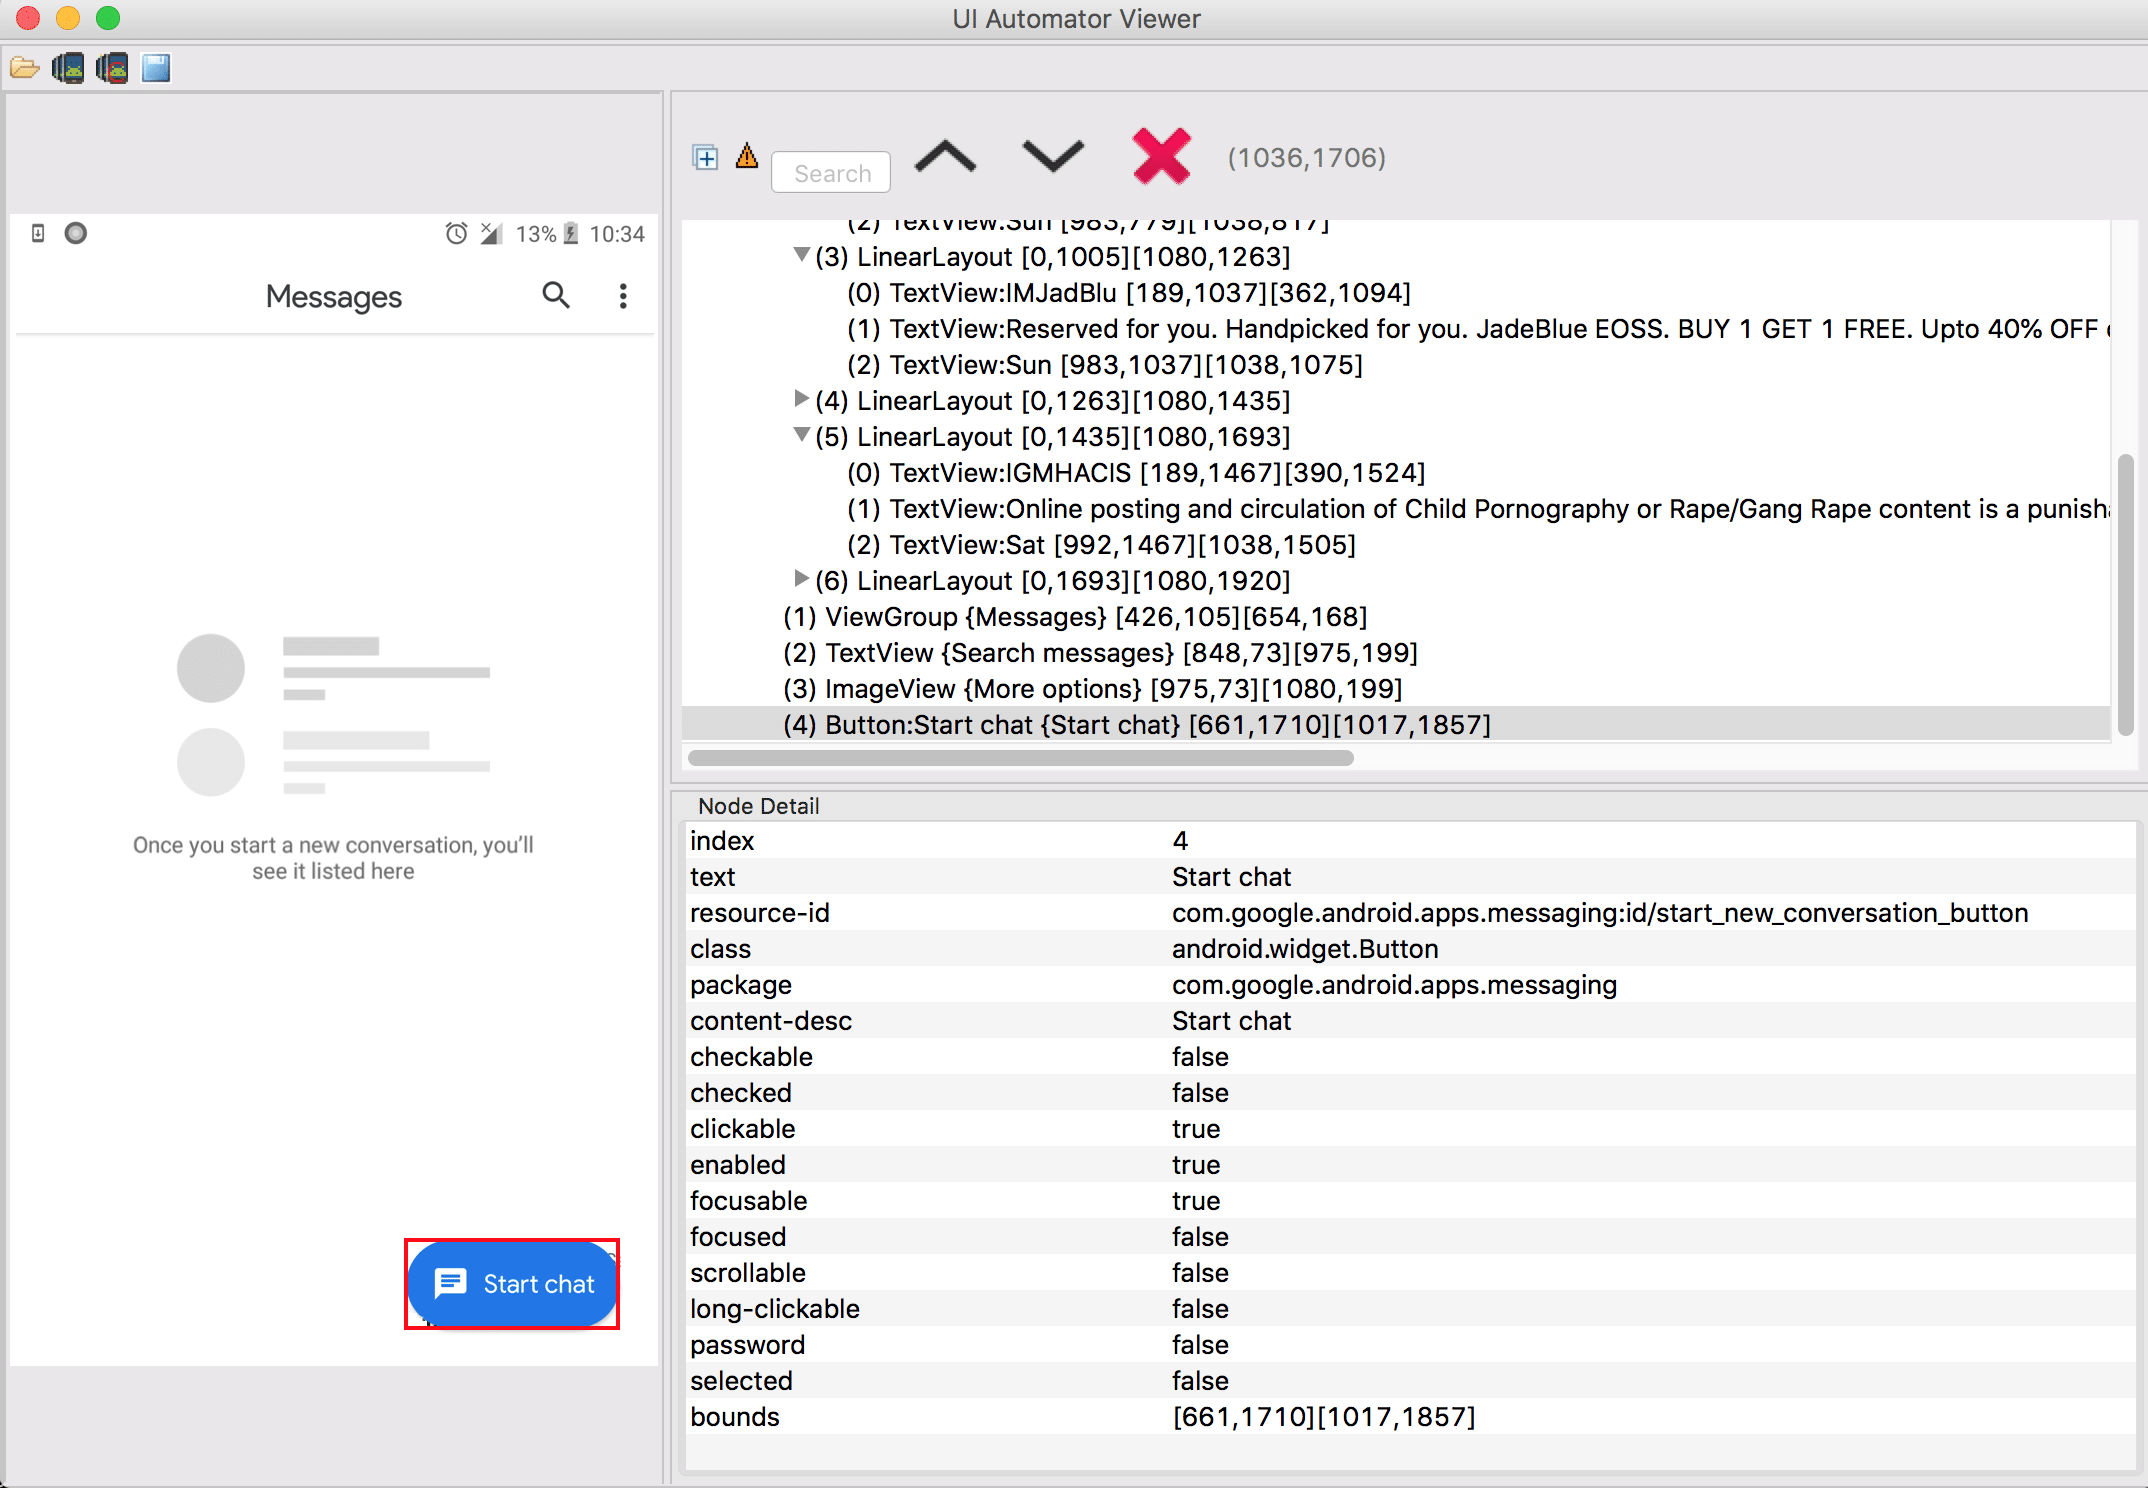
As you can see above, the button has a unique resource-id – The Google developers have assigned unique ids to all UI elements, so the first step is clear.
Now, both the conditions are satisfied, so we can move forward and start writing the automation test case. We will use the page object model framework for writing the automation test case and using it involves just a few steps. It may seem like overkill for this test case, but we’re putting in a good baseline for a larger more sophisticated automation project:
The First 4 steps are straight forward – now we get to the desired capabilities part!
Because the app we have chosen comes pre-installed on Android devices, we can skip the installation and go straight to opening the app.
DesiredCapabilities desiredCapabilities = new DesiredCapabilities(); desiredCapabilities.setCapability(MobileCapabilityType.AUTOMATION_NAME, “uiautomator2”); desiredCapabilities.setCapability(MobileCapabilityType.DEVICE_NAME, “c4e3f3cd”); desiredCapabilities.setCapability(MobileCapabilityType.PLATFORM_NAME, “Android”); desiredCapabilities.setCapability(MobileCapabilityType.PLATFORM_VERSION, “8.0”); desiredCapabilities.setCapability(AndroidMobileCapabilityType.APP_PACKAGE, “com.google.android.apps.messaging”); desiredCapabilities.setCapability(AndroidMobileCapabilityType.APP_ACTIVITY, “com.google.android.apps.messaging.ui.ConversationListActivity”); desiredCapabilities.setCapability(MobileCapabilityType.FULL_RESET, false); desiredCapabilities.setCapability(MobileCapabilityType.NO_RESET, true); desiredCapabilities.setCapability(AndroidMobileCapabilityType.AUTO_GRANT_PERMISSIONS, true);
Here, we don’t use the desiredCapabilities.setCapability(MobileCapabilityType.APP, ); capability because we are not installing the application.
After setting the desired capabilities, you need to extract the selectors using uiautomatorviewer(or Appium inspector) for all the UI elements we need to control.
NOTE: The Google message application will change periodically so there are chances that the element IDs may change over time, so please modify the automation script accordingly.
There are typically 4 screens we need to take care of for automating our scenario:
After identifying the screens, we need to get the selectors of each element from all screens, which will be needed while automating our test case.
So, let’s make a list:
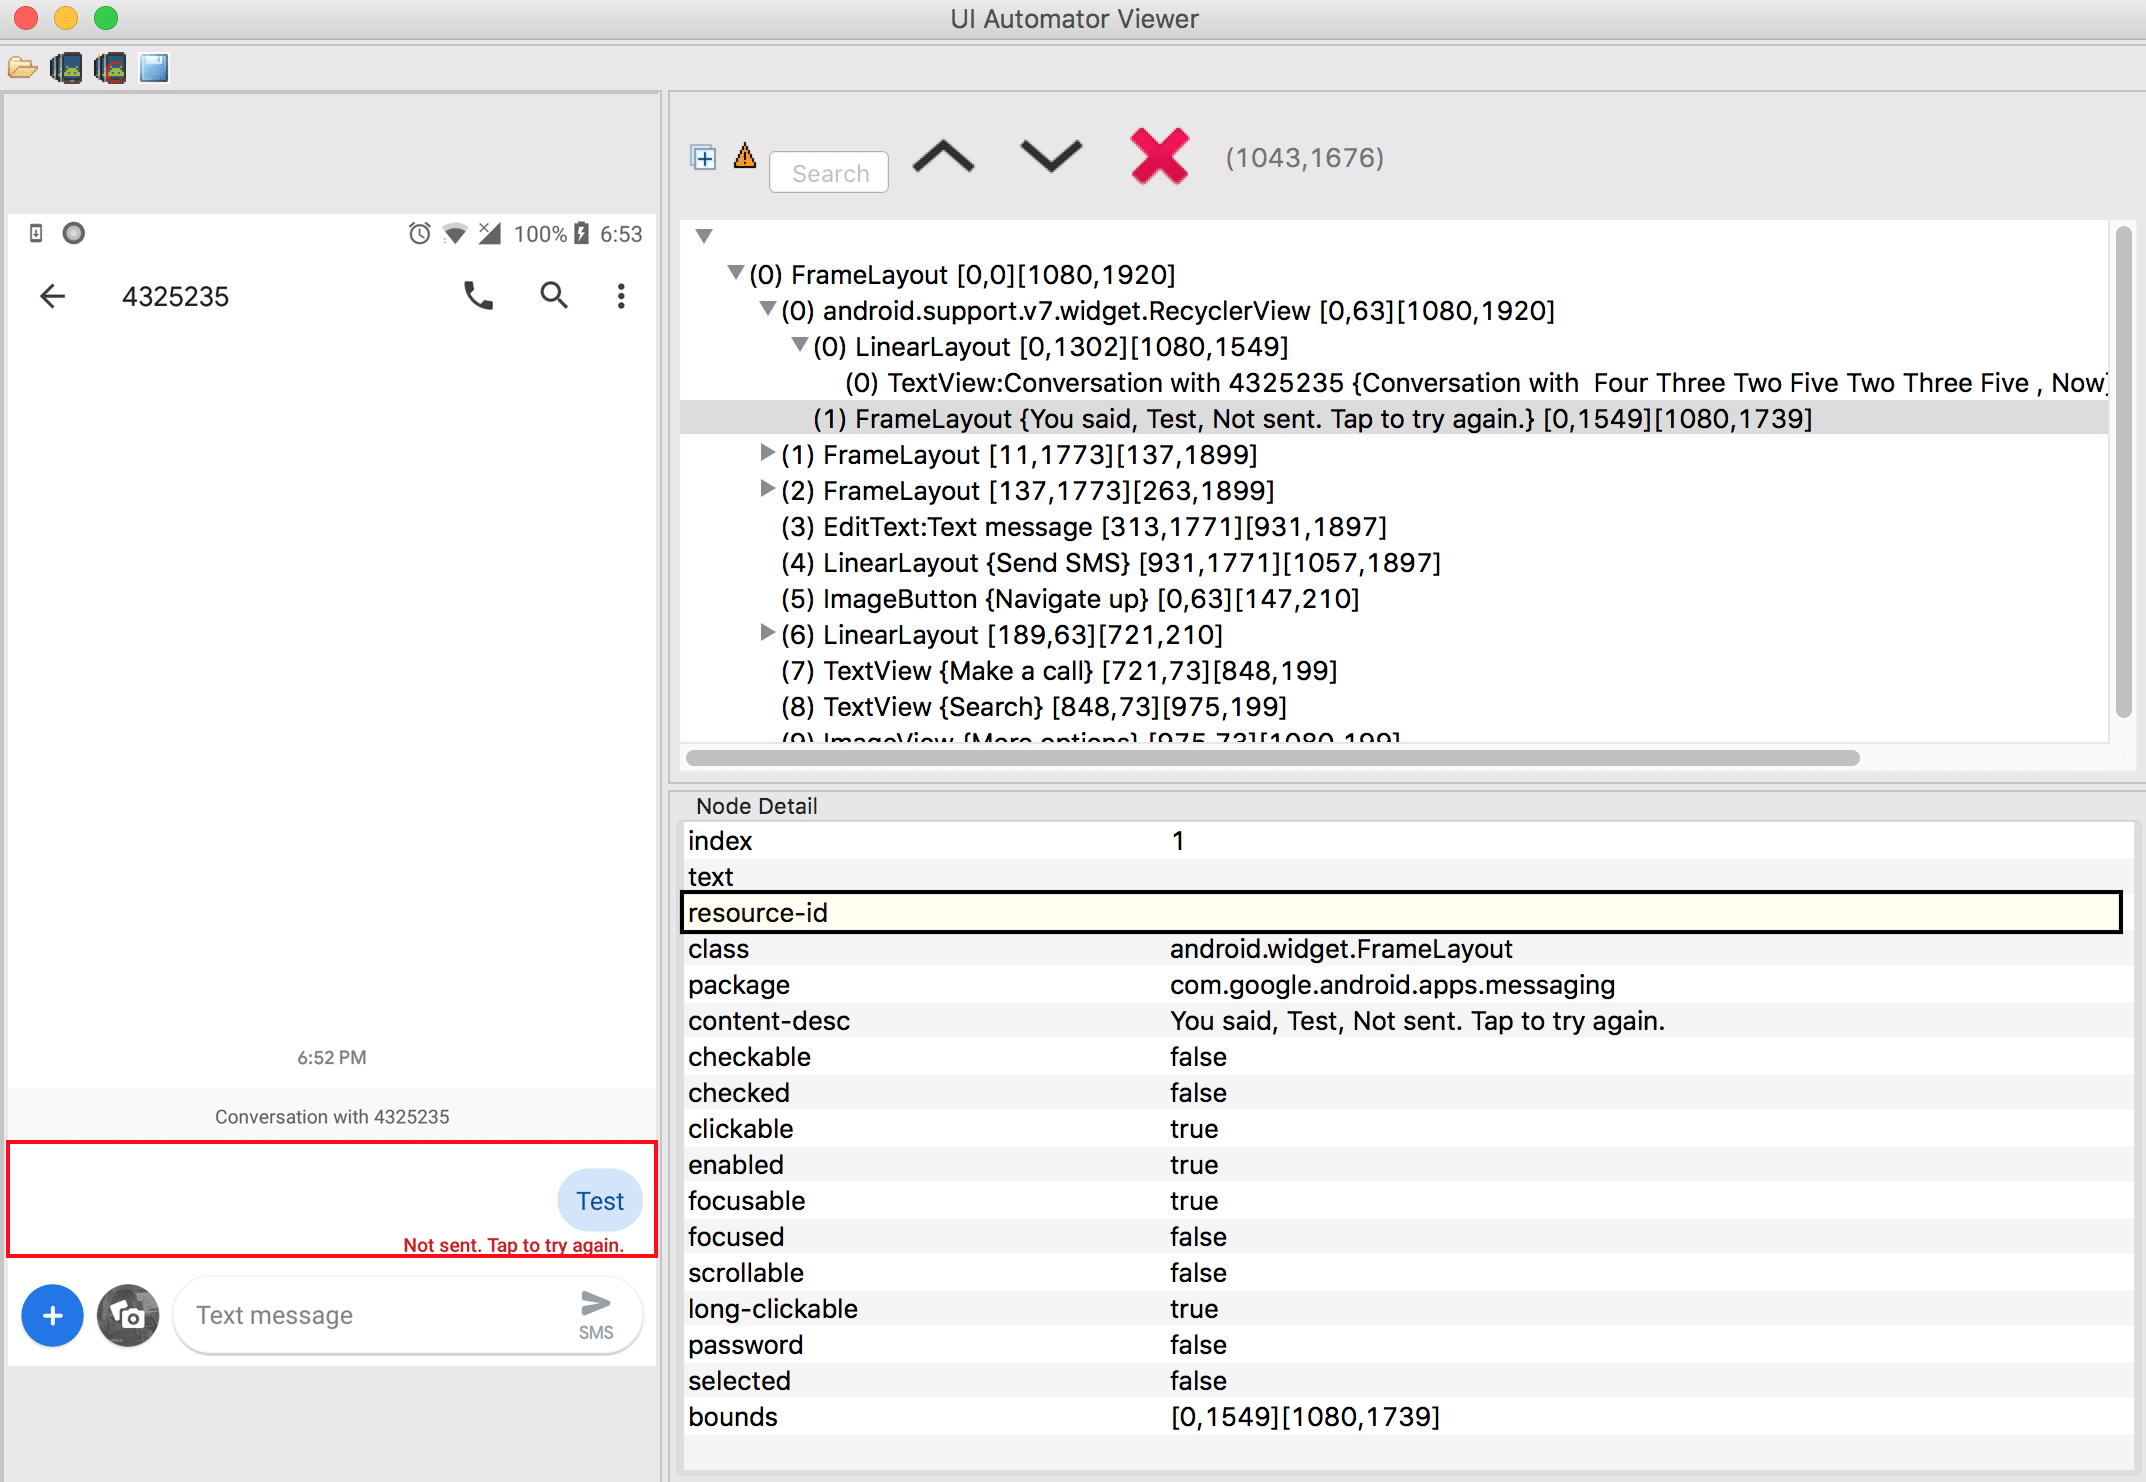
Screen Name Element Locator Messages ‘Start chat’ button ID: start_new_conversation_button Or ID: com.google.android.apps.messaging:id/start_new_conversation_button New conversation ‘To’ textfield ID: recipient_text_view New conversation ‘Send to 432-5235’ textview Not present on DOM, but we can skip this by tapping on ENTER from keyboard. Conversation SMS Message textfield ID: compose_message_text Conversation ‘SMS’ button ID: send_message_button_container Conversation Sent Message layout XPath: //android.support.v7.widget.RecyclerView/android.widget.FrameLayou
NOTE: You can use the ID selector in these formats:
If you look at the above table closely you can notice that most of elements have unique Ids, however a few elements have some issues with their id:
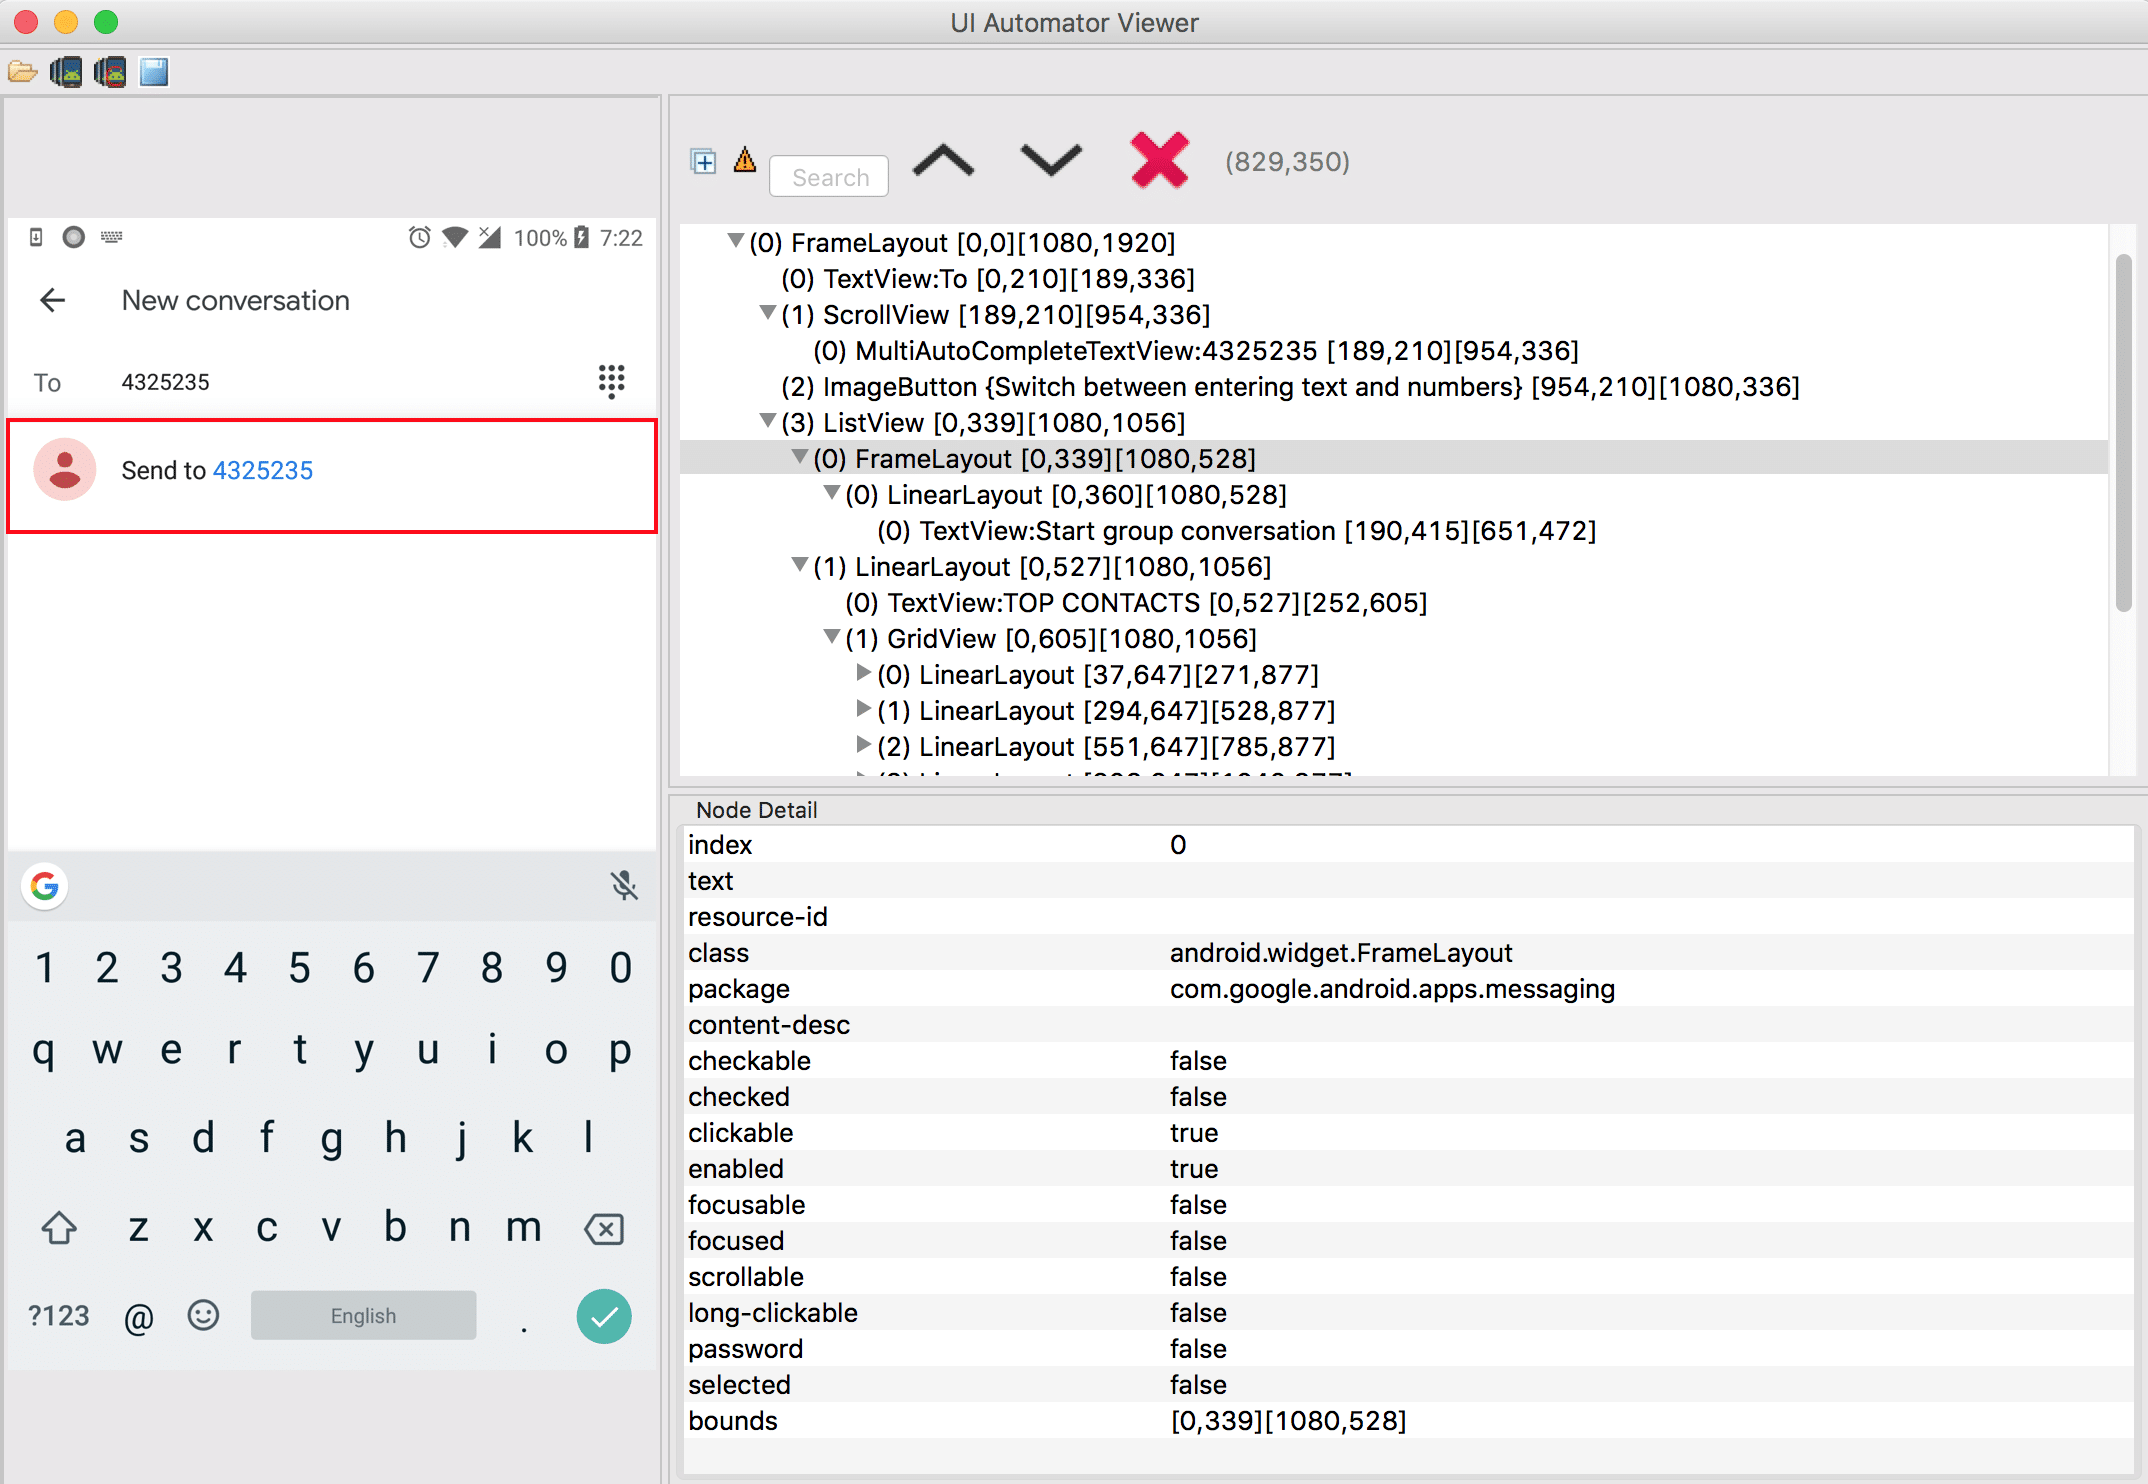
So, we need to look for a workaround. If you look closely at this screen than you might figure out that you just have to press the ‘correct’ (green check mark) icon on the keyboard and you don’t need to press the ‘Send to 432-5235’ textview.
We can click on the icon from the soft keyboard:
driver.pressKey(new KeyEvent().withKey(AndroidKey.ENTER));
@AndroidFindBy(xpath = “//android.support.v7.widget.RecyclerView/android.widget.FrameLayout”)
List sentMessageLayout;
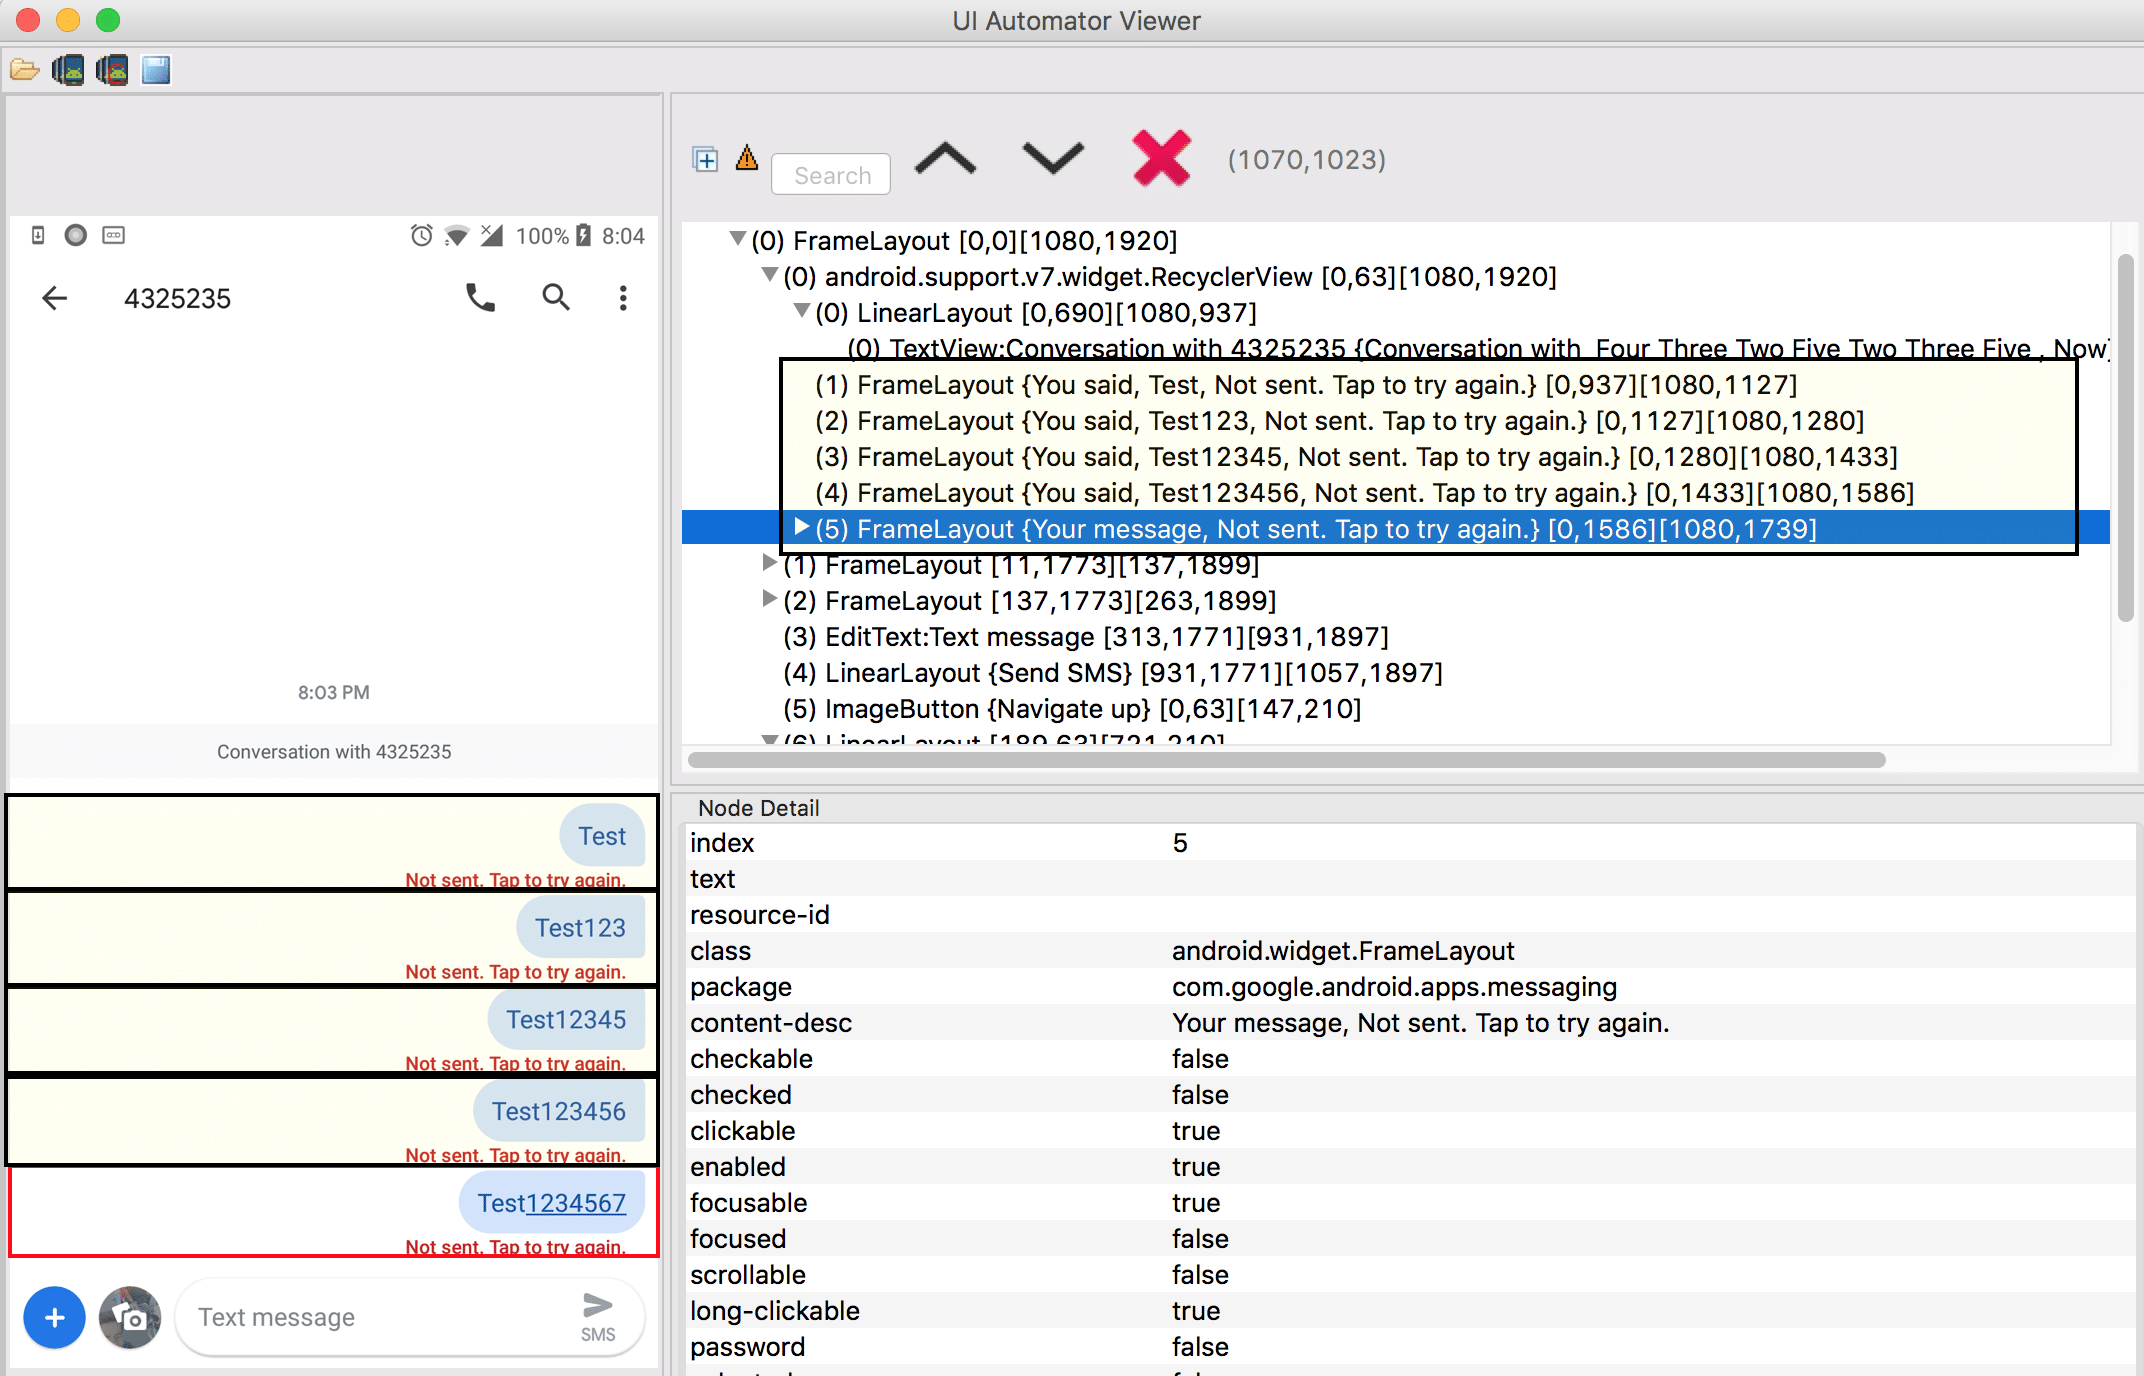
This game of finding the right locator strategy to use is very common in test automation. You’ll explore the elements and then go through a process of trying to find what the best locator strategy is in order to reach those elements. You may be wondering why we have taken the List of AndroidElement ? This is because the problem with the single AndroidElement is if you have multiple messages sent to the same mobile number it will always take the first element but we need the last element of the sent message. Please see Figure-7: FrameLayout presents for each sent message.
We need to create action methods on Page Object classes, which will tap on buttons and fill the text fields and assert text values on the app screen.
For example, on the Message(Dashboard) screen we need a method which will tap on the ‘Start chat’ button. We already have the selector of the ‘Start button’ so we can create our method:
public class MessagesPO extends BasePO { public MessagesPO(AppiumDriver driver) { super(driver); } @AndroidFindBy(id = “com.google.android.apps.messaging:id/start_new_conversation_button”) AndroidElement startChatButton; public NewConversationPO tapOnStartChatButton() { startChatButton.click(); return new NewConversationPO(driver); } }
Why does our tapOnStartChatButton() method return a new object of NewConversationPO? The answer is that whenever any method is responsible to change the screen we can return the object of the subsequent screen’s PO class so that we don’t need to create the object of that PO class separately while writing test case.
Here, the method tapOnStartChatButton() will tap on ‘Start chat’ button which will navigate to the New Conversation screen so we are returning the object of NewConversationPO class.
This practice is not mandatory, but it is good to have.
NOTE: All PO class should extend the BasePO class as it contains the logic which initializes the page factory and other utility classes. You can look into the chapter titled: “Developing Test Automation Framework for Appium using Page Object Modeling(POM)“ for more details.
We have created the below table, which gives the mapping between screen names and corresponding method names.
Screen Name Method Name Messages tapOnStartChatButton(): It will tap on Start chat button. New conversation typeAndSubmitContactNumber(String contactNo): It will type the contact no. and submit it for conversation. Conversation typeInSMSTextField(String text): This method will type into message textfield.
tapOnSMSButton(): This method will tap on the SMS button.
isConversationScreenDisplayed(): This method is used to verification purpose, it will return true if conversation screen appears.
getLastSentMessage(): It will return the AndroidElement for last sent message.
getLastSentMessageText(): This method is used to get the last sent message text.
isMessageSent(): It will verify that message is sent or not.
isLastSentMessageContains(String subString): This method will check whether last sent message contains the passed subString or not
This is the final and easiest, yet most powerful, step of automation test case writing. Here, you have to organize all the methods from your PO classes in order to make the complete automation test case and validate the result using assertions.
In our example, we have 2 assertions:
Here, we want to check that the application has sent the message and is being displayed on the conversation screen.
Assert.assertTrue(conversationPO.isMessageSent(), “Message:'” + messageText + “‘ is not being sent!”);
The 2nd parameter is the error message we want to throw, in case of failure of the assertion. A good error message should give sufficient information about what it is checking, so that your diagnostics becomes easier.
Checking that the message is sent is one thing, but was the right message sent? As discussed earlier, there is no unique id assigned to the sent message text view, so we can not get the text of the last message. We can, however, get the whole FrameLayout text. So, logically, we can have an assertion, which will check that the expected text is present on the last sent message or not. In our example, we have put the timestamp in milliseconds in a text message and we will verify that given timestamp text value is present on last sent message or not.
Assert.assertTrue(conversationPO.isLastSentMessageContains(timestamp), “Last sent message is different than expected!, Original message is: ‘” + conversationPO.getLastSentMessageText() + “‘, while the expected substring is: ” + timestamp + “‘”);
After organizing the action methods from the PO and adding our assertions we have our complete test case which will send the message to a particular contact number.
public class TestCases extends BaseTest { @Test public void verifyUserCanSendMessage() { final String phoneNo = “00011122233”; final String timestamp = System.currentTimeMillis() + “”; final String messageText = “Hello, there. Current time is: ” + timestamp; MessagesPO messagesPO = new MessagesPO(androidDriver); NewConversationPO newConversationPO = messagesPO.tapOnStartChatButton(); ConversationPO conversationPO = newConversationPO.typeAndSubmitContactNumber(phoneNo); Assert.assertTrue(conversationPO. isConversationScreenDisplayed(), “Conversation screen didn’t appear!”); conversationPO.typeInSMSTextField(messageText); conversationPO.tapOnSMSButton(); Assert.assertTrue(conversationPO.isMessageSent(), “Message:'” + messageText + “‘ is not being sent!”); Assert.assertTrue(conversationPO.isLastSentMessageContains (timestamp), “Last sent message is different than expected!, Original message is: ‘” + conversationPO.getLastSentMessageText() + “‘, while the expected substring is: ” + timestamp + “‘”); } @BeforeTest @Override public void setUpPage() throws MalformedURLException { androidDriver = new AndroidDriver(new URL(APPIUM_SERVER_URL), getDesiredCapabilitiesForAndroid()); } }
The full code is available on github here.
As we said at the outset, this app may have changed by the time this guide was published. A new UI could render some of our test cases invalid. We have however tried to lay out a methodical and disciplined approach to tackling any test automation project. You should be to apply this approach for any mobile application.

")

