Apr 30, 2026
Mobile Device Cloud Testing Checklist: A Step-by-Step QA Workflow for App Releases
Kobiton Team
Read More
App development and production is driven by a singular, ultimate goal: mobile user experience. That’s why organizations of every size prioritize testing platforms and efficient QA processes — to detect potential issues, and reduce the likelihood of them impacting end users.
Native mobile app testing is one very important component of that development process. Here, we’ll share an overview of the topic.
TABLE OF CONTENTS
Testing Native Mobile Apps – Key Factors to Consider
Emulators, Simulators, or Real Devices?
Selecting Real Devices to Test On
Running Manual or Automated Tests
How to Test Native Mobile Apps – A Step-by-Step Guide
Start Testing Your Native Mobile Apps with Kobiton Today
So, what is a native app? A native mobile application is one built specifically for a single platform, in that platform’s own languages and tooling — Swift or Objective-C for iOS, Kotlin or Java for Android. That is what separates it from a hybrid app, which wraps web code in a native shell, and from a web app, which runs in the browser and is never installed at all.
Because a native app is compiled for its platform, it gets direct access to device hardware and OS services: camera, GPS, Bluetooth, biometrics, push notifications, background services and local storage. That access is what makes native apps fast and capable, and it is also what makes them harder to test — every one of those integrations behaves slightly differently across manufacturers, OS versions and device tiers. Instagram, WhatsApp, Spotify and Waze are all native apps, each shipping separate iOS and Android builds.
The frameworks you will test with depend on the platform, and several of the best-known ones only run on one:
| Framework | Platform | Notes |
|---|---|---|
| XCUITest | iOS only | Apple’s own UI testing framework, written in Swift or Objective-C and run from Xcode |
| Espresso | Android only | Part of AndroidX Test; fast and reliable, but cannot drive an iOS app |
| Appium | iOS and Android | WebDriver-based and cross-platform, so one test suite can target both builds |
| Robotium | Android only | Older Android UI framework, largely superseded by Espresso |
| Ranorex | iOS and Android | Commercial cross-platform tool with record-and-playback authoring |
Fortunately, Kobiton is able to help you make sense of everything. Kobiton is a mobile device testing platform, accelerating testing for mobile devices, and ultimately assisting clients with the delivery of native mobile applications on actual devices. After asking, “What is a native app?,” the next question is usually in regards to how a native mobile app might be tested.
Below are some of the factors you should consider during a mobile app development process.
As you might imagine, a decision to proceed with emulators, simulators, or real devices can mean different things.
For example, emulators generally provide a more controllable environment, and can easily simulate conditions like memory and battery power. Simulators also offer a great degree of control, while also providing native mobile application testing at a faster rate than emulators. And, the benefits of using real devices for native mobile testing include faster bug detection, more robust hardware support, and cross-platform mobile app performance testing.
| Emulator | Simulator | Real device | |
|---|---|---|---|
| What it reproduces | Device hardware and software | Software environment only | Everything — it is the device |
| Typical examples | Android Emulator, Genymotion | iOS Simulator | Physical or cloud-hosted iPhones and Android handsets |
| Speed to start a test | Fast | Fastest | Slowest — install and provisioning per session |
| Cost | Low | Low | Highest, unless accessed through a device cloud |
| Good for | Early functional checks, running automation on every commit, cheap breadth across OS versions | Quick iOS UI and layout checks during development | Final verification, performance, sensors, camera, biometrics, network behaviour |
| Cannot tell you | How the app performs on real silicon, or how it behaves with real sensors | Anything hardware-dependent, including performance | Nothing — but you cannot afford to run everything here |
In practice most teams use all three: simulators and emulators for the fast feedback loop during development and on every pull request, and real devices for release verification and anything touching hardware, battery or network. Bugs that only appear on real devices — thermal throttling, camera quirks, manufacturer skins, sensor timing — are exactly the ones that reach users, which is why nothing ships on emulator results alone.
Generally speaking, cloud-based testing on real devices is the best approach. For information about research methods and experiences that lead to that discovery, contact Kobiton today!
Here are a few of the factors to keep in mind as you determine which real devices to test on.
Those answers are inputs to a device matrix — the documented list of what you test on and why. Build it across these dimensions:
Keep the matrix in two layers. A small primary set of five to ten devices covering your highest-traffic configurations runs on every build and takes your smoke and regression suites. A wider secondary set runs before release candidates and covers the long tail. Splitting it this way keeps the fast feedback loop fast without giving up coverage where it counts.
Revisit the matrix every quarter. Device share moves, OS adoption curves shift after each major release, and a matrix that made sense a year ago is quietly testing an audience you no longer have.
It’s important to choose popular devices, and those operating with different operating systems. Compatibility, memory, and processing power will also vary by device — so consider those factors as well.
Real devices matter because real usage is messy. An app that works on office wifi with a full battery and nothing else running is an app that has not been tested. Four categories of condition account for most of what users hit and lab testing misses:
Cloud device platforms let you script most of these conditions rather than reproducing them by hand — throttling the network, simulating an incoming call or capturing battery draw across a session — which is what makes them repeatable enough to belong in a regression suite.
The decision to run manual or automated native app testing brings with it several considerations; every organization has its own criteria for how it arrives at this decision.
Once you have decided to automate, the next question is what to automate with. The first fork is whether to use each platform’s native tooling — XCUITest for iOS, Espresso for Android — or a cross-platform framework like Appium that drives both from one suite. That choice usually follows from who is writing the tests:
| If tests are written by | Lean toward | Because |
|---|---|---|
| Mobile developers, in the app repo | Native tooling (XCUITest, Espresso) | Same language as the app, fastest execution, tightest integration with the build |
| A QA team covering both platforms | Cross-platform (Appium) | One suite and one skill set covers iOS and Android, at some cost in speed |
| Testers without a coding background | Codeless or low-code platforms | Test creation does not bottleneck on a small pool of automation engineers |
Whichever direction you go, judge candidate tools against the same criteria:
Factors that impact that decision include application complexity, your core team size, how important you foresee continuous integration, and (of course) the budget you have to work with.
Most of what determines whether native app testing goes well is decided before the first test runs. The steps below cover the groundwork — and the more of it you do up front, the less of your device budget gets spent discovering things you could have written down.
1. Define what the app does and who uses it. Write down the core user journeys — signup, purchase, sync, whatever your app exists to do — and rank them by business impact. Those journeys become your smoke suite, and everything else queues behind them.
2. Collect requirements and designs. Get the functional spec and the design files in one place before test design starts. Designs matter more on mobile than on web: without them you have no way to judge whether a layout on a small screen is broken or intentional.
3. Decide which OS versions and devices you support. This is a product decision with a testing bill attached. Pull your own analytics rather than market-share averages — the versions your users actually run are the ones worth supporting, and every extra version you commit to widens the regression surface for the life of the app.
4. Set exit criteria you can measure. Agree the numbers that mean ‘ready to ship’ before the release is under pressure: no open P1 defects, a crash-free session rate you will not go below, and a pass rate for the automated smoke suite. Vague criteria get argued away at 6pm on a release day.
5. Prepare environments and test data. You need a staging API that mirrors production, test accounts at each permission level, and mocked third-party services for anything you cannot safely call — payments especially. Seed data scripts so any tester can rebuild a known state instead of hunting for an account in the right condition.
6. Choose what to automate and what to keep manual. Stable, repetitive, high-value flows are automation candidates. Exploratory work, first passes on new features and anything requiring visual judgement stay manual. Deciding this at planning time stops the automation suite filling up with tests nobody trusts.
Before a release candidate goes out, the same groundwork gives you a checklist worth running:
Ready to get started with your own mobile native application? Here are some of the steps you’ll take during a mobile testing strategy with Kobiton.
First, of course, is signing up on Kobiton. If you don’t have an account yet, simply request a trial.
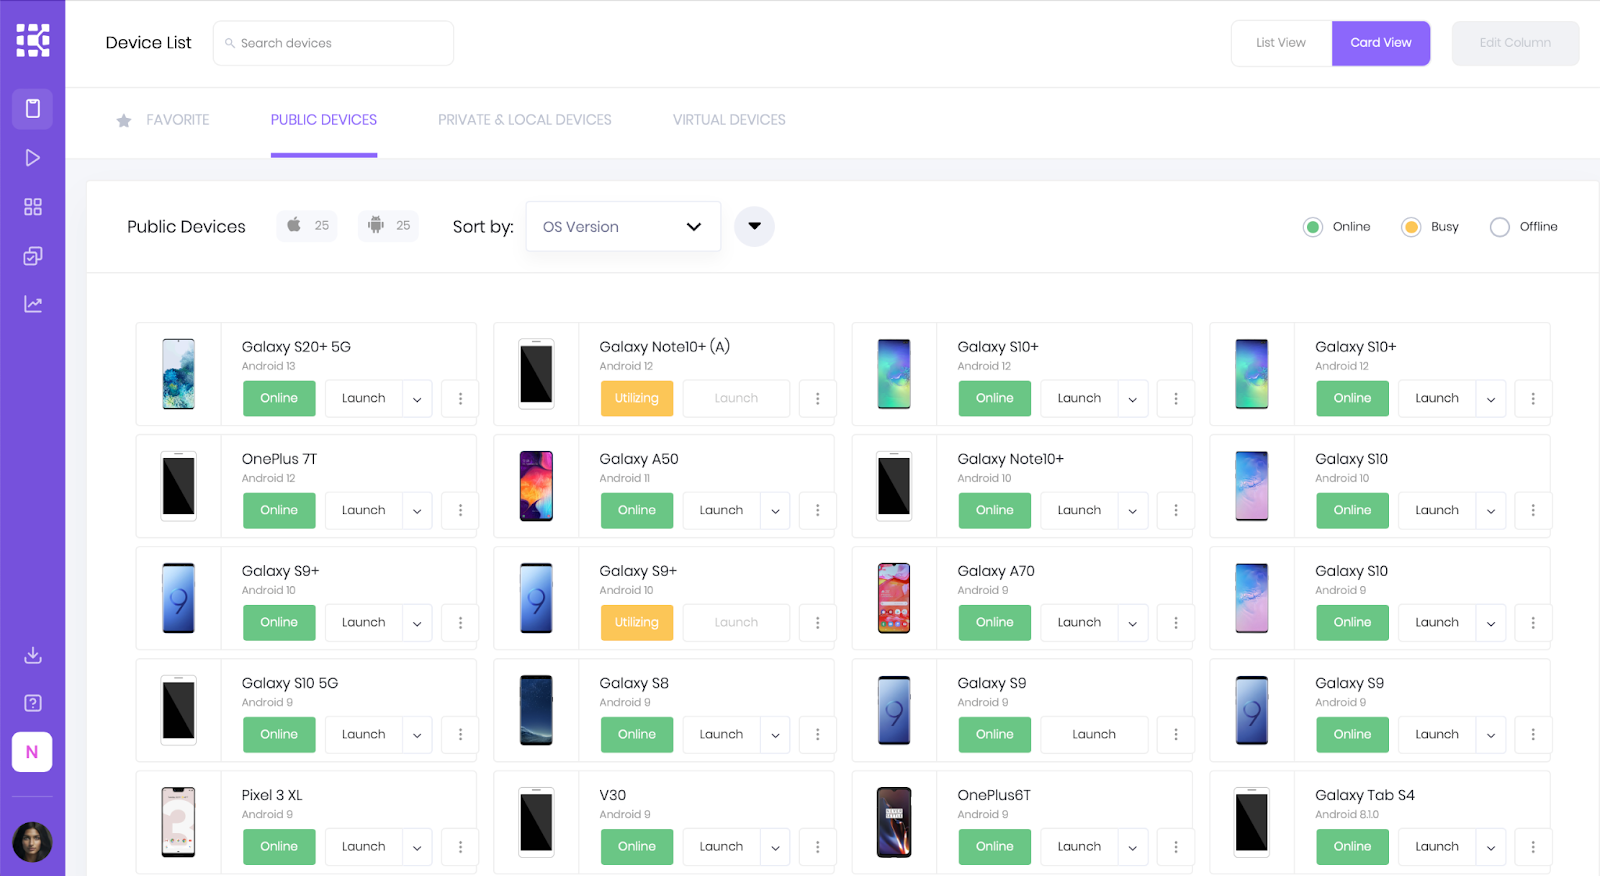
Once signed on, you’ll be able to choose from a list of real devices which to run a test on. Don’t forget that Kobiton supports and can test both iOS and Android native applications.
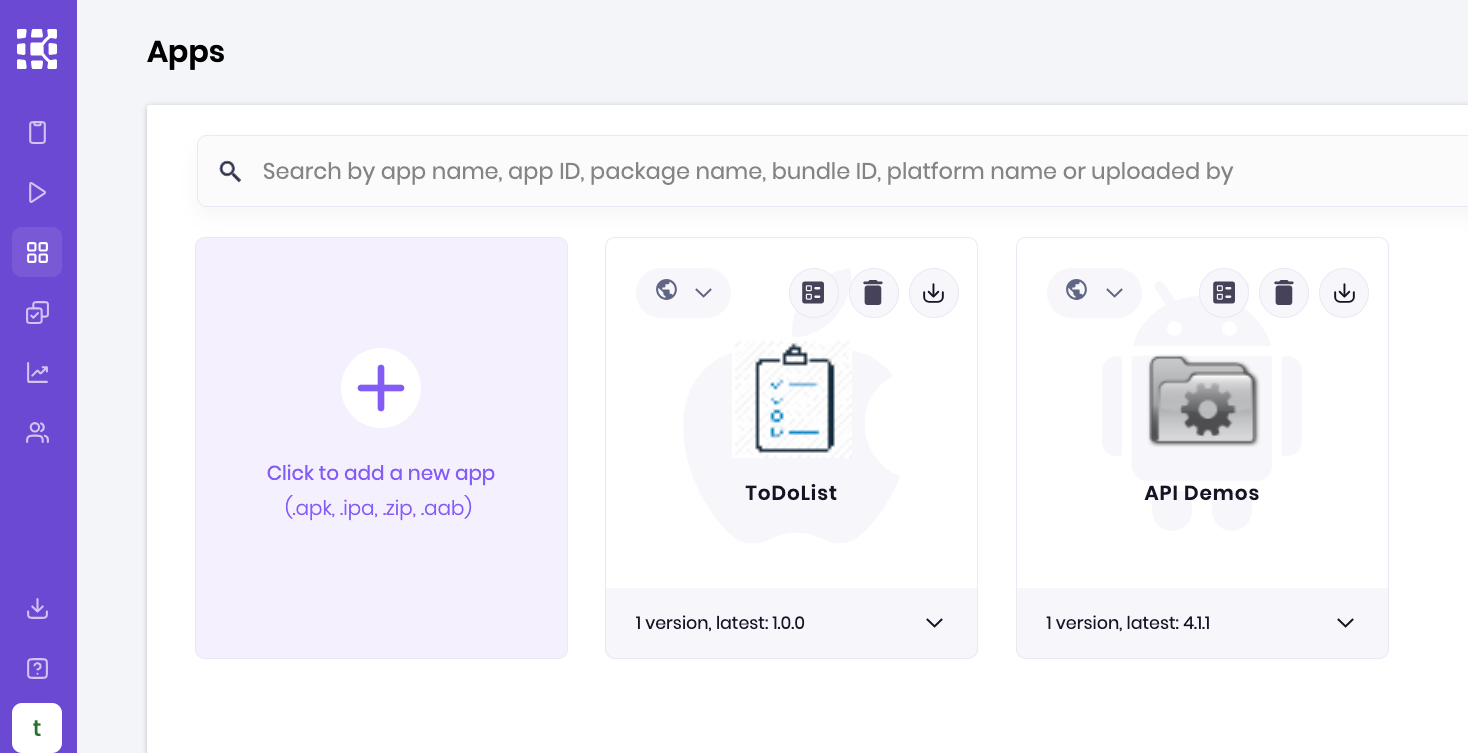
Next, you’ll want to upload a native mobile app to the Kobiton platform. In Kobiton, select Apps. To upload an app using the Kobiton portal, select the + icon and choose an .apk, .aab, .ipa, or a .zip file from your computer.
It’s easy to test your native mobile applications on real devices, with Kobiton’s efficient mobile testing platform. Not only does it provide faster device access, but it also allows easier test automation, and it provides a better user experience for mobile app testing.
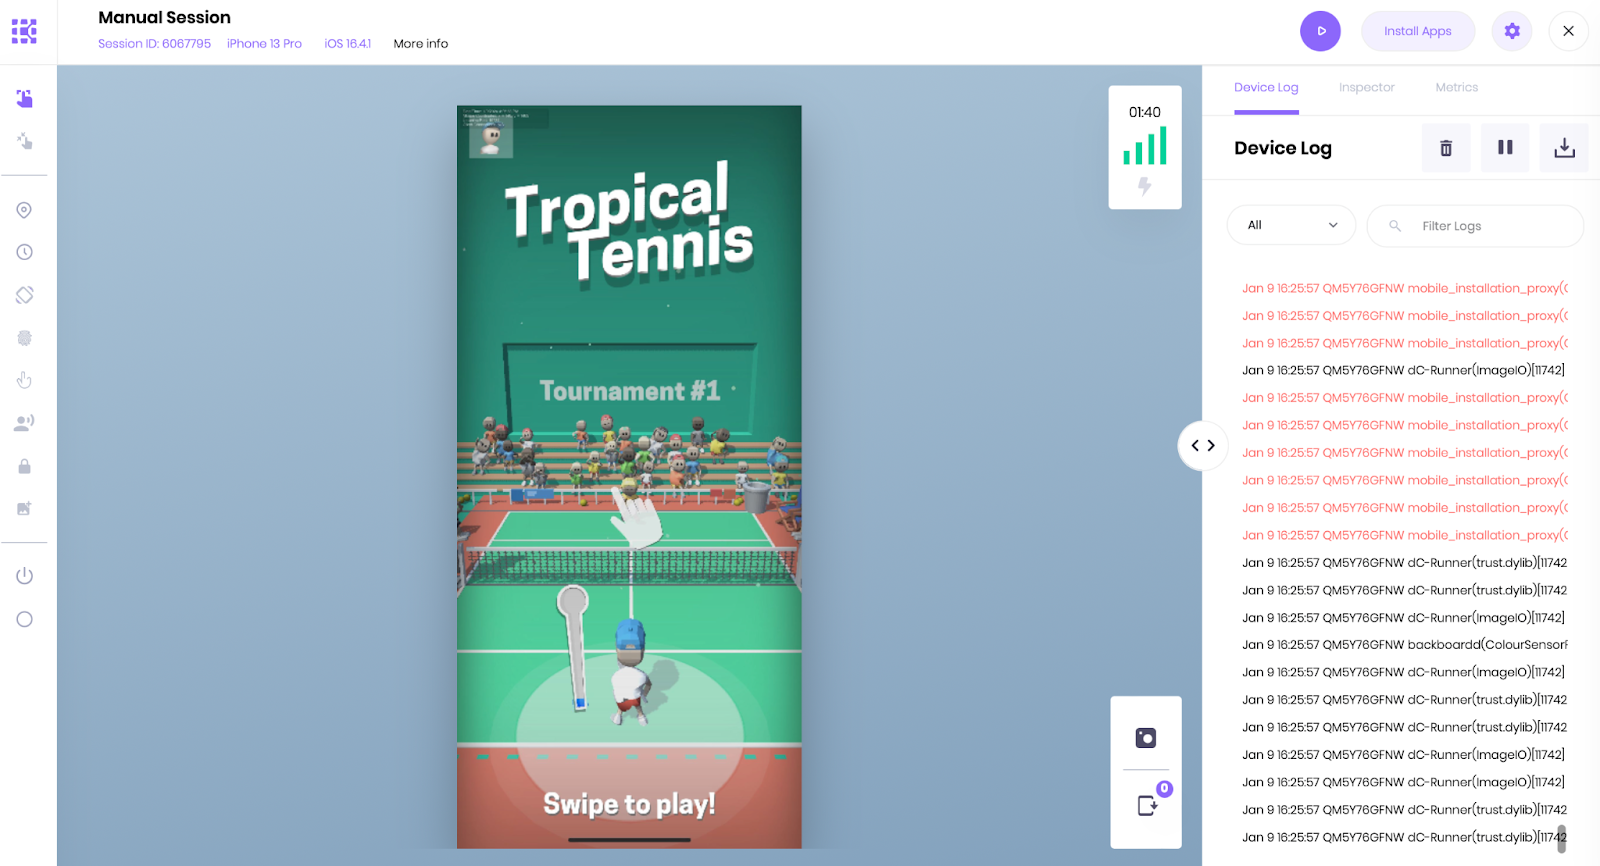
After completing a manual test, you can then review the resulting data in Kobiton’s intuitive session explorer. You can then turn that into scriptless automation, and run it against other types of devices.
There are a number of different tests that users might prioritize; it really comes down to your product’s specific needs, and those of your target audience, as well. It doesn’t matter whether you’re developing native iOS apps or Android native apps; all native mobile applications benefit from proper testing.
1. Security Testing
Are third parties able to compromise the security of your application? Depending upon the sort of information that your users will be providing to the application, safeguarding data might be your first priority. Many of the most downloaded apps of all time start here.
2. Compatibility Testing
Native apps behave differently across devices, OS versions and browsers, so part of testing a native app is confirming it holds up on the ones your users actually run. For the full approach, see our guide to mobile compatibility testing.
3. UI Testing
We all understand the term “user interface” (UI). The better a UI, the more likely an end user will enjoy using the application. UI design and testing can make or break the success of any software development — it literally includes anything that your end-user might interact with. UI testing is also another term for visual testing, which is how the UI changes across devices.
At Kobiton, we understand the significance of thorough UI testing, and know how vital it can be to understand tools and methods that successfully get your products into the hands of App Store users.
4. Functional Testing
Software requirements will likely vary between users, and functional native mobile testing ensures that a product works for those requirements.
5. Documentation Testing
Aligning digital product functions with documentation of how it should occur is the objective of documentation testing.
6. Recovery Testing
Recovery testing occurs when an engineer wants to find out how a system is able to recover after a failure — like when it crashes. During this type of test, data is uncovered about the amount of time it takes for the system to recover.
7. Performance Testing
Performance testing is especially helpful in the development of game applications, although it evaluates an application’s stability and responsiveness under any type of workload. Think of it like a stress test! Android native apps and native iOS apps can all benefit from thorough performance testing.
8. Usability Testing
As its name suggests, usability testing determines how user-friendly an application can be. It can evaluate intuitiveness, and anticipate what customer experience ratings might be like. User experience testing – or usability testing – takes place with end-users in mind. It determines an app’s intuitiveness and how a resulting customer experience might rate.
It’s important that organizations prioritize end-user preferences about an app, including components like appearance and personalization.
9. Beta Testing
Beta testing a mobile application concentrates on discovering if software meets user expectations, and is ready for release; it applies equally to Android native applications and iOS native apps.
10. Localization Testing
If your app ships in more than one region, localization testing checks that it works there and not just that it has been translated. Layouts need to survive languages that run longer than English and scripts that read right to left. Dates, times, currencies and units need to follow local convention, and anything involving scheduling or deadlines needs checking against a 24-hour clock and a day/month/year format. Regional data rules apply here too — GDPR in Europe, CCPA in California, HIPAA for health data in the US — including whether consent prompts appear correctly for each locale.
11. Accessibility Testing
Accessibility testing checks that the app works for users relying on assistive technology. On mobile that means screen reader support through VoiceOver and TalkBack, with every interactive element properly labelled and the focus order following the visual order. It also covers colour contrast, layouts that hold up when the user increases system font size, and touch targets large enough to hit reliably. Beyond the compliance case, these are the same checks that catch layout bugs affecting everyone on a small screen.
Testing a native app once, at the end of a sprint, is how release dates slip. Continuous testing moves the work into the pipeline: every commit triggers a build, every build triggers tests, and defects surface while the developer who caused them still remembers the change. The constraint on mobile is that you cannot run everything everywhere on every commit — device time is finite and app installs are slow — so the pipeline has to be staged.
| Stage | Trigger | What runs | Where |
|---|---|---|---|
| Unit | Every commit | Unit and component tests | Build agent, no device |
| Smoke | Every pull request | Core user journeys only, kept under ten minutes | Emulators and simulators |
| Regression | Merge to main, or nightly | Full automated suite | Primary device matrix |
| Release candidate | Release branch cut | Full suite plus manual exploratory and performance | Full device matrix, real devices |
A few things make the difference between a pipeline that helps and one the team learns to ignore:
A mobile bug report that cannot be reproduced is a bug that does not get fixed. Because behaviour varies across manufacturers, OS versions and hardware tiers, context that would be optional on web is mandatory here. Every report should carry:
| Field | Why it matters |
|---|---|
| Device model and OS version | The first thing a developer checks. Most mobile bugs are conditional on one or the other |
| App version and build number | Distinguishes a new regression from a known issue already fixed on main |
| Screen resolution and density | Required for any visual or layout defect; a bug at one density often vanishes at another |
| Steps to reproduce | Numbered, from a known starting state — including whether the account was new or existing |
| Expected vs actual behaviour | Separates a defect from a design decision the tester disagrees with |
| Screen recording or screenshots | Faster than any written description for gesture, animation and timing issues |
| Device logs and stack traces | Where the actual cause usually is, especially for crashes and ANRs |
| Network and device state | Connection type, battery level and available storage, when the bug looks conditional on any of them |
Capture beats description. A thirty-second recording with the device logs attached will save more developer time than any amount of careful prose, which is why testing platforms that record the session automatically tend to shorten the reporting loop more than better bug-report templates do.
Testing does not end when the build ships. On mobile it cannot: you do not control when users update, so a defect that reaches production stays in the wild until enough of your install base moves to the fix. That makes the hours after a release part of the testing process rather than a separate operational concern.
Before you ship, know how you would undo it:
After you ship, watch the signals that tell you whether the release is healthy:
Feed what you find back into the suite. Any defect that reached production is a test you did not have, and adding it is what stops the same class of bug shipping twice.
None of this is easy, and it is worth being clear about where the difficulty actually sits:
Native mobile app testing is the process of validating an app built for a single platform — iOS or Android — in the platform’s own languages and tooling. It covers functionality, performance, usability, compatibility and security, with particular attention to the device hardware and OS features a native app has direct access to.
A native app is compiled for its platform and uses device hardware directly, so it has to be tested on that hardware across manufacturers, OS versions and device tiers. Hybrid apps share a web codebase inside a native shell, so much of the testing is browser-engine testing with native integration checks around it. Web apps are tested in mobile browsers and never installed, which removes install, upgrade, permission and background-state testing entirely.
Partly. Emulators and simulators handle functional checks, layout work and automation in CI, and they are the right choice for the fast feedback loop. They cannot tell you how the app performs on real silicon, how it behaves with real sensors, cameras or biometrics, or what it does to a battery — so release verification still needs real devices, whether physical or accessed through a device cloud.
Fewer than you would like and more than one. A workable approach is a primary set of five to ten devices covering your highest-traffic OS versions, screen sizes and hardware tiers, running on every build, plus a wider secondary set for release candidates. Your own analytics decide the list, not general market share.
XCUITest for iOS and Espresso for Android are the platform-native options, both fast and tightly integrated with their build tooling but each locked to one platform. Appium is the main cross-platform framework, driving both iOS and Android from one suite via the WebDriver protocol. Codeless and low-code platforms sit alongside these for teams where testers rather than engineers author the tests.
No matter which mobile app performance testing strategy is right for you, Kobiton professionals specialize in bringing the technical world of mobile app development testing down to earth. Call us today, to speak with a representative — or contact us via email for a free demo.