Oct 28, 2026
How to capture device logs, video, and screenshots from failed mobile tests
Kobiton Team
Read More
Mobile visual testing comes down to two practical questions: what method actually catches a screen that looks wrong or reads wrong, and do you need a dedicated visual-testing product to run it? I answered both the hard way, on a mobile app I built and tested on Kobiton’s real devices. The case for why a passing functional suite can still ship a broken screen is made in the companion post on mobile UI testing. This post is the how.
The core tools are free and open: a scripted screen walk, a pixel-by-pixel comparison with ImageMagick, and a person signing off every baseline. You bring Kobiton for the real devices and a large language model (LLM) for the independent review of the copy. Below are the steps, what the pixel comparison catches, and a plain look at where a dedicated tool like Applitools does more.
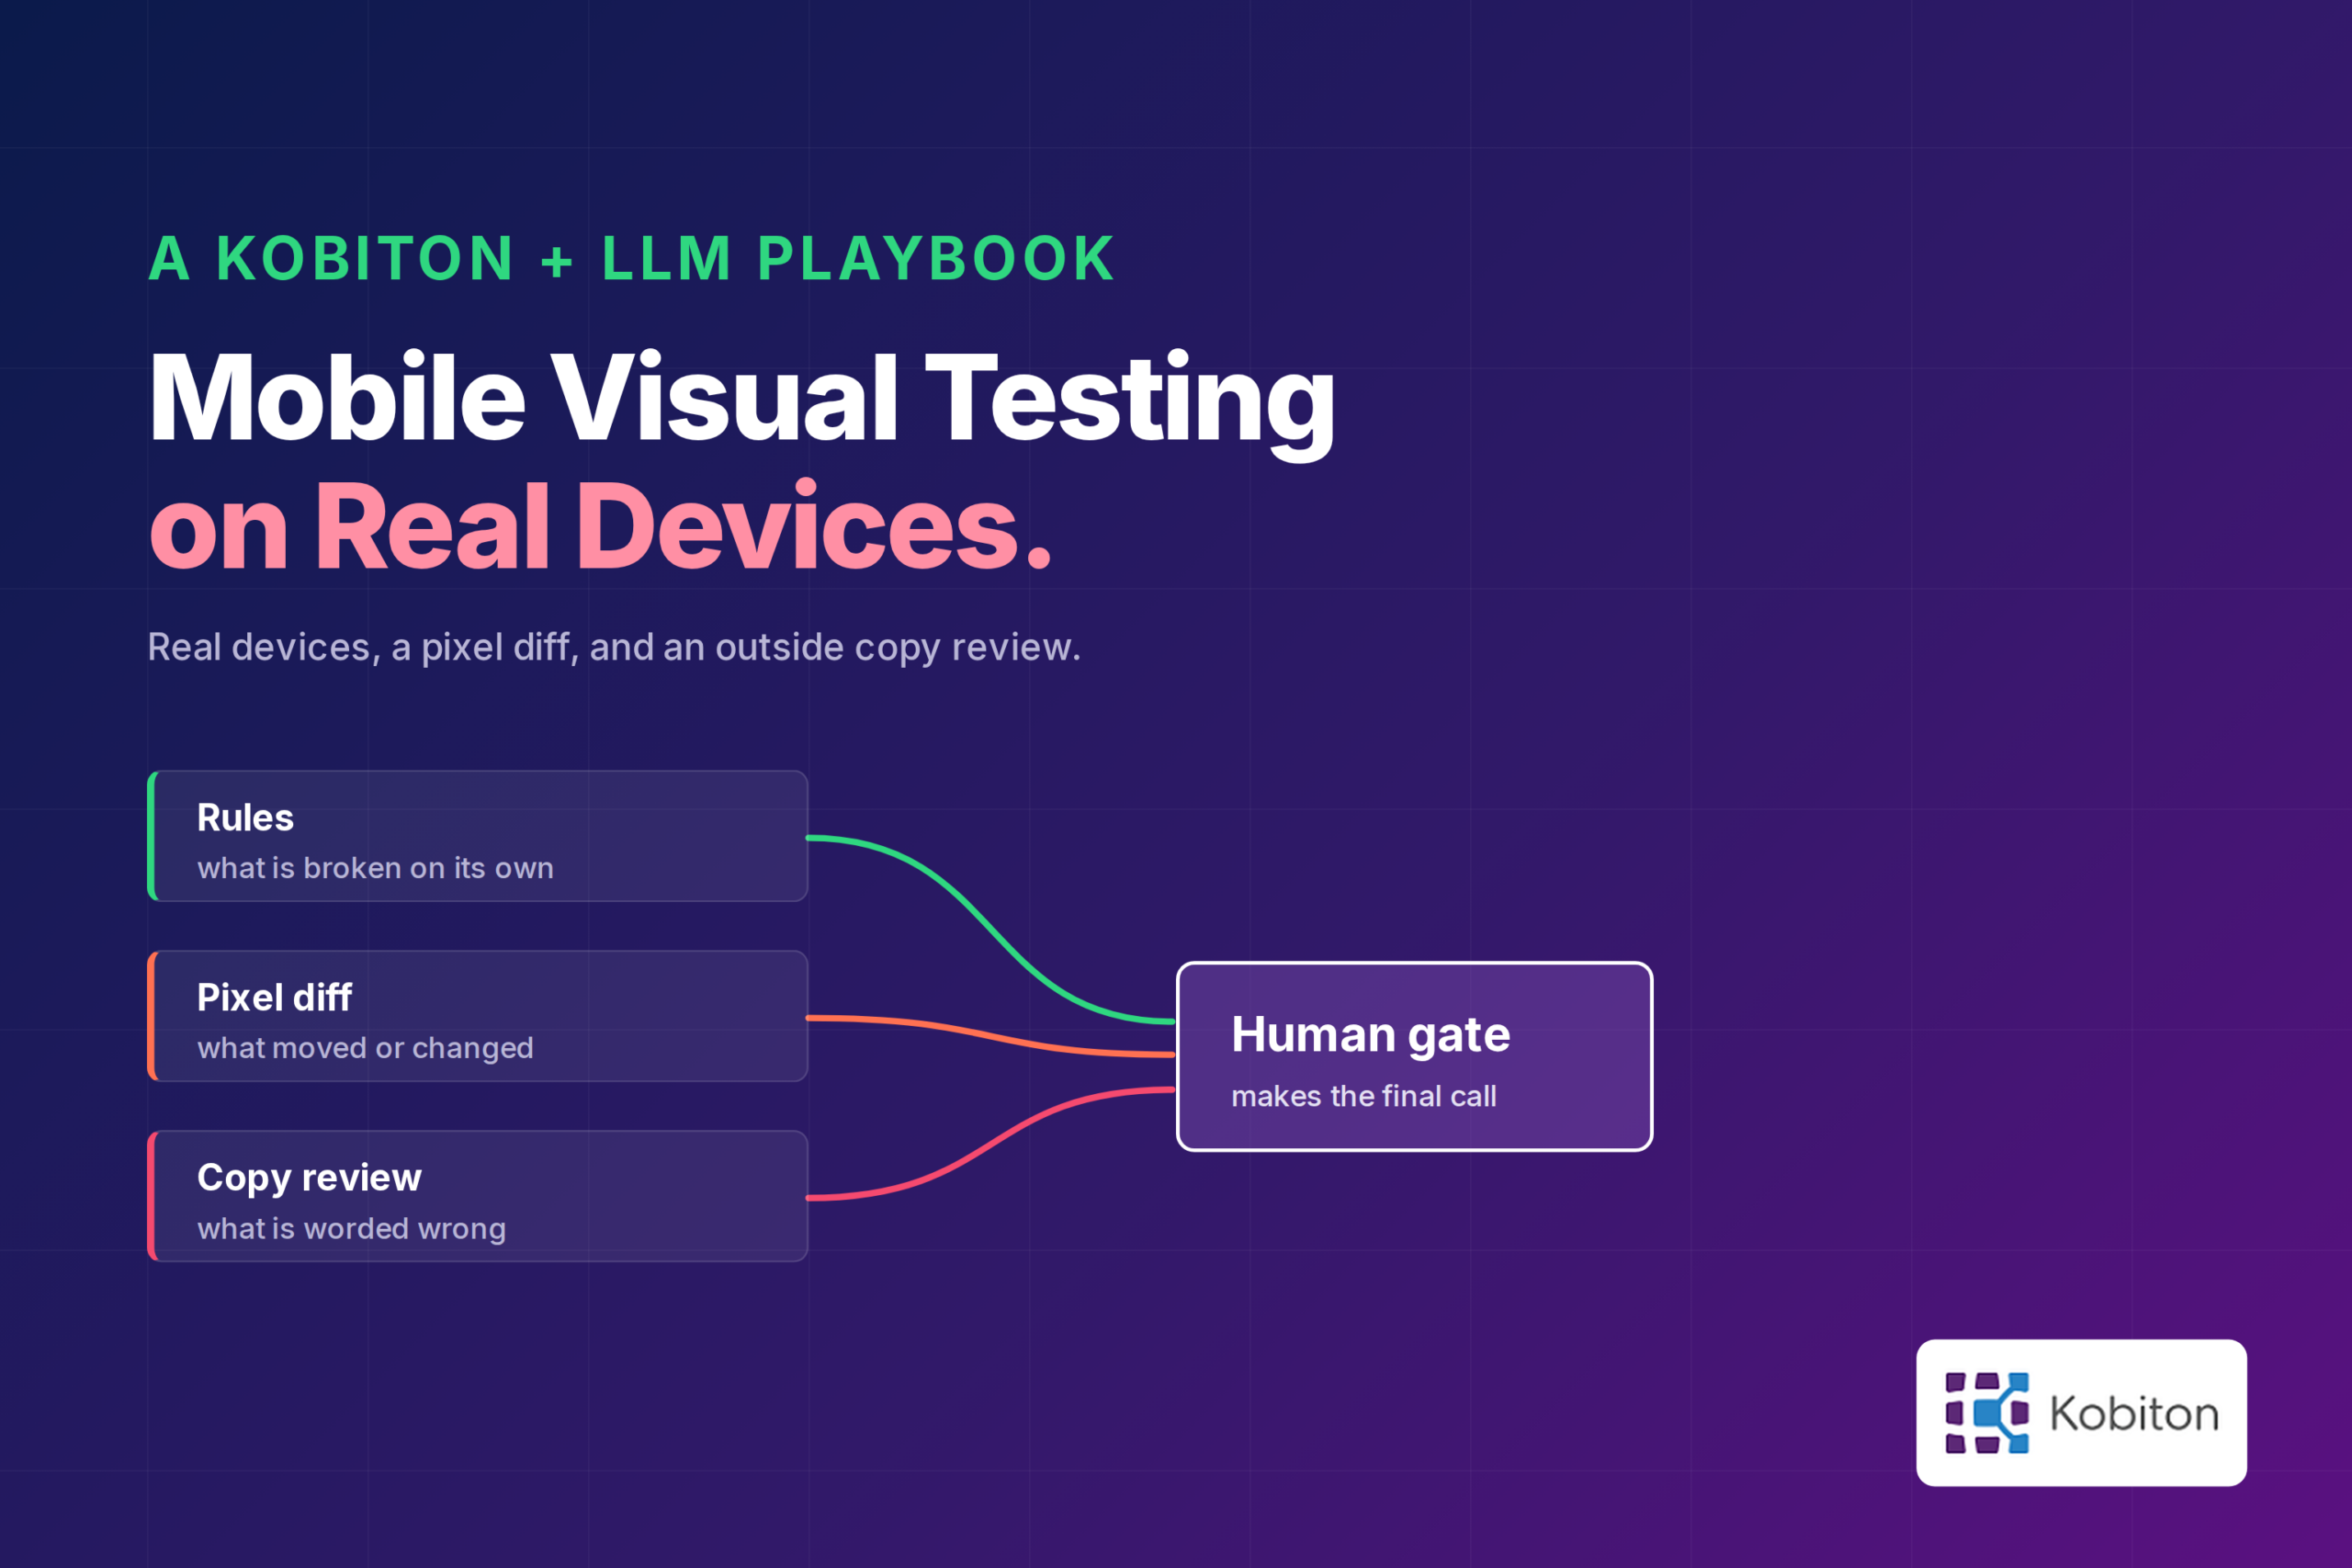
The process judges what the screens actually render, on real devices, and puts fresh eyes on every screen before a release. There are three independent layers of checking and one human approval gate, because each layer catches what the others are blind to:
The parts list is short enough that any QA team can replicate it:
List every user-facing screen as one ordered flow, because most screens depend on the state the previous one left. I wrote that walk as an Appium test, run with WebdriverIO, that drives Kobiton’s real devices. I ran one walk per platform and one per theme, light and dark.
Kobiton captures a screenshot, plus video, logs, and the real input events, at every step. Before each screenshot, confirm the screen has settled. I took two shots at least half a second apart and compared them with ImageMagick, accepting the frame only when the difference fell under a small threshold, about 0.05 percent of the pixels. This prevents saving a mid-animation frame as truth, which was the single biggest source of false alarms.
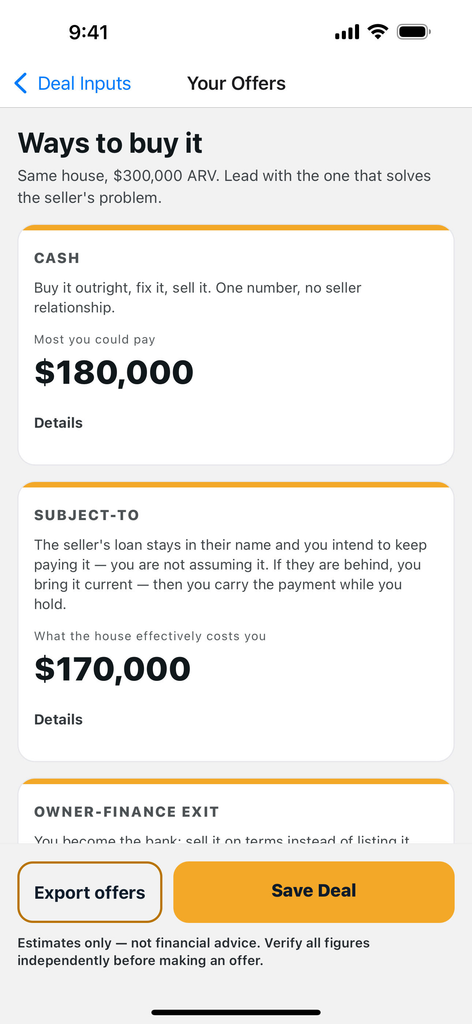
After a run you have dozens of separate screen images, roughly every screen times two themes per platform. Opening them one by one is slow, and you lose the feel of the whole app. So each run also stitches every frame into a single tiled image, six screens across, on a dark background. A person can take in the entire run at one glance, and a broken screen, a light-versus-dark inconsistency, or an odd flow jumps straight out. It is built with one ImageMagick command, its montage tool, and it is the human’s artifact: the overview you scan, and the thing you look at when you sign off a run.
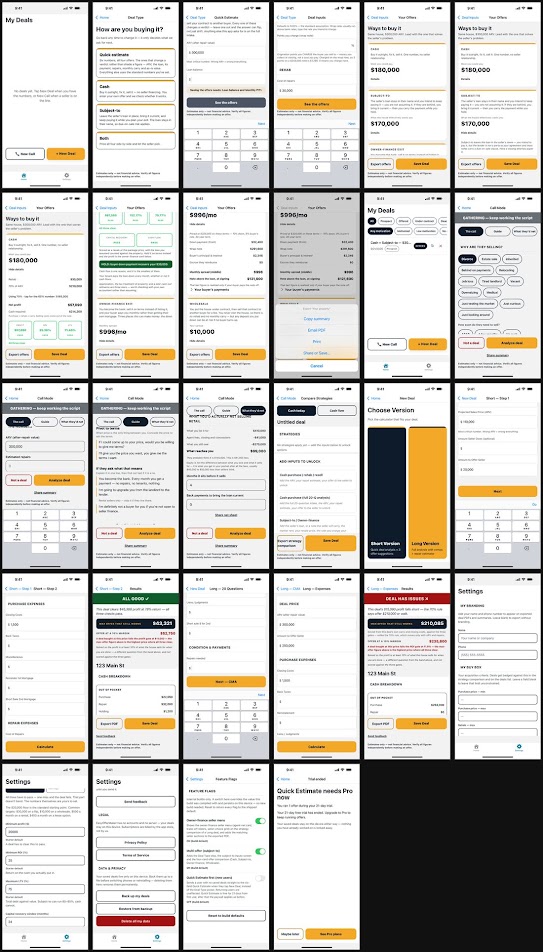
Use Kobiton’s real-device matrix to run the same walk across the specific OS versions and screen sizes your users carry. Keep baselines separate per resolution, per OS, and per theme, and never compare across sizes.
The first clean run becomes the candidate reference set for that device, OS, and theme. It is not approved yet. Run the checks in the next three steps against it first, because the whole point is to look before you bless it. The baseline is a decision, not whatever the last run happened to produce.
Some defects are wrong no matter what the baseline says, so this layer needs no baseline at all, and it is the fastest of the three to run. Start with Kobiton’s built-in validations for accessibility, crashes, and response time, part of its Intelligent Quality Suite (IQS), which you turn on in your test capabilities. Then add a few layout checks of your own. Because iOS and Android report their screen contents differently, I first normalized both into one common shape, then wrote a short set of checks over that shape, each one added because a real defect had slipped past the automated tests:
Each of these flags a broken screen on its own, before any comparison against a baseline.
Once you have an approved baseline, every later run is compared against it pixel by pixel. This is visual regression testing in its plainest form. I did this with ImageMagick, so there is no extra dependency beyond the test harness.
For each screen, ImageMagick’s compare tool counts how many pixels differ between the new frame and the baseline. It uses a small color tolerance, which ImageMagick calls fuzz, of about 2 percent, so the soft edge pixels around text and shapes (anti-aliasing) are not counted as a change. Before comparing, the parts the operating system draws are cropped out, and the keyboard’s position is read from each frame so it can be excluded too. I flagged a screen when more than about 0.03 percent of the pixels below the system bars differed.
Four things to get right:
A human reading a screen, and even an LLM reviewing the copy, both read for meaning. They are good at “is this wrong” and poor at “did this move three pixels” or “is this orange slightly off.” The pixel comparison is the opposite. It does not understand the screen at all, which is exactly why it catches the small, mechanical regressions nobody would think to assert: a button that shifted, a color token that drifted, a label that got clipped by one character, an icon that failed to render, two elements that started to overlap.
The two diffs below are illustrations: changes I planted on a real baseline frame to show what the comparison does, not bugs it caught in a live run. The first is a color regression. I shifted a single brand color token by a few shades, the kind of change a careless theme edit makes. On the screen itself you can barely tell. The comparison flags every element that uses that token at once:
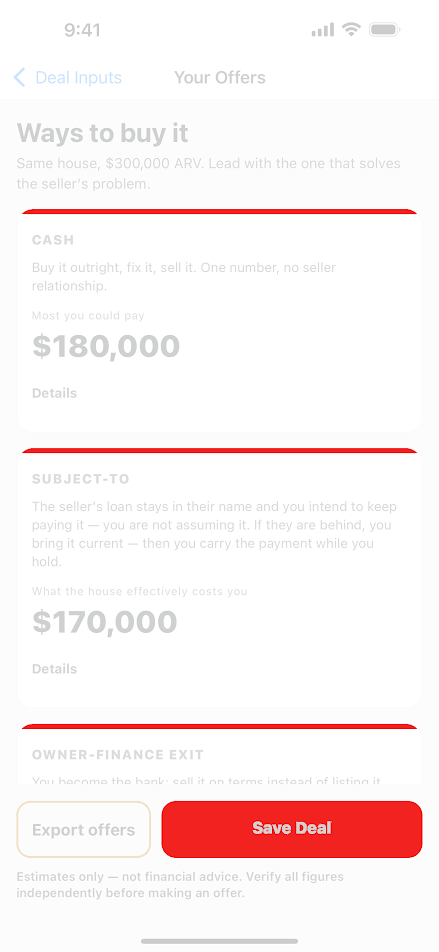
That one small change lit up all three card accent bars and the primary button. A copy review would pass this screen. A person scanning the contact sheet would probably pass it too. The pixel comparison does not.
The second is a layout regression. I moved the bottom action bar up by a small amount, enough that the buttons began to collide with the disclaimer line beneath them. Each button still looks fine on its own, so nothing about the individual elements is wrong:
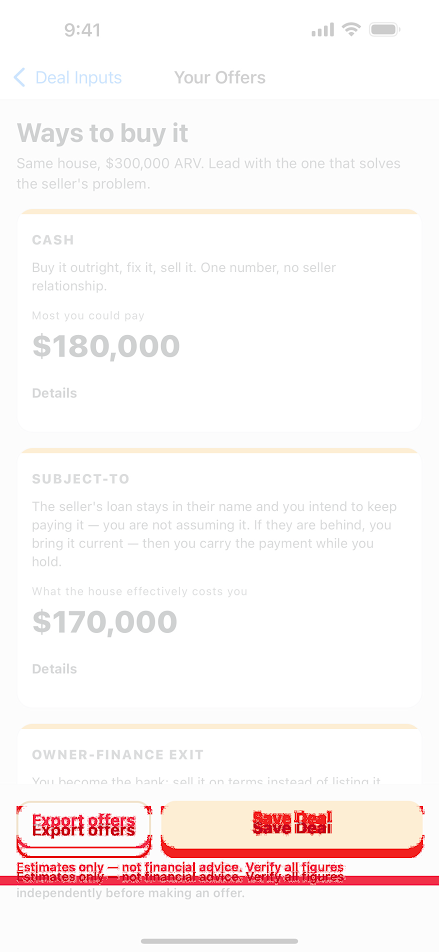
It is the kind of defect that ships, because every element passes its own check and the collision only exists in the geometry between them. The pixel comparison sees the geometry.
This layer is deterministic and cheap. It runs on every build, it never gets bored on the fortieth screen, and it catches the regressions that live in the pixels rather than in the words. It has no idea what the screen means, and it does not need one.
The rules and the pixel diff catch geometry and movement. They are blind to a label that is simply wrong, a sentence that teaches the wrong thing, or copy that contradicts itself. And once you have every screen in both themes across platforms, that is far too many frames to read every word by eye. So before a baseline is approved, the full set of frames goes to an independent reviewer: an LLM outside the project, running in a different tool, that did not build the app, cannot see the code, and has no stake in the frames passing.
What to send:
How to use the answer: verify every blocker against the actual frames before acting on it, separate real defects from style preferences, land the verified fixes, re-run, then approve.
A worked example. In one real run on my app, an independent model reviewed every screen in both themes, 54 images in a complete pass. It checked labels, helpers, amounts, buttons, warnings, results, readability, and light-and-dark consistency. It confirmed four earlier defects had been fixed: a clipped label on a key card, a screen left unusable with the keyboard up, a wrong financial definition, and a results screen whose wording contradicted itself. It checked the money explanations hardest, specifically whether a user could confuse cash paid to the seller with the total price or an existing loan balance. It filtered its own false alarms: normal scroll-edge cuts, intentional test values, keyboard states, and an accepted wording backlog. Its conclusion was that nothing visible warranted pulling the release, with a short list of wording and contrast refinements to consider.
It also stated its own limits plainly: this was a screenshot and copy review, not an audit of the source code, the calculation spec, or a requirements document. Keep that statement of scope in every report. A visual review should say exactly what it did and did not verify.
Speed and scale come first, and they are why AI visual testing belongs in a mobile pipeline at all. A full run is 54 images, every screen in light and dark, repeated every build. A person reading every word on every screen, both themes, every time, would take hours and would do it less carefully each pass. The model reads all 54 in one pass, in minutes, every build. Require a result for every frame, and a list of anything it could not read, so coverage is checked rather than assumed.
The catch: it over-flags. It once called a clipped box a missing word, and it will raise style preferences as if they were defects. So the model widens the net and moves fast, and the human verifies each blocker against the real frame and decides. It does not replace the human gate. It makes the gate’s job tractable.
Once the rules, the pixel comparison, and the outside review come back clean, a person signs off the candidate as the baseline. Record who approved it and when. Then keep it honest:
Everything above is built from a real-device foundation plus two thin additions you write yourself: a pixel comparison with ImageMagick, and an independent copy review with a fixed prompt. It is cheap and repeatable, and for a lot of teams it covers mobile visual testing without a separate product.
A purpose-built tool still does more in some places. For demanding visual regression, Applitools is the premium option, and Kobiton integrates with it directly through the Applitools Eyes integration, so you can run Eyes-powered visual checks against Kobiton’s real devices and see the Eyes status and report from the Kobiton session overview. If you want the strongest visual regression available, that is the path, and it is already wired into the platform.
Three places a tool like Applitools goes beyond a homegrown pixel comparison:
On top of that, a dedicated tool brings a dashboard, batch history across runs, and baseline auto-maintenance out of the box, none of which you get for free from a script.
The question you are asking decides the tool. A pure visual-regression tool answers “did this screen change from the approved look,” and Applitools answers that better than a homegrown diff, with finer control and far less maintenance. The approach in this post adds two things a baseline-diff tool does not do on its own: it runs on real devices through Kobiton, and it puts a meaning-level review on the actual copy, where a pixel diff is blind. The copy review is what caught the wrong definition and the self-contradictory results screen. Use the pixel diff and the copy review for correctness and real-device coverage. Reach for Applitools when you need fine-grained visual regression at scale.
Connect the Kobiton MCP server to an LLM. MCP, the Model Context Protocol, is the open standard that lets an AI assistant call outside tools. Describe the screen walk in plain language and let the model drive Kobiton to run it and pull the screenshots. Let the model do the first-pass triage of the differences and the rule hits, and route the frames to the independent reviewer. A human still gives the final approval. This is how I ran the walk for this post. That turns mobile visual testing from a heavy custom build into something a QA team runs and maintains by describing intent. The Kobiton MCP server works with MCP-capable assistants such as Claude Code, Cursor, and GitHub Copilot.
Start with the screens that matter most. Script the walk, capture settled frames on the devices your users carry, run the checks on a clean run, then approve it as the baseline and compare later runs against it. Add the outside copy review once the baseline holds. Each layer covers a blind spot in the others: the rules for what is broken on its own, the pixel diff for what moved or drifted, the copy review for what is worded wrong, and a person for the final call. Run on Kobiton’s real devices and driven through its MCP server, mobile visual testing becomes a repeatable release gate rather than a one-off effort. When you need the strongest visual regression on top of that foundation, Kobiton integrates with Applitools, so you can add it without leaving the platform. For where visual checks sit in the wider practice, start at the mobile app testing hub.