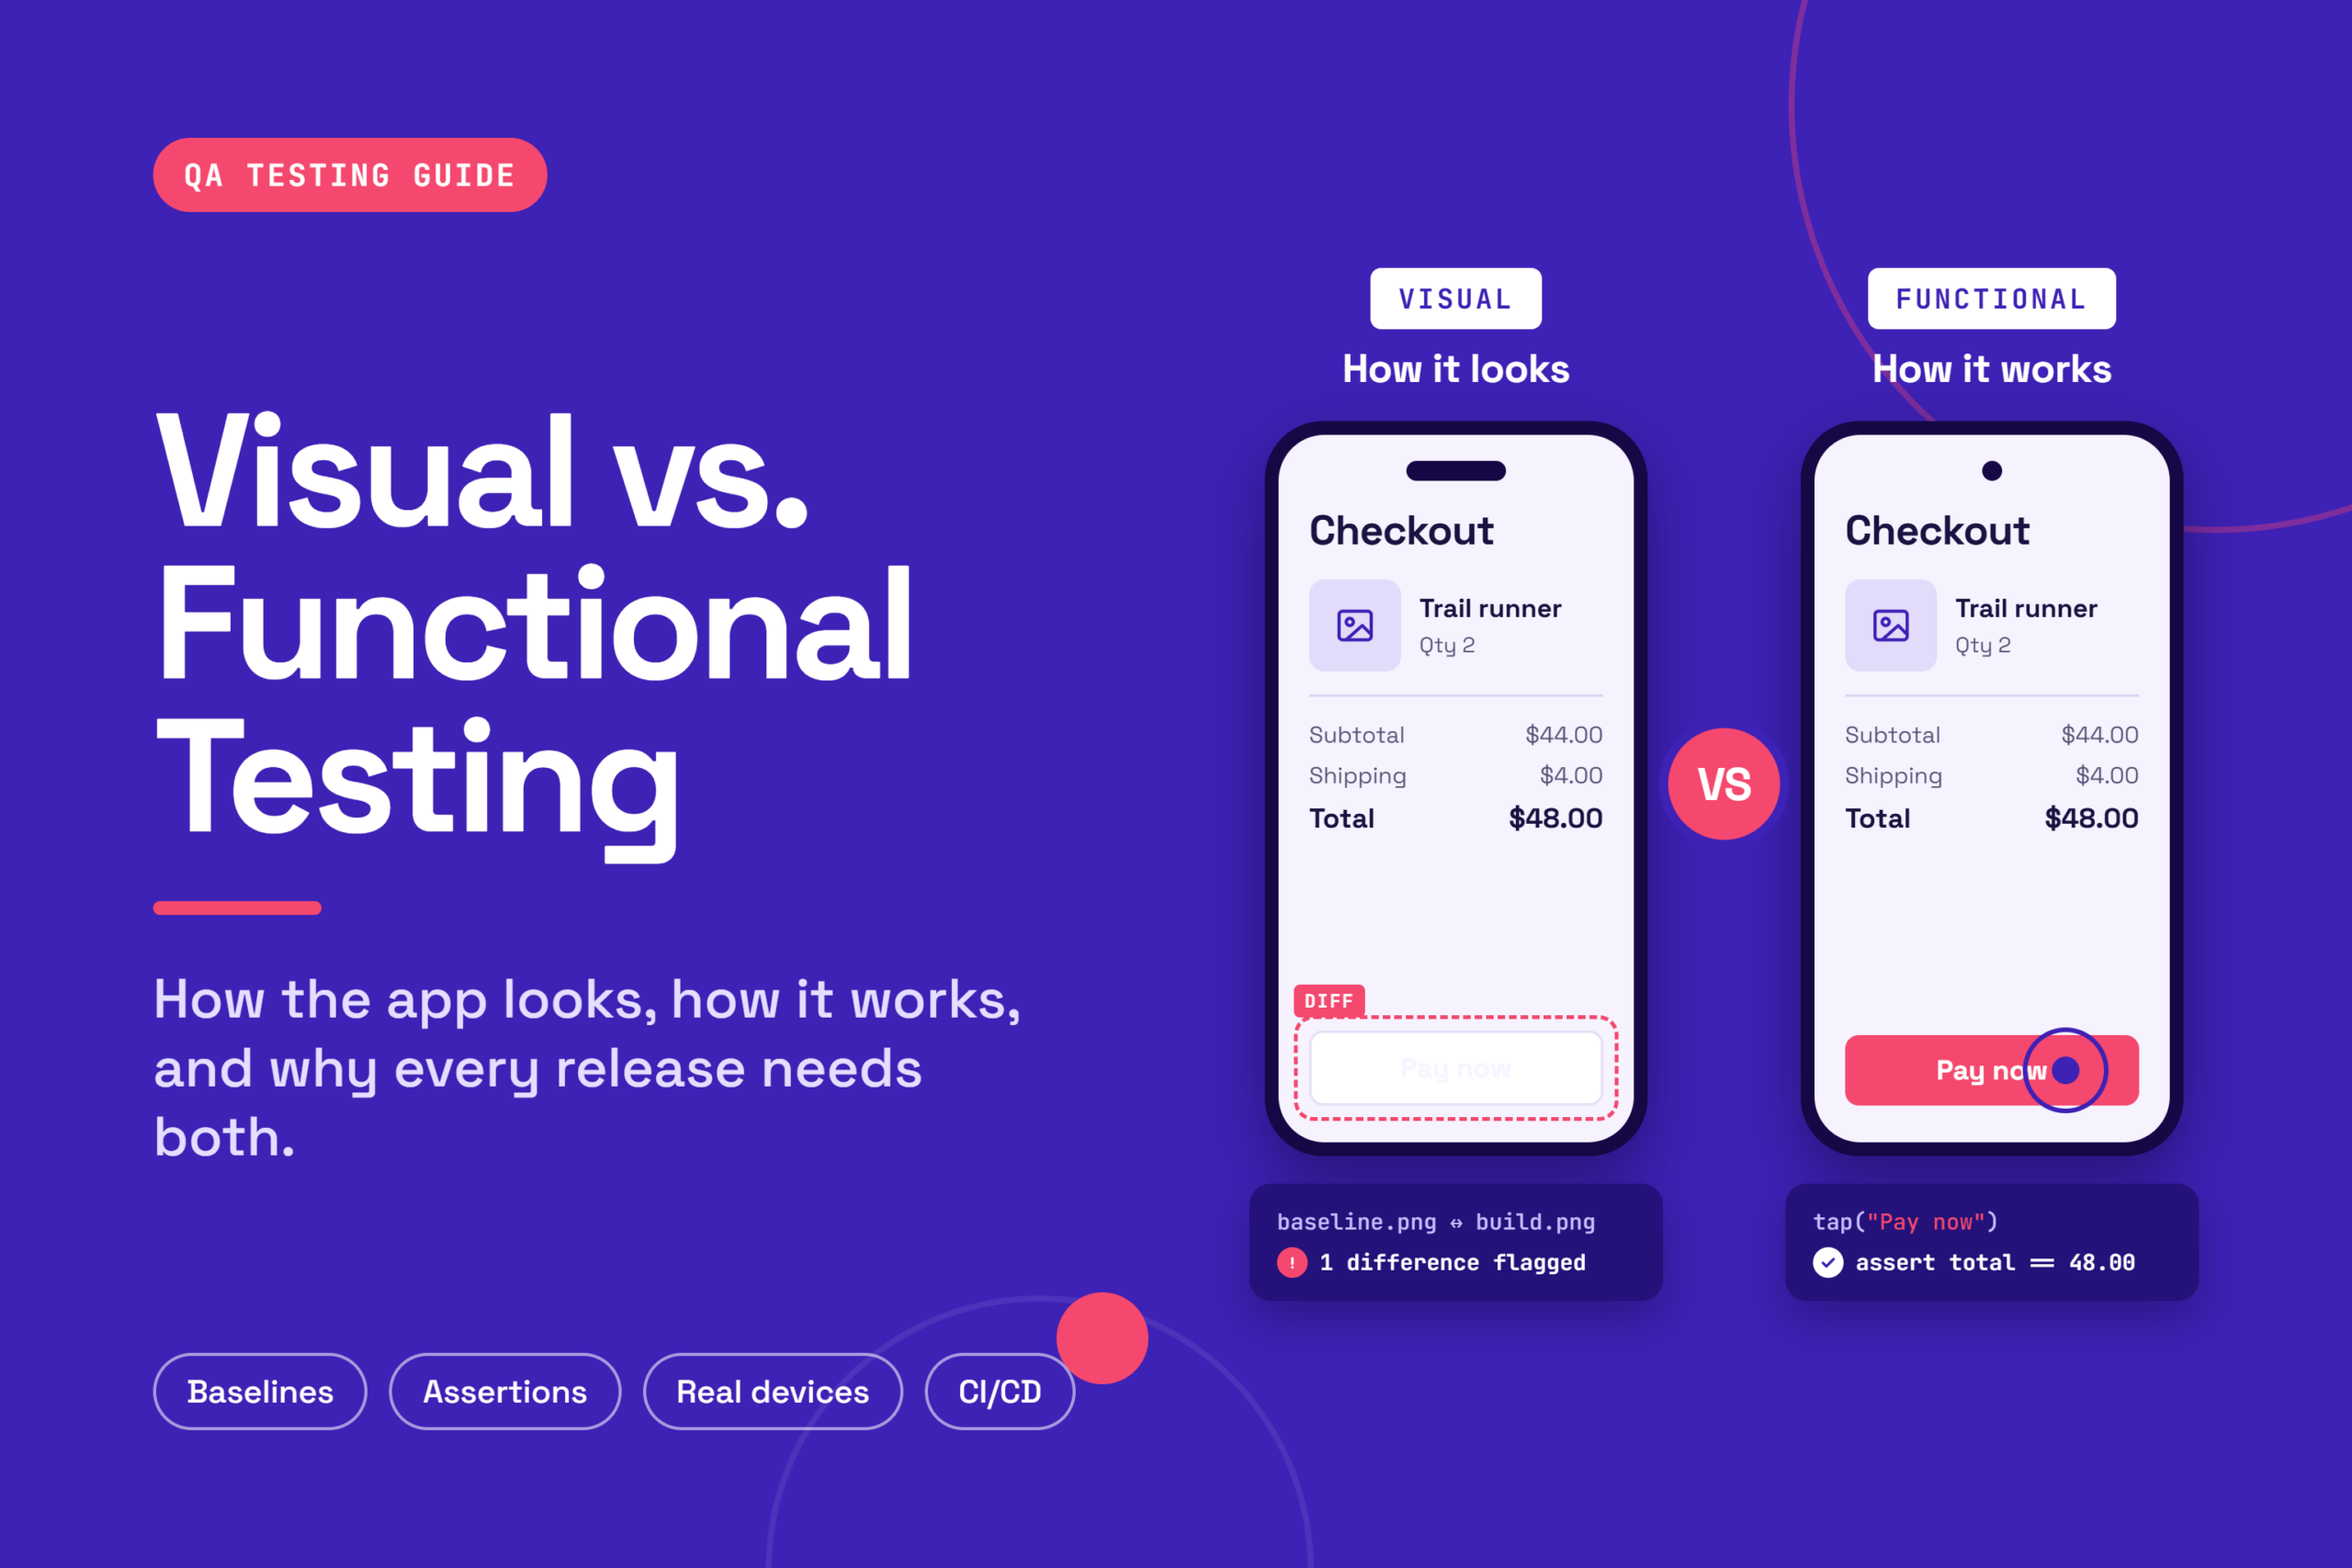
In software development, it’s not enough for an application to just work it also needs to look right. That’s where the difference between visual testing and functional testing becomes important.
Both are essential parts of quality assurance, but they focus on different things. Functional testing checks whether the app works correctly, while visual testing ensures that everything looks clean, consistent, and user-friendly.
Visual vs Functional Testing
Explore the differences in objectives, coverage, defect detection, and use cases
Detailed Comparison
See how visual and functional testing differ across key dimensions.
Match the Scenario
For each scenario, pick which type of testing would catch the issue. See your accuracy improve as you go.
When Should You Use Each?
Quick reference for choosing the right testing approach.
- Launching a new design or UI update
- Checking responsiveness across devices
- Verifying UI after code changes
- Ensuring accessibility and readability
- Catching layout shifts and spacing issues
- Validating brand consistency across screens
- Testing dark mode or theme variations
- Validating core features and workflows
- Testing data processing and backend logic
- Ensuring forms and navigation work
- Verifying user actions complete correctly
- Checking API responses and integrations
- Testing checkout, login, payment flows
- Confirming business rules execute properly
🤝 Better Together
Visual and functional testing aren’t replacements — they’re partners. Functional testing ensures your app works properly, while visual testing ensures it looks polished. Using both gives you complete confidence in your product before release.
What Is Visual Testing?
Visual testing focuses on how an application looks to the user. It checks things like layout, colors, fonts, buttons, spacing, and overall design.
The goal is to catch issues such as misaligned elements, overlapping text, or broken layouts. These problems can affect user experience, even if the app is technically working fine.
How visual testing works
Most automated visual testing follows the same basic loop, built around a baseline: a set of approved screenshots that show what each screen is supposed to look like.
1. Capture the baseline. Run the app on your target devices and capture the screens you care about. Once reviewed and approved, these become the reference images.
2. Capture the new build. After a code or design change, capture the same screens on the same devices.
3. Compare. The tool compares each new screenshot with its baseline and highlights anything that changed.
4. Review. Someone on the team looks at each flagged difference. If the change was intended, such as a redesigned button, they accept it and it becomes the new baseline. If not, it's logged as a bug.
Where tools differ is in how they decide that two screenshots are "different":
| Comparison method | How it works | Strength | Weakness |
| Pixel-by-pixel | Flags any pixel that changed between the baseline and the new screenshot | Very precise; nothing slips through | Noisy: tiny rendering differences such as anti-aliasing or font smoothing show up as failures |
| Threshold-based | Ignores differences below a set tolerance or inside regions you exclude | Fewer false alarms than pure pixel comparison | Needs tuning, and a tolerance set too loosely can hide real bugs |
| Visual AI | Uses machine learning to judge whether a change would be noticeable or meaningful to a person | Filters out rendering noise and handles dynamic content better | Depends on the quality of the model, and flagged results still need human review |
On mobile, baselines are usually captured per device or per screen size, because the same screen legitimately looks different on a compact phone and a tablet. That's another reason real devices matter: the baseline should reflect what users actually see on that hardware.
Today, many teams use Visual AI tools to make this process easier. These tools can quickly compare screens and detect visual differences. Platforms like Kobiton also help teams test on real devices, so they can see exactly how the app appears to actual users.
What Is Functional Testing?
Functional testing is all about how the application works. It checks whether features perform as expected and whether users can complete tasks without issues.
For example, in an online store, functional testing would verify that clicking “Add to Cart” actually adds the item and that checkout works properly. It doesn’t focus on how the button looks, only whether it works.
Functional testing can be done manually or using automation tools like Selenium, Cypress, or Appium. When combined with platforms like Kobiton, teams can test functionality across real devices and environments.
Key Difference Between Visual and Functional Testing
The main difference is simple:
- Visual testing checks how the app looks
- Functional testing checks how the app works
Here's how the two approaches compare across the dimensions that matter most when you're planning test coverage:
| Dimension | Visual testing | Functional testing |
| Core question | Does the screen look right? | Does the feature work? |
| What it validates | Layout, spacing, fonts, colors, images, alignment, and how screens render across devices | Features, user workflows, inputs and outputs, business rules, and integrations |
| How it checks | Compares a screenshot of the current build against an approved baseline image | Interacts with the app (tap, type, swipe, submit) and asserts on the expected result |
| Typical defects found | Overlapping or truncated text, misaligned buttons, missing images, wrong colors or fonts, broken layouts | Broken navigation, failed logins, incorrect calculations, form validation errors, failed API calls |
| What it can't see | Whether a button actually does anything when tapped | Whether an element is visible, readable, or styled correctly |
| Test classification | Usually classed as non-functional testing | Functional testing |
| Common tools | Screenshot-comparison and Visual AI tools, often built into device clouds | Appium, Espresso, XCUITest, Selenium, Cypress |
| Main maintenance cost | Reviewing flagged differences and updating baselines after intentional UI changes | Updating scripts and locators when flows or element IDs change |
| When it runs best | After UI changes, and across many devices and screen sizes | On every build, for critical user flows |
Real examples: bugs only one type of test will catch
The easiest way to see the difference is to look at bugs where one test passes and the other fails. Each of these is a common mobile defect:
| Scenario | Functional test | Visual test |
| After a theme update, the text on the "Pay now" button renders white on a white background | Passes: the button exists and the tap completes checkout | Fails: the label is invisible in the screenshot |
| A translated label is longer than the English text and gets cut off or spills outside its button | Passes: the element is found and works | Fails: the truncation or overflow shows up as a difference |
| On a phone with a display cutout, the app header slides under the status bar and partly hides the back arrow | Passes: the back button is still in the view hierarchy | Fails: the overlap is visible on that device |
| A product image fails to load and shows a blank placeholder | Usually passes, unless a script explicitly checks the image | Fails: the missing image is an obvious difference |
| Tapping "Submit" saves the order with the wrong quantity | Fails: the assertion on the order total catches it | Passes: the screen looks exactly as expected |
| A required-field error message never appears when the field is left empty | Fails: the expected message isn't found | Passes, unless the error state was captured in a baseline |
Notice the pattern. Functional tests only check what you tell them to assert, and they can't see the screen. Visual tests see everything on the screen but have no idea whether the logic behind it is correct. Each one covers the other's blind spot.
Both are important because a good application needs to do both well. An app that works but looks broken can frustrate users, while a beautiful app that doesn’t function properly is equally problematic.
Manual vs Automated Testing
Both types of testing can be done manually or through automation.
Manual testing involves testers reviewing the app themselves, which works for smaller projects but can take time and lead to human errors.
What to look for in a visual testing tool
Some functional frameworks offer basic screenshot comparison. Appium, for example, includes an image comparison command. These basic options usually lack baseline management and a review workflow, which are what make visual testing sustainable at scale. When evaluating tools for mobile, look for:
- Real-device support, so comparisons reflect actual hardware, OS versions, and manufacturer rendering.
- Baseline management per device and screen size, with a clear way to approve intentional changes.
- Noise reduction, whether through Visual AI, tolerance settings, or region masking, to keep false positives manageable.
- Reuse of existing functional tests, so you can add visual checks without writing and maintaining a separate set of scripts.
- CI/CD integration, so visual results show up alongside functional results on every build.
- A review workflow that lets developers, designers, and QA agree on whether a difference is a bug.
Automated testing speeds things up. Visual regression tools can capture screenshots and compare them automatically, while functional automation tools can run test cases quickly. This helps teams test faster and more consistently, especially when integrated into CI/CD pipelines.
Limitations of Each Approach
Neither type of testing is perfect on its own. Knowing where each one struggles helps you set them up properly.
Visual testing challenges
| Challenge | What happens | How teams reduce it |
| False positives | Small rendering differences, such as font smoothing or a slightly different shadow, get flagged as failures | Use tolerance thresholds or Visual AI comparison rather than strict pixel matching |
| Dynamic content | Timestamps, ads, carousels, animations, and personalized data change on every run | Use test data that stays the same between runs, pause or disable animations, and mask regions that are expected to change |
| Baseline maintenance | Every intentional UI change means reviewing and approving new baselines | Review diffs as part of the pull request or release process so baselines are updated as soon as a change is approved |
| Device spread | Each device or screen size may need its own baseline, which multiplies the number of images to review | Group devices by screen class and focus visual coverage on the screens users rely on most |
Functional testing blind spots
It can't see the screen. A functional test can confirm an element exists and responds to a tap, but not whether it's readable, correctly positioned, or hidden behind something else.
It only checks what you assert. If no one wrote an assertion for an image, label, or icon, a functional test won't notice when it breaks.
Scripts break when the UI changes. Renamed element IDs or reordered screens can fail tests even when the feature still works, which adds maintenance.
It needs a script per flow. Covering many screens with functional tests means writing and maintaining assertions for each one, while a visual check covers everything on the screen at once.
When Should You Use Visual Testing?
Visual testing is useful when:
- You are launching a new design or updating your UI
- You want to check responsiveness across devices
- You need to verify UI after updates or changes
- You want to ensure accessibility and readability
It helps catch issues that directly affect user experience and brand perception.
Visual issues that are specific to mobile apps
Mobile apps face visual risks that web pages mostly don't. Functional tests will pass straight through all of these:
- Screen size and density. The same layout has to work on compact phones, large phones, and tablets, at very different pixel densities. Spacing that looks fine on one device can crowd or clip on another.
- Notches, cutouts, and safe areas. Camera cutouts, rounded corners, and system bars can overlap content when an app doesn't respect the device's safe areas.
- System font scaling. Users can increase text size through iOS Dynamic Type or Android's font and display size settings. Larger text can truncate labels or push buttons off-screen.
- Dark mode and themes. Hard-coded colors that look fine in light mode can disappear against a dark background.
- Orientation and foldables. Rotating the device, split-screen mode, or unfolding a foldable changes the available space mid-session.
- Manufacturer customizations. Android device makers can change default fonts, system UI, and rendering details, so a screen can look different on two phones running the same Android version.
- On-screen keyboard. The keyboard can cover input fields or the button the user needs to tap next.
Many of these depend on the physical device, so emulators and simulators don't always reproduce them faithfully. Running visual tests on real devices shows you what users actually see.
When Should You Use Functional Testing?
Functional testing should always be part of your process. It is used to:
- Validate core features and workflows
- Test data processing and backend logic
- Ensure forms, navigation, and user actions work correctly
Without it, your application may look good but fail to perform.
Quick coverage checklist
Use these as a starting point when planning coverage for a screen or feature.
| Visual testing: check that… | Functional testing: check that… |
| Every element appears in the right position, size, and color | Forms validate required fields and reject invalid input |
| No text, button, or image overlaps or hides another element | Navigation and back actions go to the right screens |
| Text isn't truncated, including in other languages and larger font sizes | Search, filters, and sorting return the correct results |
| Images and icons load and display correctly | Create, edit, and delete actions save the right data |
| Layouts hold up across screen sizes, orientations, and dark mode | Confirmation and error messages appear when they should |
| Content stays clear of notches, system bars, and the keyboard | Invalid inputs and edge cases are handled gracefully (negative testing) |
Why You Need Both
Visual testing and functional testing are not replacements for each other they work best together.
How to combine visual and functional testing
Using both doesn't mean doubling your work. Most teams combine them like this:
1. Let functional tests drive the critical flows. Login, search, checkout, and payments should be covered by functional tests that run on every build.
2. Add visual checks to the screens those flows already reach. Your functional test is already navigating to the cart or the payment screen, so capture and compare those screens along the way instead of writing separate scripts to get there.
3. Report the two results separately. A functional failure means something is broken; a visual difference may be intentional and needs review. Keeping them apart stops a cosmetic change from hiding a logic failure, and stops a logic failure from being dismissed as cosmetic.
4. Go wider with visual coverage. Because a visual check doesn't need an assertion per element, it's cheap to run across far more devices, screen sizes, and languages than you'd cover with functional scripts.
5. Build both into your CI/CD pipeline. Functional failures should block the build. Visual differences should be reviewed and approved or rejected before release.
| Pipeline stage | Functional testing | Visual testing |
| Every commit or pull request | Smoke tests on critical flows | Key screens on a small core set of devices |
| Release candidate | Full regression suite | Full screen set across the wider device matrix |
| After OS or device updates | Re-run critical flows on updated devices | Re-capture and compare all key screens on updated devices |
On Kobiton, visual validation can run from the screens captured during an existing functional test session on real devices, so you get visual coverage without maintaining a second set of scripts.
Functional testing ensures your app works properly, while visual testing ensures it looks right. Using both gives you complete confidence in your product before release.
Final Thoughts
The difference between visual testing and functional testing comes down to appearance vs behavior. Both are equally important for delivering a high-quality application.
By using the right tools and combining both approaches, teams can create apps that are not only functional but also visually polished and user-friendly.
FAQs
What is visual testing?
Visual testing checks how an application looks, including layout, spacing, fonts, colors, buttons, and overall UI consistency.
What is functional testing?
Functional testing checks whether an application works correctly, including features, forms, navigation, user actions, and backend logic.
What is the main difference between visual and functional testing?
Visual testing checks how the app looks, while functional testing checks how the app works.
Why is visual testing important?
Visual testing helps catch UI issues such as misaligned elements, overlapping text, broken layouts, and design inconsistencies that can affect user experience.
Do you need both visual and functional testing?
Yes. Functional testing ensures the app works properly, while visual testing ensures it looks polished, consistent, and user-friendly.
Is visual testing a type of functional testing?
No. Visual testing is usually classed as non-functional testing because it checks how the app is presented, not how it behaves. In practice, though, visual checks are often run inside functional test sessions, which is why the two are easy to confuse.
Can functional tests catch visual bugs?
Only a few, and only where you've written an explicit assertion, such as checking that an element is displayed. A functional test can't tell you whether that element is readable, correctly aligned, or covered by something else. Catching those issues reliably needs visual testing.
What is the difference between visual testing and visual regression testing?
Visual testing is the broad practice of checking how an app looks. Visual regression testing is the most common form of it: comparing a new build against approved baseline screenshots to catch unintended visual changes introduced by code updates.
Can you run visual tests inside functional test scripts?
Yes, and it's often the most efficient approach. Your functional test already navigates through the app, so visual checks can capture and compare screens along the way. Keep the results separate so visual differences are reviewed on their own rather than failing the functional run.
Can visual testing replace manual UI review?
It replaces the repetitive part: scanning screen after screen for differences. Human judgment is still needed to decide whether a flagged change is intended and whether the design actually works for users.