How to Use the Appium Inspector

Reading Time : 24 min read
kobiton-appium-inspector

Navigating mobile app testing becomes easier when you can inspect an app’s UI elements before writing or debugging automation scripts. Appium Inspector provides a visual way to examine Android and iOS app elements, view their properties, and identify locators for automated tests.

Recent Appium versions (2.x and 3.x) use a modular, driver-based design, which makes Appium Inspector flexible across different testing setups. Whether you are working with Android or iOS, you can use Appium Inspector to inspect elements, verify attributes, identify locators, and troubleshoot automation sessions.

Introduction to Appium Inspector 

Inspector tools allow engineers to confirm the proper operation of mobile app elements. The most common element inspectors in use today are:

  • Chrome and Safari Dev Tools
  • Appium Inspector
  • UiAutomatorViewer (Android)
  • XCUiTest, including Accessibility Inspector (iOS)

With Appium 2.0, the modular architecture lets users choose which drivers and plugins to install, making it easier to customize your testing setup. This means you can tailor Appium Inspector to work specifically with your testing needs, whether it’s Android, iOS, or even both. For Android testing, understanding the benefits of Appium Inspector for Android can help teams inspect elements, identify locators, and create more reliable automation workflows.

To get the most out of each tool, it’s important to have expert guidance, which Kobiton offers — supporting both tools and processes.

What is Appium and What Does it Do?

Appium is an open-source mobile automation testing framework that supports multiple programming languages. Its primary purpose is to combat device/ platform fragmentation when automating for both Android and iOS apps.

Like the element inspectors mentioned, Appium Inspector allows automation engineers to inspect both Android and iOS applications’ DOM (Document Object Model) in one ecosystem. With Appium 2.0, this capability is more flexible than ever, thanks to its plugin-based system. Whether you’re working with native apps, web apps, or hybrid apps, you can use the Inspector with customized drivers that suit your testing goals. 
Appium eBook

What is Appium Inspector and What is its Purpose?

Appium Inspector is a key utility in Appium’s ecosystem, enabling developers and automation engineers to inspect a mobile app’s UI for both Android and iOS devices. It facilitates mobile automation by allowing engineers to select the Appium server, then start a session to inspect and interact with UI elements in real-time.

With Appium 2.0, you now have greater control over which components of the Inspector you use. The plugin-based architecture makes it easy to extend or modify Appium’s functionality. For instance, you can install only the iOS or Android drivers you need and even add custom plugins for enhanced inspection capabilities like optimizing element locators.

How to Download and Install Appium Inspector (Windows and macOS)

Appium Inspector is a standalone desktop application, so it is installed separately from the Appium server. Before starting an inspection session, download the version that matches your operating system.

Download Appium Inspector

Go to the Appium Inspector releases page on GitHub and select the installer for your operating system.

– Windows: Download the .exe installer.

– macOS: Download the .dmg installer and select the version that matches your Mac’s processor.

– Linux: Download the .AppImage package when available.

Install Appium Inspector on Windows

After downloading the Windows installer, open the .exe file and follow the installation prompts.

If Windows SmartScreen prevents the application from opening, check the file’s Properties and use the available Unblock option before launching it again.

Once installation is complete, open Appium Inspector from the Start menu or desktop shortcut.

Install Appium Inspector on macOS

Open the downloaded .dmg file and drag Appium Inspector into your Applications folder.

When launching the application for the first time, macOS may display a security warning. If the application is blocked, open System Settings, go to Privacy & Security, and use the available option to allow the application to open.

Install Appium Before Starting a Session

Appium Inspector is the interface used to inspect your application, but it still needs an Appium server and the appropriate platform driver to create a session.

If Appium is not installed yet, install Appium first and then add the driver required for your testing platform.

The Plugin Alternative

Inspector also ships as an Appium server plugin, which runs it in a browser instead of as a desktop application. Install the plugin, start the server with it enabled, and open the Inspector path on your server’s host and port:

1. Install it: appium plugin install –source=npm appium-inspector-plugin

2. Start the server with the plugin active: appium server –use-plugins=inspector –port 4723

3. Open the Inspector page served at that host and port in a browser.

The plugin version is the better fit for machines where installing desktop software is awkward, and for sharing one inspection setup across a team. The desktop app remains easier for day-to-day local work, and either connects to a cloud provider the same way.

Matching Inspector to Your Appium Version

Inspector is a separate application on its own release cycle, so an Inspector build and an Appium server can disagree. Three settings account for most connection failures:

SettingAppium 1.xAppium 2.x and 3.x
Server path/wd/hub/ — leaving the old path in place is the most common reason a session never opens
DriversBundled with the serverInstalled separately, for example appium driver install uiautomator2
Capability namesPlain names acceptedNon-standard capabilities need the appium: prefix, such as appium:automationName

As a rule, run a current Inspector release against a current server. Newer Inspector features attaching to a session that is already running, for instance require both sides to be recent, and an older Inspector against a 3.x server will connect but hide capabilities it does not know about.

Appium vs. UI Automator vs. XCUiTest

UI Automator is a framework for functional testing on Android, while XCUITest is Apple’s official IDE for iOS. Both tools offer rich capabilities for element inspection, but Appium Inspector provides a unified cross-platform solution. It can handle both iOS and Android app testing within the same session, leveraging Appium 2.0’s multi-driver support, making it the go-to choice for automation engineers who need flexibility across platforms.

ToolPlatformsBest forLimitations
Appium InspectorAndroid, iOSCross-platform work where one tool and one locator strategy serve bothNeeds a running Appium server and the right driver
UIAutomatorViewerAndroidA quick look at a hierarchy without any Appium setupDeprecated in recent Android SDK releases; static snapshots only
Xcode Accessibility InspectoriOSNative iOS work and accessibility auditingmacOS and Xcode only; no Android
Android Studio Layout InspectorAndroidDeep view-hierarchy analysis during developmentTied to the IDE; no iOS
Chrome and Safari DevToolsWebViewsDebugging the web content inside a hybrid appCannot see native elements

What are the Differences Between Appium and Appium Studio?

Appium is an open-source mobile automation framework that provides diverse programming language and platform support options. Appium Studio, an IDE created by Experitest, delivers additional features such as a better GUI and enhanced device management. However, it is a commercial extension more suited to large-scale, enterprise-level deployments.

FeatureAppiumAppium Studio
LicenseOpen-sourceCommercial (paid)
CustomizationHigh (via plugins, drivers)Limited (pre-set enterprise features)
Ease of UseRequires more technical knowledgeUser-friendly GUI, more suitable for less technical testers
Cross-Platform SupportSupports iOS, Android, and WindowsSupports iOS and Android
Device ManagementRequires third-party solutions or cloud providersBuilt-in device management and easy access to device farms
Programming LanguagesSupports multiple languagesPrimarily focused on GUI-based testing
SupportCommunity-driven supportDedicated customer support from Experitest
Suitable ForSmaller teams, individual testers, or companies with custom requirementsLarger enterprises with the need for enhanced management and advanced features

How do I get the Appium Inspector?

Visit the Appium Inspector GitHub releases page and choose the correct version for your operating system (e.g., .dmg for macOS or .exe for Windows). Download and install it.

When do I use Appium Inspector?

This tool is most helpful for:

  • Automation Script Creation
  • XPath Expression Generation
  • Element Identification
  • Cross-platform Testing
  • Debugging/Troubleshooting
  • Record and Playback Testing

With Appium 2.0, these tasks become even more efficient, thanks to the introduction of custom plugins that enhance core functionalities like element searching or session management.

Key Features of Appium Inspector

Element Identification & Attribute Verification: Appium Inspector’s GUI helps users identify and verify element properties such as text, color, and position. With Appium 2.0, you can leverage enhanced XPath and Accessibility ID performance through newly available plugins, ensuring faster and more stable element location.

Script Creation: Use Appium Inspector to create cross-platform automation scripts, reusing them for both Android and iOS apps. Appium 2.0’s streamlined architecture makes this even easier by allowing parallel script execution across devices, ensuring greater efficiency in test automation.

Debugging Capabilities: The improved debugging tools in Appium Inspector include video recordings, screenshots, and device logs, which help troubleshoot failed tests more effectively. With Appium 2.0, debugging can be further customized using plugins tailored for capturing detailed logs and error reports.

XPath and Accessibility ID Generation: Appium Inspector helps generate precise XPath expressions and Accessibility IDs for stable element targeting. In Appium 2.0, XPath generation can be optimized using custom plugins, providing a more robust way to handle dynamic elements.

Getting Started with Appium Inspector

Appium Inspector

Set Up Appium Inspector in 5 Steps

1

Install Appium and a driver

Install the core server with npm i -g appium, then add a platform driver: appium driver install uiautomator2 for Android or xcuitest for iOS.

2

Start the Appium server

Open a terminal and run appium. The server starts with only the drivers you installed, so it stays fast and lean.

3

Connect the Inspector

Open Appium Inspector and set the remote host to 127.0.0.1 and port 4723. Testing in the cloud? Point it at your Kobiton endpoint instead.

4

Set desired capabilities

Enter platformName, deviceName, automationName, and your app path. Save the set to reuse it next session.

5

Start a session and inspect

Click Start Session to launch your app, then tap any element to read its ID, XPath, and accessibility attributes for your scripts.

Kobiton runs Appium Inspector against real iPhones and Android phones in the cloud, so you can inspect on devices your team does not have on the desk.

Appium uses a modular, driver-based setup. You install the core server once, then add only the drivers you need for the platforms you test. Recent versions (2.x and 3.x) keep drivers separate from the core, so your setup stays light and you update each piece on its own.

Install the platform drivers before you start a session:

appium driver install uiautomator2
appium driver install xcuitest

Desired Capabilities Builder

Pick your platform and fill in the details. Copy the capabilities JSON straight into Appium Inspector, and the matching driver-install command into your terminal.

Desired capabilities (JSON)


Install the driver first


Copied

Works with Appium 2.x and 3.x. Install the core server with npm i -g appium, then add the driver shown above. Testing on real devices in the cloud? Point the Inspector’s remote host at your Kobiton endpoint instead of localhost.

Get the Device Ready

Inspector can only see a device Appium can see, and Appium can only see a device the platform tooling has already recognised. Sort this out before you open Inspector, or you will spend the first ten minutes debugging the wrong layer.

Android

1. On the device, enable Developer options, then turn on USB debugging.

2. Connect the device by USB and accept the debugging prompt on the handset.

3. Run adb devices in a terminal. The device should be listed with the status 'device'. A status of 'unauthorized' means the prompt was not accepted; 'offline' usually means the cable or port is the problem.

4. If you are using an emulator instead, start it and let it finish booting before you begin. A half-booted emulator returns an empty source tree.

iOS

iOS inspection requires macOS with Xcode installed, because the XCUITest driver builds and installs a helper app on the device. A simulator works with no extra setup. A physical iPhone needs to be provisioned for development and trusted on the Mac, and the first session on a new device is slower while the helper app is installed.

1. Start Appium Server

Open a terminal and launch Appium 2.0 using the appium command. The modular nature of Appium 2.0 lets you start the server with only the relevant drivers, ensuring faster performance.
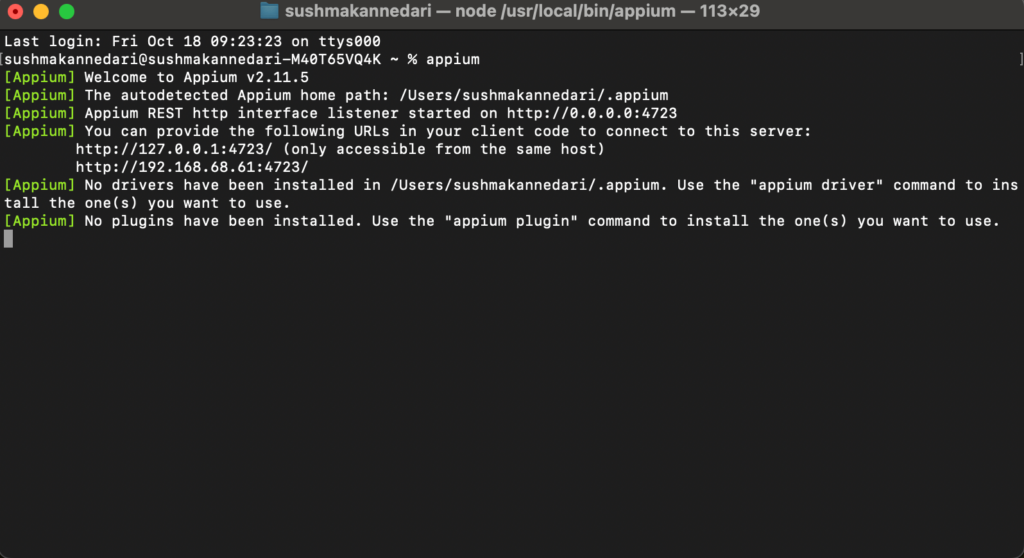
With only the drivers you need installed, the server starts fast and stays lean.

Terminal screenshot showing Appium 2.0 server startup with autodetected home path and URLs for the Appium REST HTTP interface listener
Starting Appium 2.0 server via terminal

2. Connect to Appium’s Server

Open Appium Inspector and Set the Remote Host to 127.0.0.1 and the Remote Port to 4723. You can customize this further by connecting to remote servers or cloud services like Kobiton.

3. Set Desired Capabilities

Desired capabilities define the device on which tests will run. With *Appium 2.0*, saving and reusing these capabilities is easier than ever. Here’s an updated example:

{
  "platformName": "Android",
  "appium:deviceName": "...",
  "appium:automationName": "UiAutomator2",
  "appium:app": "..."
}

The four capabilities above are the minimum. These are the ones you will reach for next:

CapabilityPlatformWhat it does
appium:appPackageAndroidLaunches an app already installed on the device, instead of pushing an APK. Pair it with appActivity.
appium:appActivityAndroidThe activity to open. Without it, Appium launches the default and may land on the wrong screen.
appium:bundleIdiOSThe iOS equivalent of appPackage — targets an already-installed app.
appium:udidBothPins the session to one device when several are connected.
appium:platformVersionBothSelects an OS version. Required when more than one device or simulator could match.
appium:noResetBothKeeps app data between sessions. Useful when you want to inspect a screen that sits behind a login.
appium:fullResetBothUninstalls and reinstalls before the session. Use when you need a guaranteed clean state.
appium:autoGrantPermissionsAndroidAccepts runtime permission dialogs automatically so they do not block the first screen.

Keep the appium: prefix on everything except platformName. A missing prefix is rejected by the server before the session opens, and the error message rarely says so plainly.

Tip: Save your desired capabilities for future sessions to streamline testing, especially when switching between devices or apps.

4. Start New Session

Click 'Start Session' to begin your connection and start inspecting app elements. You’ll quickly begin identifying issues and optimizing your app’s performance in real-time.
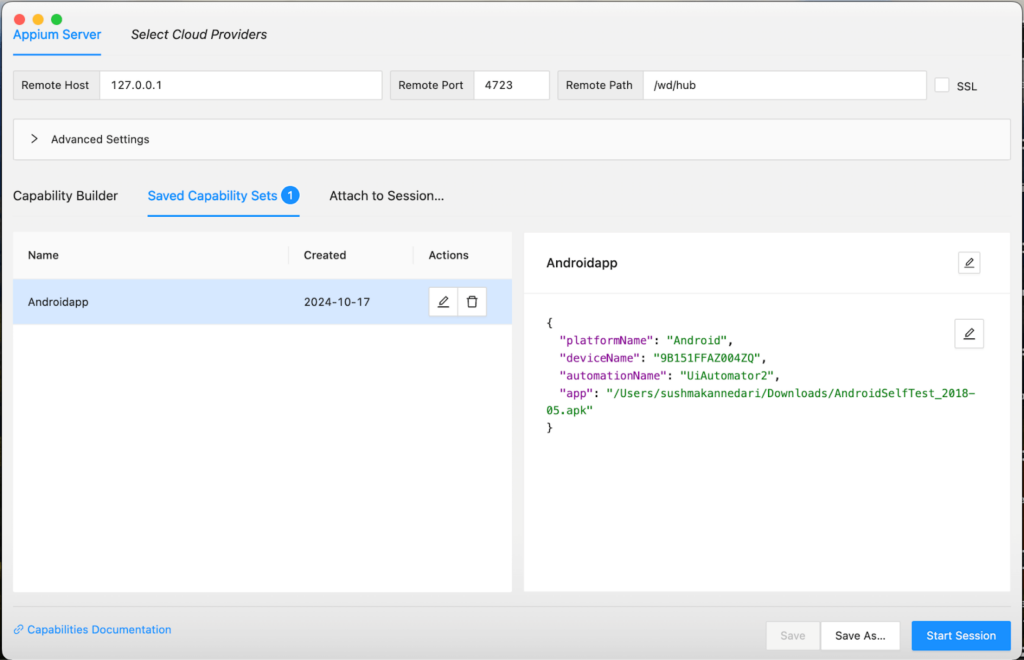
Appium Inspector interface showing saved capability sets for an Android app with platform name, device name, and automation name UIAutomator2.
Configuring and saving desired capabilities in Appium Inspector

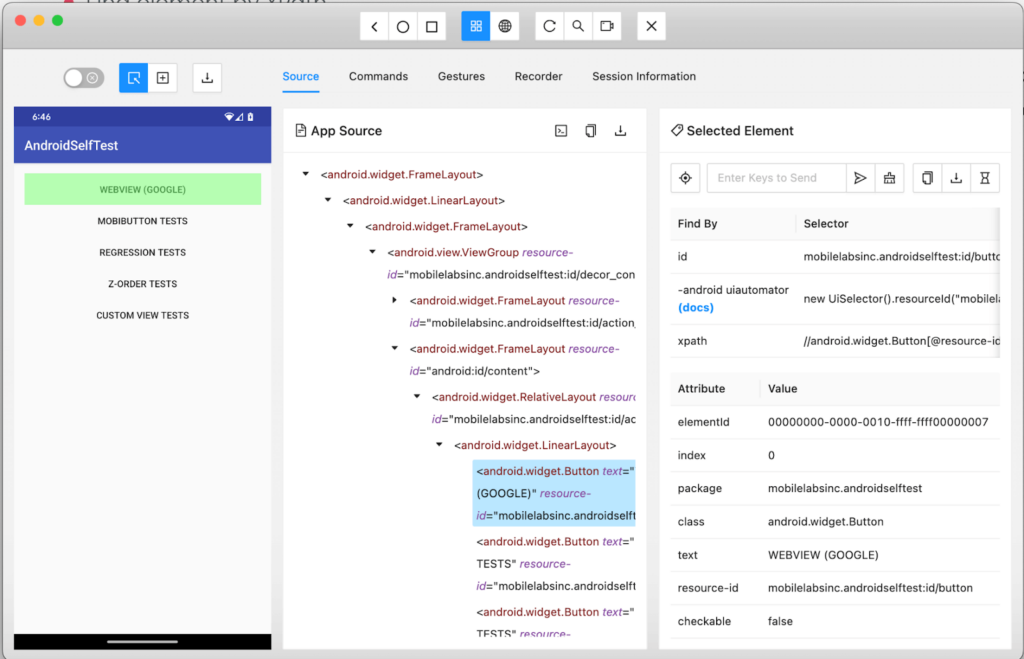
5. Inspect Elements

Use Appium Inspector’s locator strategies such as ID,XPath, or Accessibility ID to find elements in your app. With Appium 2.0, the improved Selector plugin allows for even more efficient element identification, reducing errors and speeding up the test creation process.
On iOS, the same idea applies, but lean on Accessibility ID and predicate strings more than XPath. XPath on iOS can be slow and brittle. Make sure the xcuitest driver is installed and your device or simulator is set up for automation before you start the session.

Appium Inspector interface displaying the app source tree for AndroidSelfTest, with the selected element’s attributes and selectors including ID,Xpath,and class.
Inspecting elements in an Android app using Appium Inspector, showing detailed element attributes

Choosing a Locator That Will Not Break

Inspector will offer you several ways to target the same element. They are not equally durable. A locator built on the app's structure breaks the next time a developer wraps a view in another container; a locator built on an identifier the developer set on purpose survives that change. Work down this order and stop at the first strategy that returns exactly one element.

PriorityStrategyUse it whenWhat breaks it
1Accessibility IDThe element has a content-desc on Android or an accessibility identifier on iOS. Works unchanged across both platforms, so the same locator serves one cross-platform test.A developer removes or renames the identifier
2ID (resource-id / name)Android elements with a resource-id such as com.example.app:id/login_button. Fast and stable within a platform.A rebuild changes the ID, or the app is a WebView where none exists
3Class chain or predicate string (iOS)iOS elements with no accessibility identifier. Much faster than XPath because XCUITest evaluates it natively.Deep hierarchy changes
4XPathNothing else identifies the element. Treat it as a last resort, especially on iOS where it is slow and brittle.Almost any layout change

Verify the Locator Before It Goes Into a Script

A locator that looks right in the source tree can still match three elements. Inspector has a search panel for exactly this, and using it takes a few seconds:

1. Open the Search for Element panel and pick the locator strategy you chose above.

2. Paste the value and run the search.

3. Check the match count. One match means you are done. Several means the locator is ambiguous and will pick whichever element Appium reaches first, which is how a test starts passing against the wrong button.

4. If it is ambiguous, add a distinguishing attribute rather than an index. //android.widget.Button[2] survives nothing.

5. Tap the element from the panel to confirm Inspector is acting on the one you meant.

From Inspected Element to Test Code

Inspector gives you two ways to get from the screen to a script. Both are starting points rather than finished tests.

Copying a Locator by Hand

Select the element, read the attribute you settled on, and write the lookup yourself. In the Java client that looks like this:

driver.findElement(AppiumBy.accessibilityId("Login")).click();

Or, using an Android resource ID:

driver.findElement(AppiumBy.id("com.example.app:id/login_button")).click();

Recording a Flow

Inspector's recorder watches what you do in the session and writes it out as code. Start it from the record icon, then tap, type and swipe through the flow you want to automate. The recorder panel fills up as you go, and a language selector lets you switch the output between Java, Python, JavaScript and others.

Treat the result as a draft. Recorded code hardcodes every value, tends to reach for XPath where a better locator exists, and has no waits or assertions in it. Before it goes anywhere near a commit, replace the fragile locators using the priority order above, pull the reusable ones into page objects, and add the assertions that make it a test rather than a script that clicks things.

Limitations of Appium Inspector

While Appium Inspector offers robust capabilities for mobile app testing, there are some limitations:

  • It shows snapshots, not a live feed. The screenshot and source are captured when you refresh, so anything that animates, times out or updates in the background will have moved on by the time you click it.
  • It only holds one app at a time. Flows that cross between apps — a payment handoff, an OAuth login through a browser — cannot be inspected end to end in one session.
  • It inherits its driver's limits. Inspector sees what UiAutomator2 or XCUITest exposes and nothing more, so a driver bug or an unsupported element type becomes an Inspector problem.
  • Deep hierarchies get truncated. React Native and Flutter apps regularly hide elements below the default snapshot depth.
  • Hybrid content needs a context switch. WebView elements are invisible in the native tree until you change context, which catches out most people the first time.
  • It is a desktop install per tester, unless you run the plugin version or connect through a cloud provider.

With Appium 2.0, many of these limitations can be mitigated by utilizing custom plugins. For example, hybrid app support can be enhanced through third-party plugins or drivers, and performance on older devices can be improved by using optimized configurations.

Using Appium Inspector on Windows OS

Appium Inspector works on Windows, but ensure you have Appium 2.0 installed, along with the relevant drivers for your platform (Android/iOS). You can customize your setup using Appium’s plugin system, making it easier to switch between platforms.

Is Appium Inspector Compatible with Cloud-based Testing Services?

  • A Kobiton account, with your username and API key from the API keys page in your portal settings.
  • Appium 2.5 or later, plus the driver for the platform you are testing.
  • Appium Inspector installed, or the Inspector plugin enabled on your server.
  • Your app uploaded to the Kobiton app repository, so you can reference it by app ID rather than a local file path.

Connect Appium Inspector to Kobiton

1. Start the Appium server with the Inspector plugin enabled: appium server --use-plugins=inspector --port 4723

2. Open Appium Inspector and choose Select Cloud Providers, then pick Kobiton from the list.

3. Enter your Kobiton username and API key. Inspector stores these against the provider, so you only do this once.

4. Set your capabilities for the device you want (example below), then click Start Session.

A minimal Android capability set for a Kobiton device looks like this. Setting deviceName to an asterisk lets Kobiton allocate any device matching the rest of the criteria, which is usually what you want when you are inspecting rather than running a fixed regression.

CapabilityExample valueWhat it does
platformNameAndroidThe platform to allocate
appium:deviceName*Any available matching device; name a model to pin it
appium:platformVersion14OS version to allocate
appium:appYour Kobiton app IDThe uploaded build to install and launch
kobiton:groupIDYour device groupOnly needed if your account uses device groups

Once the session starts, Kobiton allocates the device, installs and launches the app, and mirrors the screen into Inspector. From there it behaves exactly as a local session: tap an element in the screenshot, read its attributes, and copy the locator into your script. The difference is that the device is a real handset you did not have to buy.

Yes. You can point Appium Inspector at a cloud device provider instead of a local server, so you can inspect apps on real devices you do not have on your desk. With Kobiton, you set the remote host to your cloud endpoint, start a session, and inspect elements on real iPhones and Android phones in the cloud. This helps when you need to reproduce an issue on a device or OS version your team does not own.

Troubleshooting Common Appium Inspector Issues

A few problems come up often when you start a session. Here is how to clear them fast.

Session will not start. Check that the Appium server is running and that the Remote Host and Port in the Inspector match the server (default 127.0.0.1 and 4723). A mismatch here is the most common cause.

"No driver found” or the platform will not load. You are missing the driver for that platform. Install it with appium driver install uiautomator2 for Android or appium driver install xcuitest for iOS, then restart the server.

There is a third cause worth knowing about. Cross-platform frameworks such as React Native and Flutter produce very deep view hierarchies, and Appium truncates the page source it returns to keep it manageable. Elements below the cut-off simply do not appear, no matter how long you wait or which context you are in.

Two driver settings control this. Increasing the maximum snapshot depth lets Appium walk further down the tree before it stops, at some cost to how quickly the source refreshes. Excluding attributes you do not need from the page source shrinks each node, which often gets you deeper without touching the depth limit at all. Change one, refresh the source, and see whether your element appears before you change the other.

Element not found, or the source tree looks empty. Give the app a moment to finish loading before you refresh the source. If an element still will not appear, it may sit inside a WebView or hybrid context. Switch context in the Inspector to reach it.

Capabilities rejected. Double-check platformName, deviceName, automationName, and the app path. A wrong path or a typo in automationName stops the session before it opens.

Best Practices for Appium Inspector

  • Inspect Elements: Use the graphical interface to view detailed element properties and verify them for automation scripts.
  • Parallel Testing: In Appium 2.0, parallel testing across multiple devices is more efficient, helping you scale your automation efforts.
  • Use XPath and Accessibility IDs: Leverage Appium Inspector’s tools to generate XPath expressions and use Accessibility IDs for precise targeting, ensuring test script stability.

Advanced Techniques and Tips

  • Page Object Model (POM): This design pattern helps make your tests more maintainable by separating UI code from test logic. In Appium 2.0, using POM can be enhanced by employing plugins that optimize locator strategies.
  • Dynamic Element Identification: Use dynamic locators like XPath and CSS selectors. With Appium 2.0, relative XPath paths can be more efficiently handled using plugins that improve locator performance.
  • Cross-Platform Testing: Reuse test scripts for both Android and iOS. Appium 2.0’s driver flexibility makes switching between platforms faster and more efficient.

Appium Inspector FAQs

Is Appium Inspector free?

Yes. Inspector is open source and free to use, with no licence tied to the number of testers or sessions. Costs only enter the picture when you inspect on a device cloud rather than hardware you own.

What is the difference between Appium Inspector and the Appium server?

The server does the work: it receives WebDriver commands and executes them on the device. Inspector is a client with a screen attached — it connects to the server, asks for the page source and screenshot, and gives you somewhere to click. You cannot run Inspector without a server.

Can Appium Inspector generate test code?

Yes, in two ways. Selecting an element gives you copyable locator values, and the recorder writes out a full snippet in Java, Python, JavaScript and other client languages based on your actions. Both need cleaning up before they belong in a suite.

Can I inspect hybrid apps and WebViews?

Yes, but you have to switch context first. Elements inside a WebView will not appear in the native source tree; change the context in Inspector to the WEBVIEW entry and the DOM becomes visible.

Does Appium Inspector work with real devices in the cloud?

Yes. Select your cloud provider inside Inspector and supply your credentials rather than pointing at localhost. The Kobiton walkthrough above covers the full sequence.

Why can I see an element on screen but not in the source tree?

Usually because the screen has not finished rendering, the element sits inside a WebView, or the framework is limiting how deep the page source goes. Refresh the source first, then switch context, then look at the snapshot depth settings.

Mastering Appium Inspector with Kobiton

Appium Inspector, especially with the added flexibility of Appium 2.0, is a must-have tool for mobile automation. Whether you’re inspecting elements, generating scripts, or debugging, Appium’s new modular approach makes it easier to scale your testing and adapt to the latest technologies. Teams should always choose the framework that best fits their needs, and with Appium 2.0, the choice has never been clearer.

Our clients run the testing tool gamut using Appium, Espresso, and XCTest / XCUITest frameworks. Kobiton enhances Appium Inspector’s functionality by providing cross-platform testing capabilities, making it easier for you to deliver reliable mobile experiences. Experience this difference for yourself by trying Kobiton today with a free demo. Streamline your testing efforts and optimize your mobile apps more efficiently.

Get a Kobiton Demo