
Jun 21, 2022
Best Practices To Follow When Developing a Health App

Adam Creamer
Read More

Developing a test automation framework for Appium boils down to a simple 2-step process:
In the real world, Appium is used to automate an entire mobile application and the simple idea to put all element locators and interactions with locators into one file won’t help us. It’s just a bad design. When we inevitably go back to increase automation test coverage, we would likely end up with an unmaintainable project – large project files, complex code and duplicate usage of element locators will become the bane of your daily automation life.
Moreover, even a small change in the application UI would break the existing working locators, and if we use the linear structure in our test code, it will become so difficult to fix that locator because we need to replace the invalid locator from each place in the code.
For Example, most apps or websites have a ‘home’ page, such as a dashboard, containing a number of menu options. Many automation test cases might click on these menu options to perform a specific task. Now imagine that the UI is changed/revamped and menu buttons are relocated and some of them removed. This will lead to automation tests failure because scripts will not be able to find the particular element.
So in order to reduce that pain, we need to use some kind of structure which can eliminate those difficulties. And that masterpiece code structure (or framework as it’s more commonly called!) is known as Page Object Modeling.

Page Object Model (POM) is a widely used design pattern in Appium (and Selenium) test automation. It enhances test maintenance and reduces code duplication by keeping locators and test cases separate. Essentially, a Page Object is an object-oriented class that encapsulates all the UI element locators for a specific page (or screen) of your Application Under Test, along with the methods to interact with these elements. This structure ensures that if a UI change breaks the tests, you only need to update the corresponding Page Object class rather than every individual test script.
The basic structure of a Page Object Model in an Appium framework typically includes:
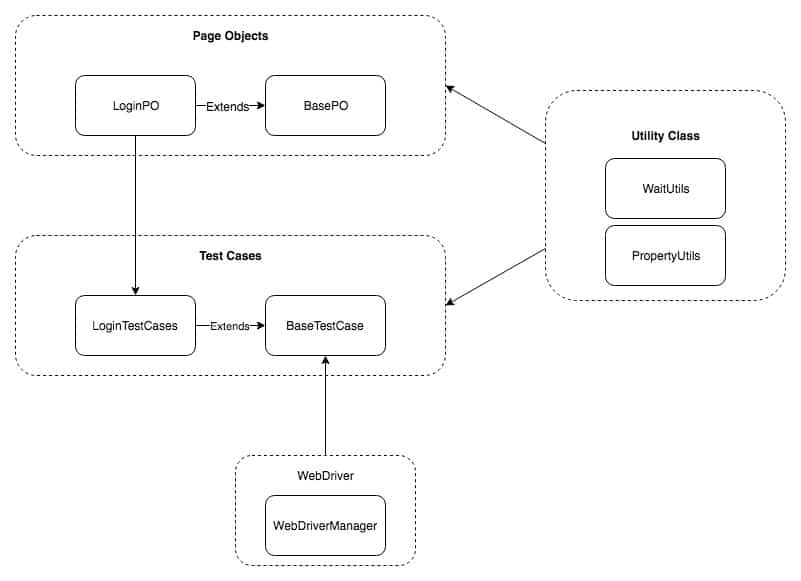
NOTE: The above structure just illustrates one possible Page Object Model structure – It may vary according to the needs of your app and test cases, and POM works best for multi page web application.
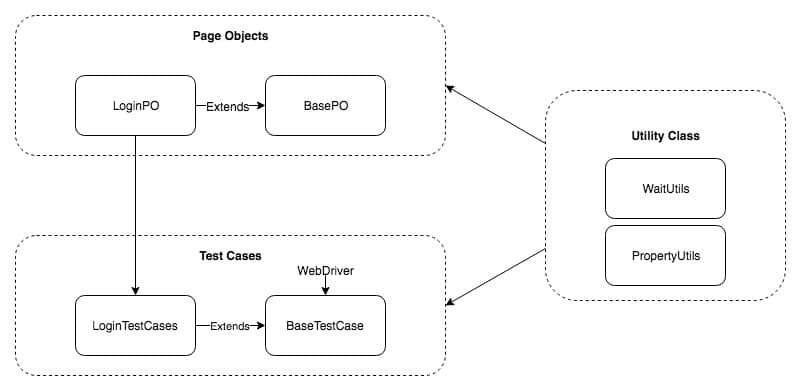
However, for simplicity—especially when starting out—we can use a “light-weight” version of POM. In this modified structure, we remove the separate WebDriver entity and include WebDriver creation logic in the BaseTestCase. This approach is particularly suitable for mobile automation (iOS and Android), where you typically deal with a more limited set of devices compared to multiple browsers in web automation.
w:
Follow the below steps to implement this (Steps shown below remain same for Intellij IDEA and Eclipse IDE):

Figure-3: Create Java Project.
2. When you click on the Create button it will build the whole project and link the default dependencies.
3. As we are using Maven as a build tool, the first thing you need to do is to add the Maven dependencies and Import the changes.
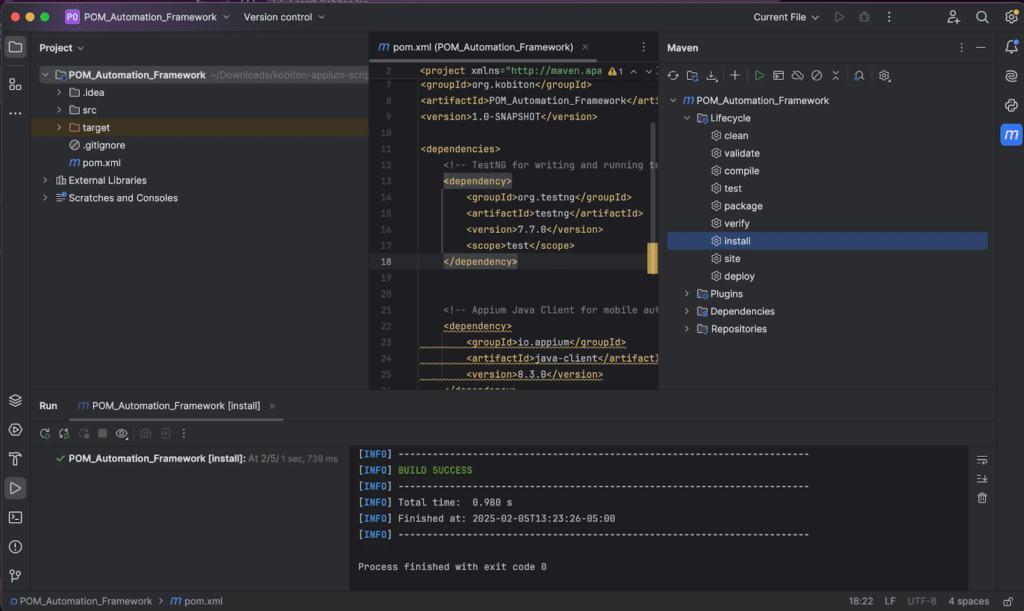
Figure-4: build Maven.
4. You can observe that there is a src directory created by default project structure
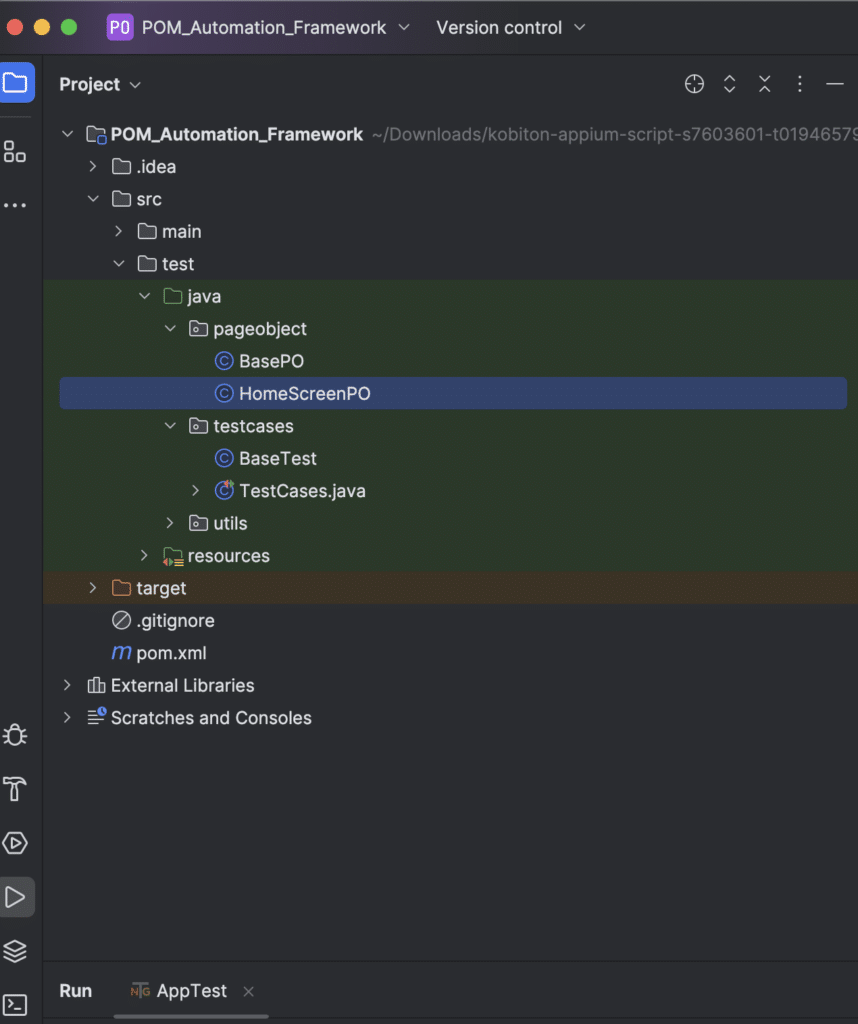
Figure 5: Project structure
We will walk through each piece of code so you understand how it all fits together.
Below is a minimal pom.xml showing how to include Appium Java Client 8+ (which supports Appium 2.0), TestNG, and related dependencies. Adjust versions as needed.
<project

       xmlns="http://maven.apache.org/POM/4.0.0"

       xmlns:xsi="http://www.w3.org/2001/XMLSchema-instance"

       xsi:schemaLocation="http://maven.apache.org/POM/4.0.0

                       http://maven.apache.org/xsd/maven-4.0.0.xsd">

   <modelVersion>4.0.0</modelVersion>

   <groupId>org.kobiton</groupId>

   <artifactId>POM_Automation_Framework</artifactId>

   <version>1.0-SNAPSHOT</version>

   <properties>

       <maven.compiler.source>17</maven.compiler.source>

       <maven.compiler.target>17</maven.compiler.target>

       <project.build.sourceEncoding>UTF-8</project.build.sourceEncoding>

   </properties>

   <dependencies>

       <!-- Appium Java Client 8.3.0 (brings in Selenium 4.28.x) -->

       <dependency>

           <groupId>io.appium</groupId>

           <artifactId>java-client</artifactId>

           <version>9.3.0</version>

       </dependency>

       <!-- TestNG -->

       <dependency>

           <groupId>org.testng</groupId>

           <artifactId>testng</artifactId>

           <version>7.7.1</version>

           <scope>test</scope>

       </dependency>

       <dependency>

           <groupId>org.seleniumhq.selenium</groupId>

           <artifactId>selenium-remote-driver</artifactId>

           <version>4.28.1</version>

       </dependency>

       <!-- (Optional) SLF4J binding to remove the "NOP" logger warning -->

       <dependency>

           <groupId>org.slf4j</groupId>

           <artifactId>slf4j-simple</artifactId>

           <version>2.0.7</version>

           <scope>test</scope>

       </dependency>

   </dependencies>

   <build>

       <plugins>

           <plugin>

               <groupId>org.apache.maven.plugins</groupId>

               <artifactId>maven-surefire-plugin</artifactId>

               <version>3.0.0-M9</version>

           </plugin>

       </plugins>

   </build>

</project>1. After adding the Appium and TestNG dependencies, we will create the Page Object package inside src > test > java
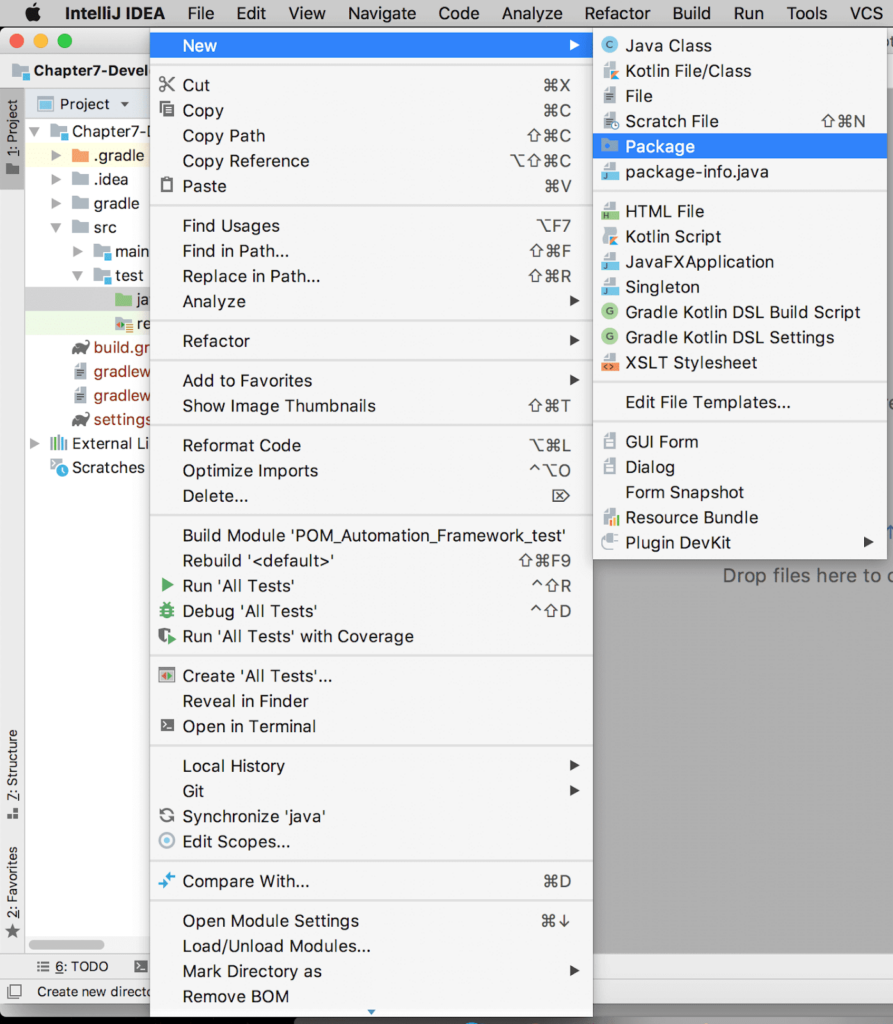
Figure-10: Adding new package inside src_test_java.
2. Using the same approach, add a testcases and utils package.
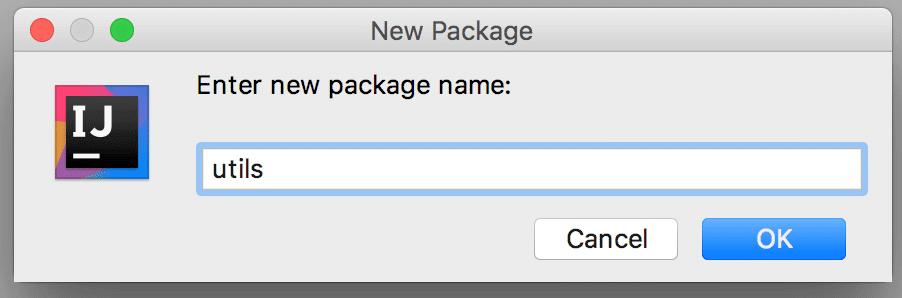
Figure-12: Package Name utils.png.
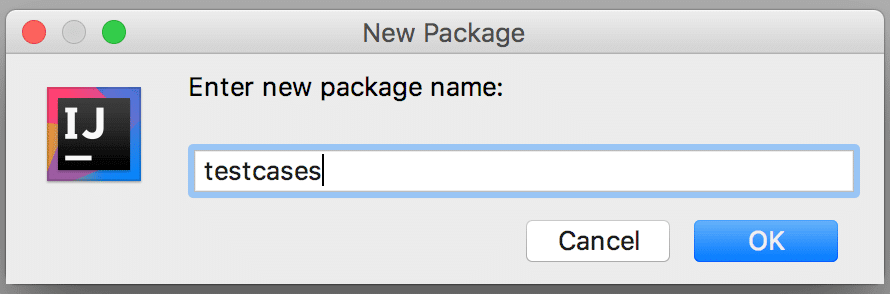
Figure-13: Package Name test cases.
Adding configuration.properties
Our first step is to create a configuration.properties file under the src/test/resources/ directory. In Java-based automation frameworks, .properties files are commonly used to centralize configuration values (like device names, app package names, or URLs) in a single location.
This follows the Page Object Model principle of separating configuration details from the test logic. If you need to change the connected device name, for instance, you simply edit the value of the android.device.name key—no need to modify multiple test classes.
Here’s a sample of what the configuration.properties file might contain:
android.device.name=emulator-5554

android.platform.version=11

app.path=/path/to/your/app.apkNote: You can load these values in your tests using Java’s Properties class to retrieve each key-value pair as needed.
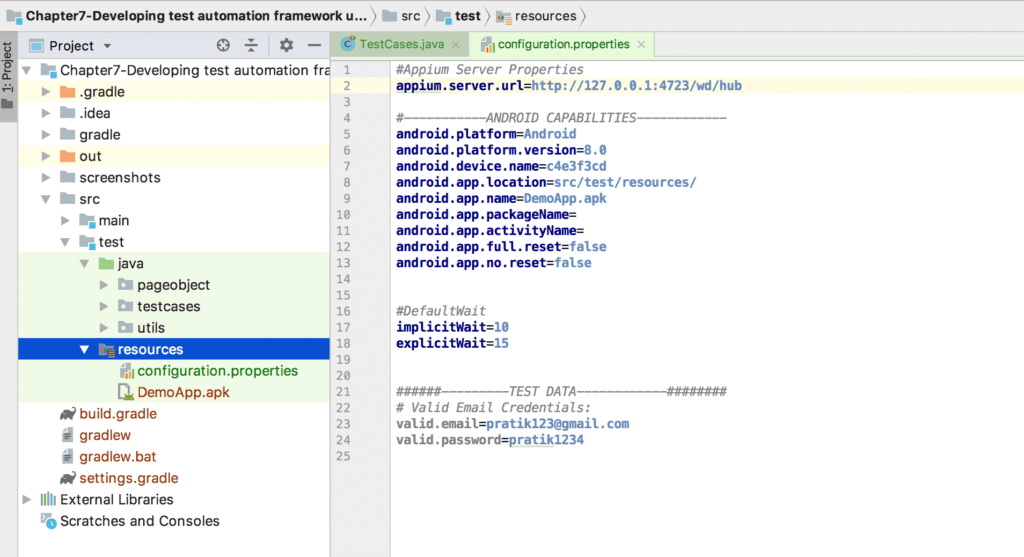
Figure-14: configuration properties.
Goal: Provide a centralized way to read key-value pairs from configuration.properties (or other .properties files).
Why It’s Needed: Keeps your test code DRY (Don’t Repeat Yourself). Instead of re-writing file reading logic in multiple places, you only implement it once. Makes it easy to update or extend configuration access in the future (e.g., adding environment-specific properties).
Goal: Handle different types of waits (implicit, explicit, fluent) to synchronize your test scripts with the UI loading times.
Why It’s Needed: Avoids flaky or brittle tests by introducing proper wait conditions (e.g., wait until a new element appears on the screen). Encapsulates repeated wait logic (e.g., for specific locators) into reusable methods.
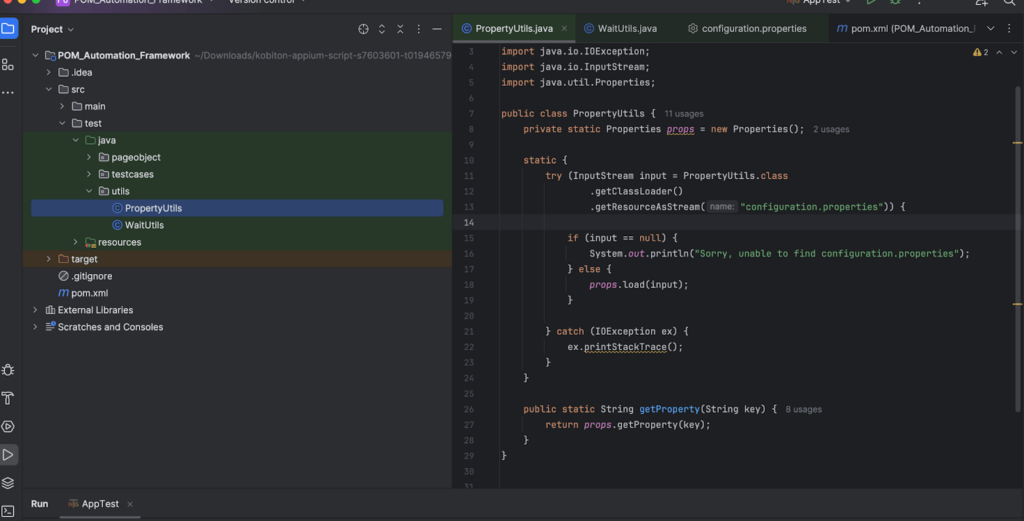
Figure-15: utils PropertyUtils.
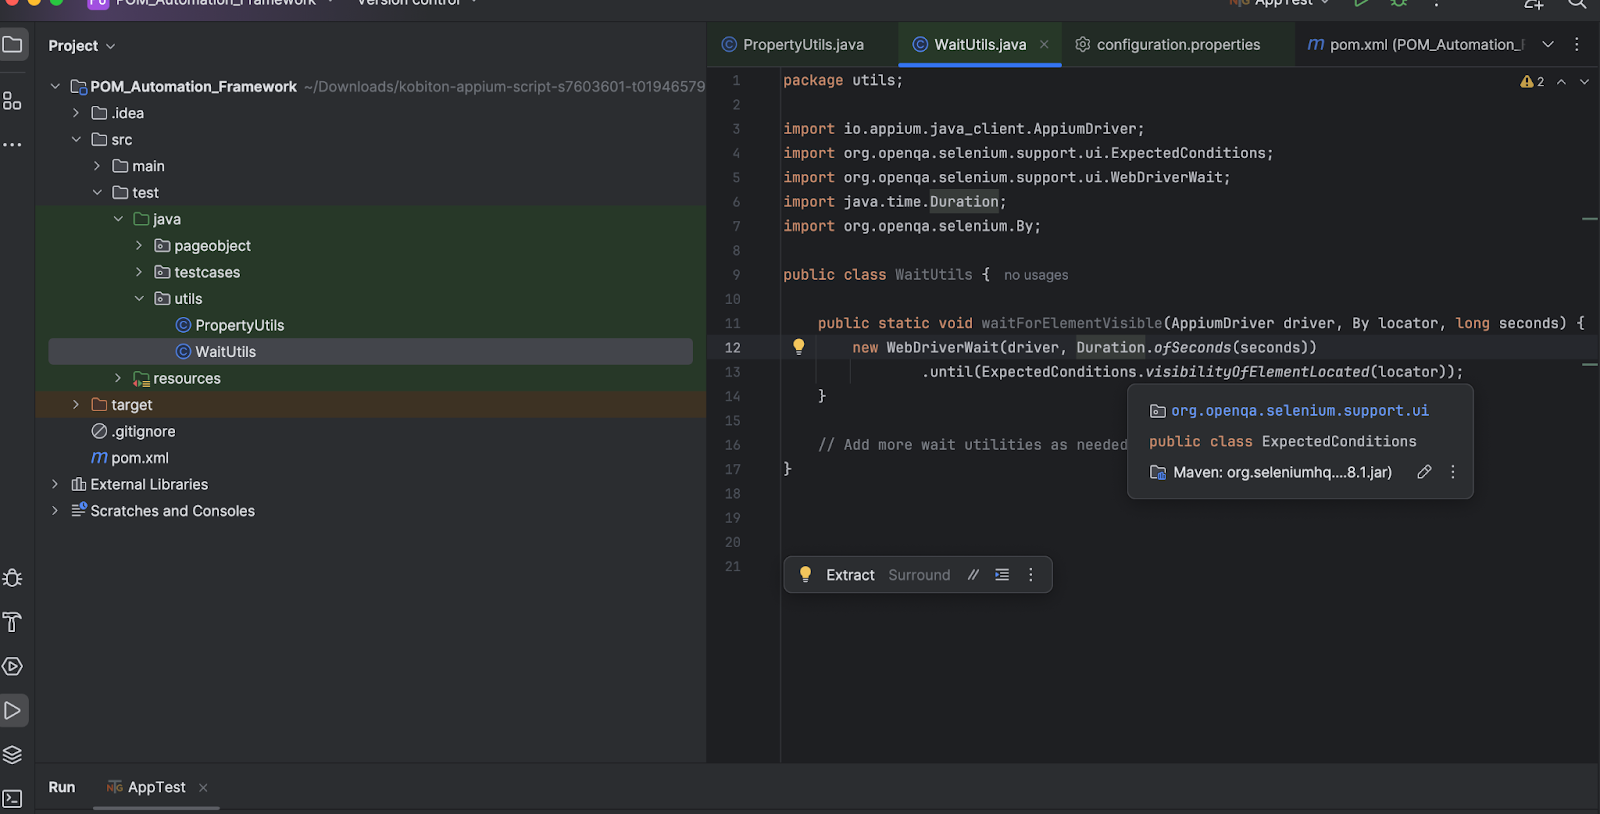
Figure-16: utils WaitUtils.
In a well-structured test automation framework (especially one following the Page Object Model), a BaseTestCase class serves several important purposes:
Here’s a quick overview of some commonly used TestNG annotations:
import org.testng.annotations.AfterMethod;

import org.testng.annotations.BeforeMethod;

import org.testng.annotations.Test;

public class TestCases {

    @BeforeMethod

    public void setUp() {

        System.out.println("Before Method executed..!");

    }

    @Test

    public void test() {

        System.out.println("Test");

    }

    @AfterMethod

    public void tearDown() {

        System.out.println("After Method executed..!");

    }

}Have a look at the below screenshot to get the idea how to execute the test case and refer to the second screenshot for output of the above program.
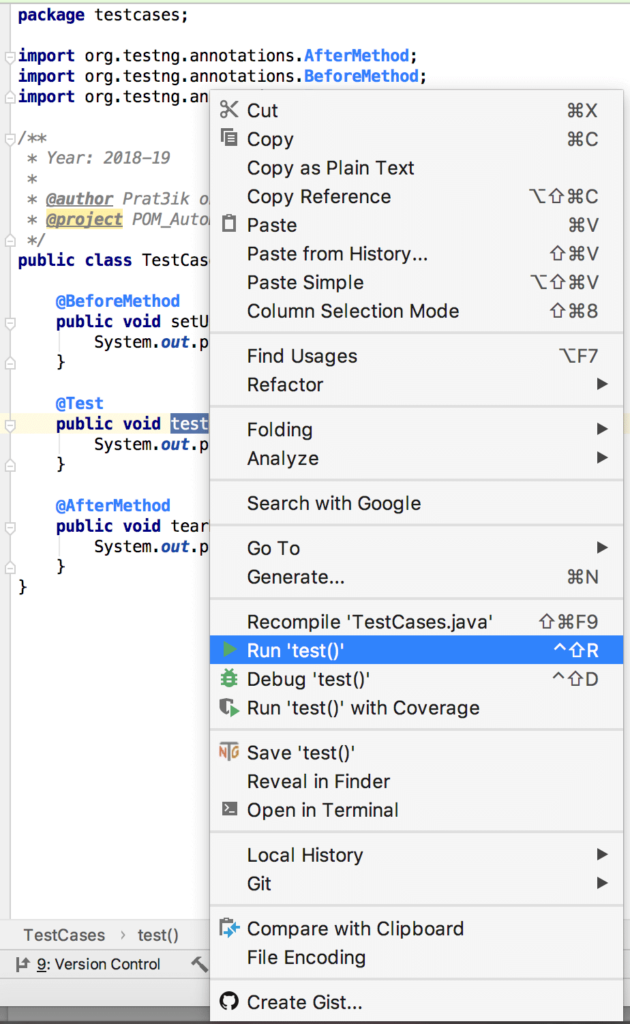
Figure-17: Execute the TestNG test.
You can learn more about TestNG Annotations here: https://www.tutorialspoint.com/testng/testng_basic_annotations.htm
The idea is to put the code for creation of the WebDriver object inside @BeforeMethod, because we want the webdriver object in place before starting the test case(method). Please refer below code:
@BeforeMethod

public void setUpAppium() throws MalformedURLException {

    DesiredCapabilities capabilities = new DesiredCapabilities();

    setDesiredCapabilitiesForAndroid(capabilities);

    driver = new AppiumDriver(new URL(APPIUM_SERVER_URL), capabilities);

}

/**

 * It will set the DesiredCapabilities for the local execution

 *

 * @param desiredCapabilities

 */

private void setDesiredCapabilitiesForAndroid(DesiredCapabilities desiredCapabilities) {

String PLATFORM_NAME = PropertyUtils.getProperty("android.platform");

String PLATFORM_VERSION = PropertyUtils.getProperty("android.platform.version");

String APP_NAME = PropertyUtils.getProperty("android.app.name");

String APP_RELATIVE_PATH = PropertyUtils.getProperty("android.app.location") + APP_NAME;

String APP_PATH = getAbsolutePath(APP_RELATIVE_PATH);

String DEVICE_NAME = PropertyUtils.getProperty("android.device.name");

String APP_PACKAGE_NAME = PropertyUtils.getProperty("android.app.packageName");

String APP_ACTIVITY_NAME = PropertyUtils.getProperty("android.app.activityName");

String APP_FULL_RESET = PropertyUtils.getProperty("android.app.full.reset");

String APP_NO_RESET = PropertyUtils.getProperty("android.app.no.reset");

desiredCapabilities.setCapability(MobileCapabilityType.AUTOMATION_NAME, "uiautomator2");

desiredCapabilities.setCapability(MobileCapabilityType.DEVICE_NAME, DEVICE_NAME);

desiredCapabilities.setCapability(MobileCapabilityType.PLATFORM_NAME, PLATFORM_NAME);

desiredCapabilities.setCapability(MobileCapabilityType.PLATFORM_VERSION, PLATFORM_VERSION);

desiredCapabilities.setCapability(MobileCapabilityType.APP, APP_PATH);

desiredCapabilities.setCapability(AndroidMobileCapabilityType.APP_PACKAGE, APP_PACKAGE_NAME);

desiredCapabilities.setCapability(AndroidMobileCapabilityType.APP_ACTIVITY, APP_ACTIVITY_NAME);

desiredCapabilities.setCapability(MobileCapabilityType.FULL_RESET, APP_FULL_RESET);

desiredCapabilities.setCapability(MobileCapabilityType.NO_RESET, APP_NO_RESET);

        desiredCapabilities.setCapability(AndroidMobileCapabilityType.AUTO_GRANT_PERMISSIONS, true);

}

// To get Absolute Path from Relative Path

private static String getAbsolutePath(String appRelativePath){

    File file = new File(appRelativePath);

    return file.getAbsolutePath();

}

/**

* This will quite the android driver instance

*/

private void quitDriver() {

    try {

 	this.driver.quit();

} catch (Exception e) {

 e.printStackTrace();

}

}This code illustrates how you can leverage the @BeforeMethod and @AfterMethodto leverage WebDriver object creation and deletion.
Every Test Case class file extends the Above BaseTest Class file, so all the methods in the BaseTest class file are visible and applicable to extending classes(TestCases) and eventually you don’t need to provide any extra code at your TestCase level to manage the WebDriver creation and deletion. You just have to focus on Test methods creation on the TestCases.java file.
4. Add a BasePO Class under the pageobject package.
5. Below code is responsible to initialize the web elements:
private void initElements() {

   PageFactory.initElements(new AppiumFieldDecorator(driver, Duration.ofSeconds(IMPLICIT_WAIT)), this);

}Now every other Page Object class like LoginPO will extend the BasePO class, so the constructor of BasePO is always called first and initElements method will be called on BasePO constructor. In simple language, initElements will always called first whenever any Page Object class gets called.
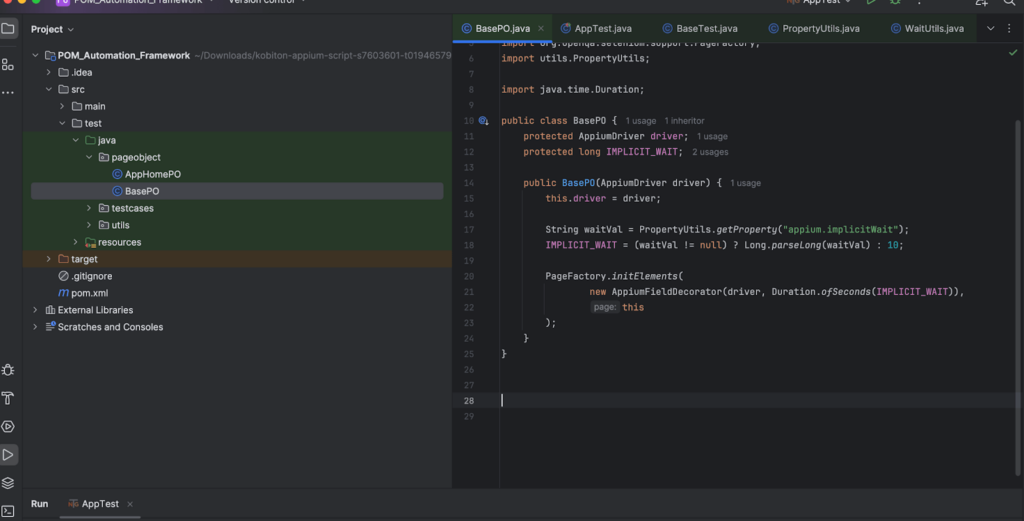
Figure-19: BasePO.
Here you can also see some objects and variables defined. IMPLICIT_WAIT is getting the values defined in the properties file of java which will be stored under resources/ dir.
In the Page Object class, you need to define the element’s locators using the below approach:
For iOS:
@iOSFindBy(xpath = “//XCUIElementTypeTextField”)

IOSElement emailTextField;For Android:
@AndroidFindBy(xpath = “//android.widget.TextView[@text=’Login Screen’]”)
AndroidElement loginScreenTextView;
In this example, we will work with the sample Android application and we will use the UiAutomatorViewer inspection tool as it is a speedy way to get the element’s locator.
In the below screenshot we get the locator for Login Screen Textview.

Figure-20: UiAutomatorViewer for Android Application.
And you can create methods in the Page Object class (like in LoginPO) for the element locators, for example, if you want to Tap on Login TextView, then you can create a method such as tapOnLoginScreenTextView().
HomeScreenPO.java
package pageobject;

import io.appium.java_client.AppiumDriver;

import io.appium.java_client.android.AndroidElement;

import io.appium.java_client.pagefactory.AndroidFindBy;

public class HomeScreenPO extends BasePO {

    public HomeScreenPO(AppiumDriver driver) {

        super(driver);

    }

    @AndroidFindBy(xpath = "//android.widget.TextView[@text='Login Screen']")

    AndroidElement loginScreenTextView;

    /**

     * This method will click on Login Screen textview.

     */

    public void tapOnLoginScreenTextView(){

        loginScreenTextView.click();

    }

}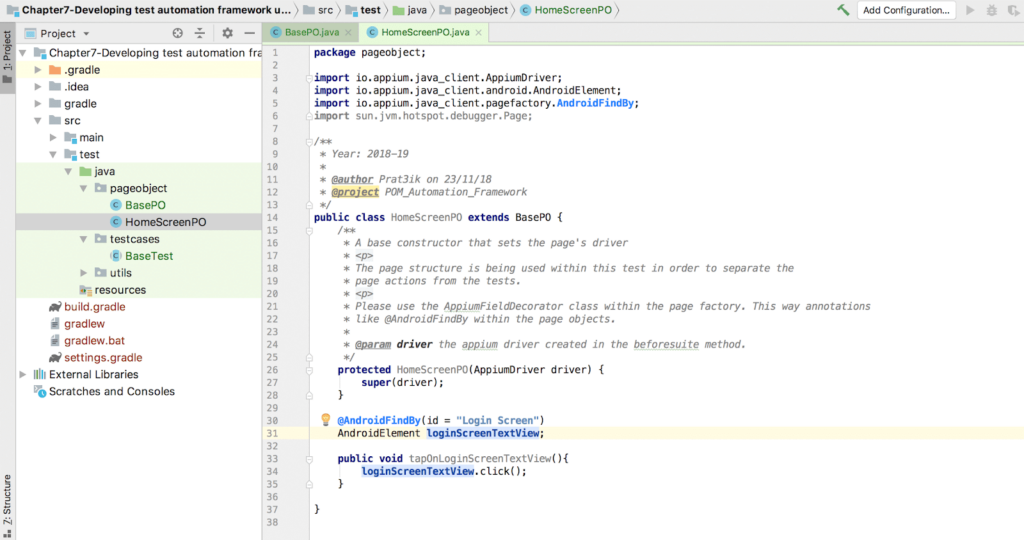
Figure-21: HomeScreenPO.png
6. Now that we have created our first Page Object class and added our first locator into it, we are ready to create a very basic simple test on TestCase
7. Before creating the test case you need to provide the correct path to the application. You can either:
In our example we will use the locally resided .apk file.
NOTE: Before executing the Test Case make sure that the Appium mobile automation test server is running on https://127.0.0.1:4723/wd/hub
TestCases.java

package testcases;
import org.testng.annotations.AfterMethod;
import org.testng.annotations.BeforeMethod;
import org.testng.annotations.BeforeTest;
import org.testng.annotations.Test;
import pageobject.HomeScreenPO;

/**
 * Year: 2018-19
 *
 * @author Prat3ik on 23/11/18
 * @project POM_Automation_Framework
 */
public class TestCases extends BaseTest{
    @Test
    public void test() {
        HomeScreenPO homeScreenPO = new HomeScreenPO(driver);
        homeScreenPO.tapOnLoginScreenTextView();
    }
    @BeforeTest
    @Override
    public void setUpPage() {
    }
}Execute the above test by selecting the test method > Right Click > Run ‘test()’
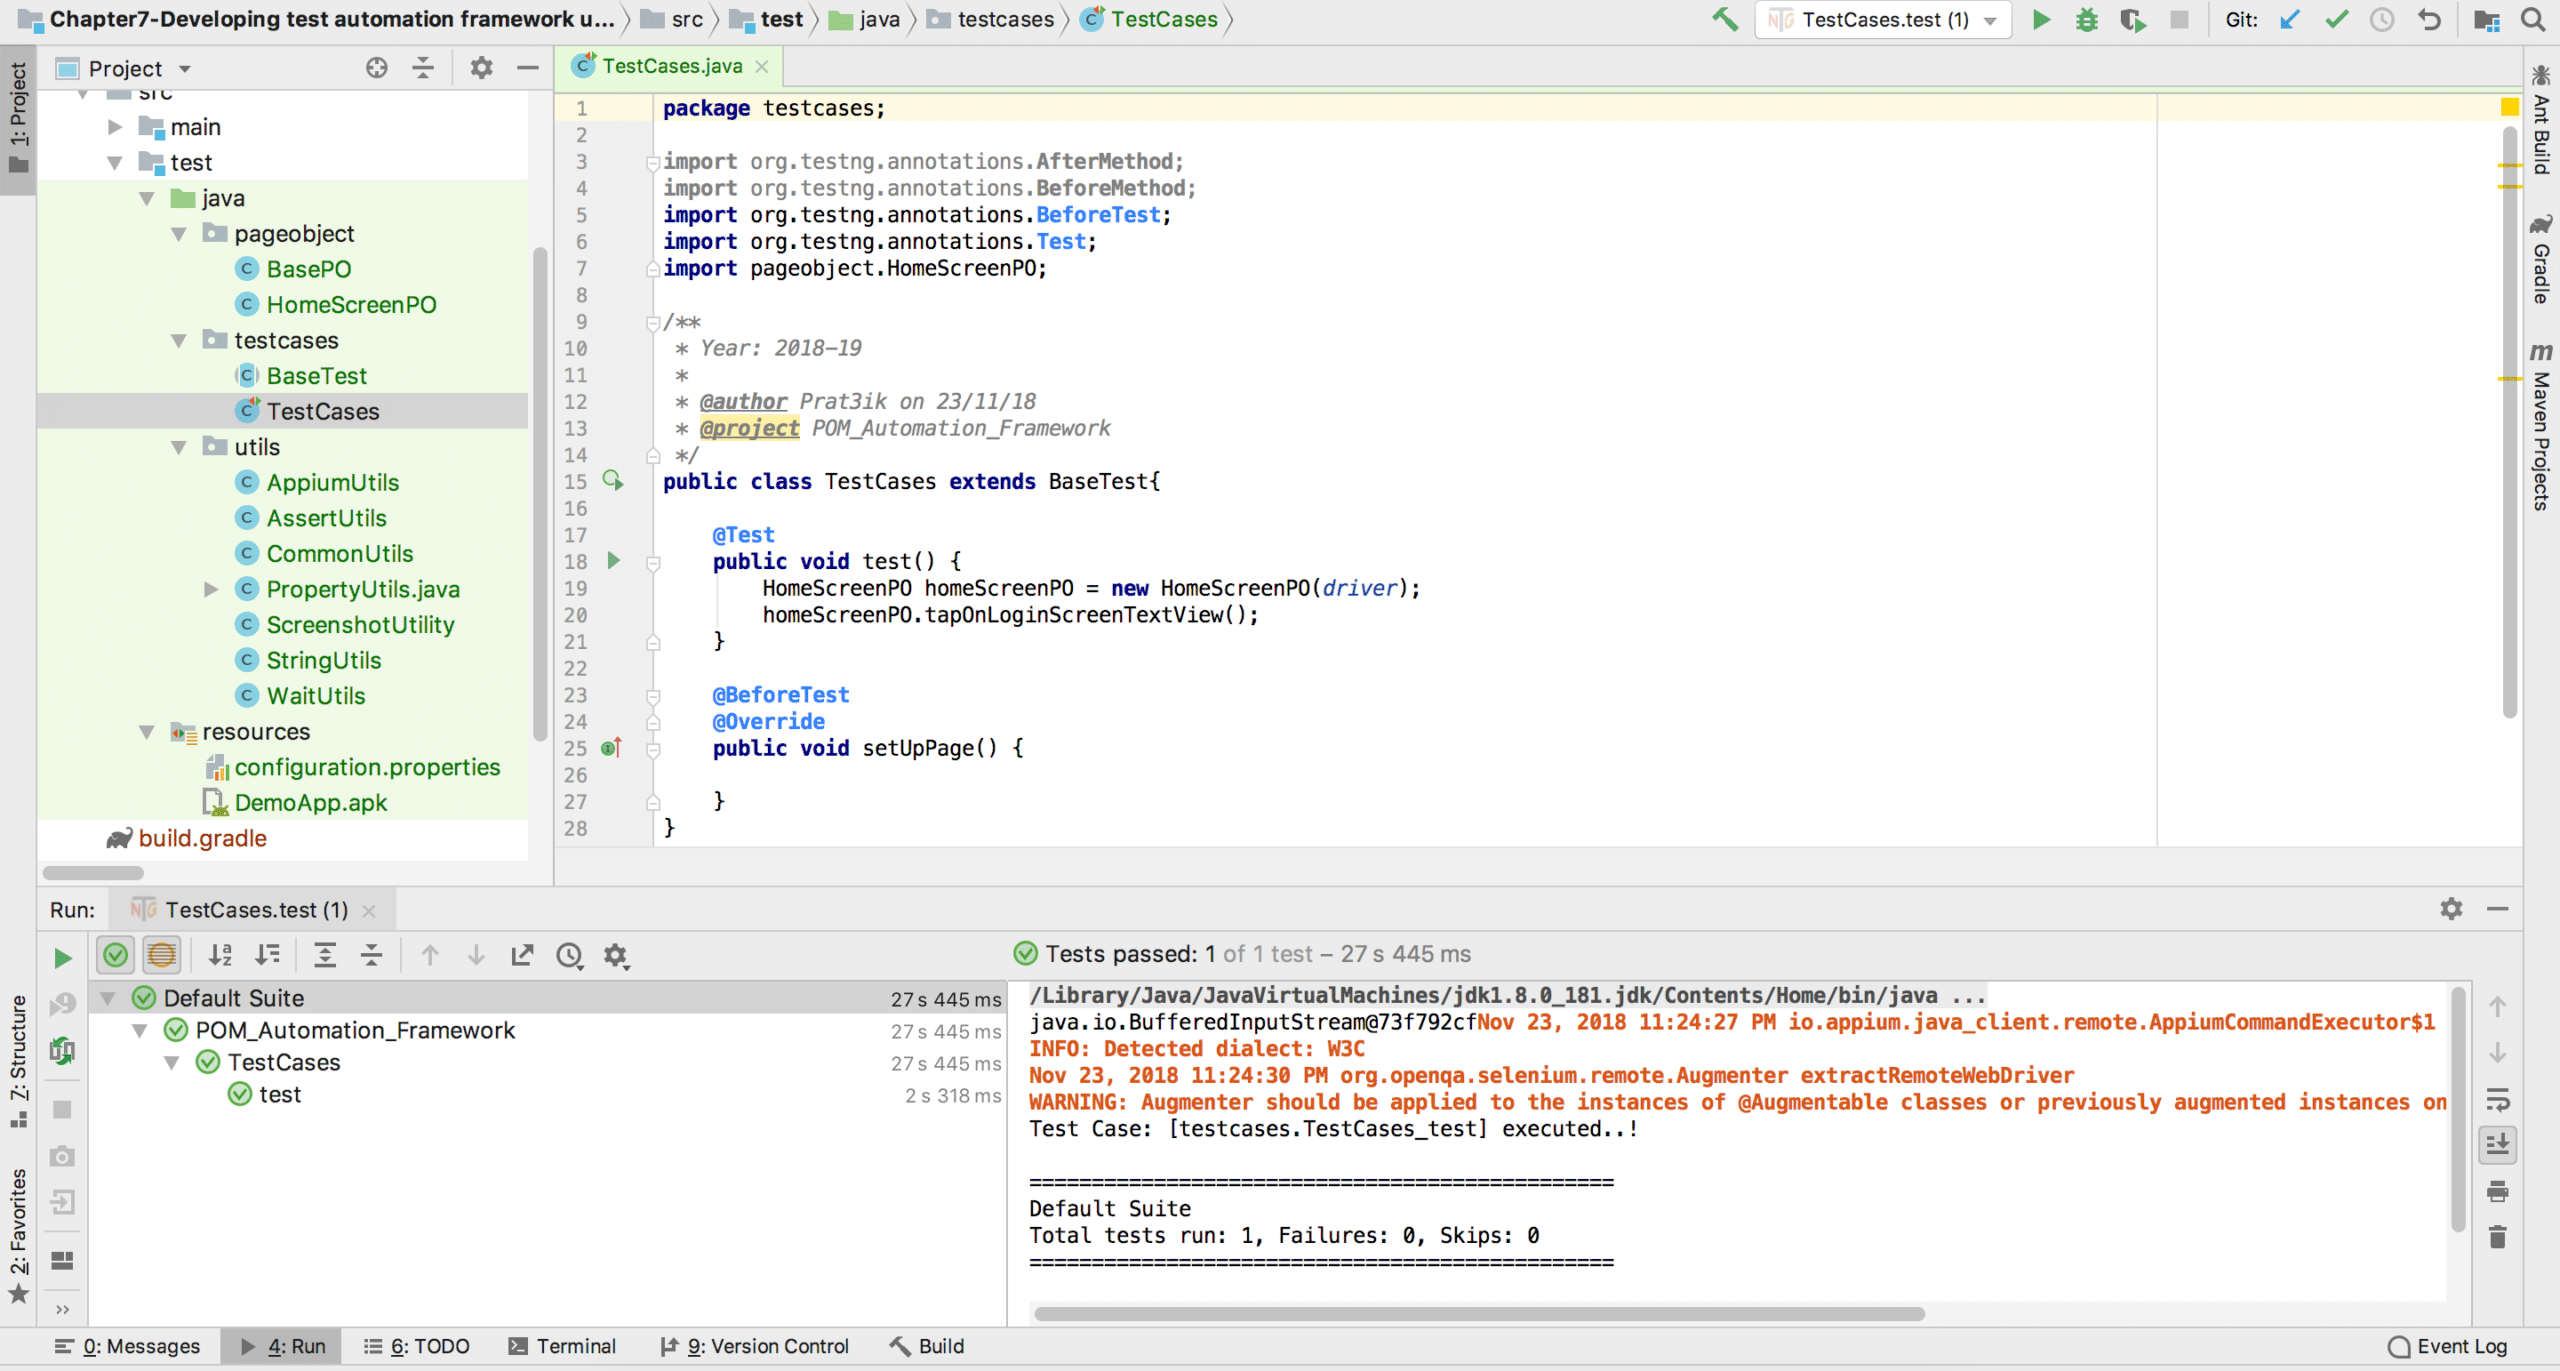
If you can execute the test case successfully, then you will get the above screenshot.
Once you’ve completed all the setup and run your test, you should see a success message or screenshot similar to the one shown above.
You can find the complete code for this framework here: (GitHub link)
It might seem like a lot of setup for a single test, but remember that this groundwork enables quick scaling. Adding new test cases now simply means creating a new Test class and leveraging your existing Page Objects and utilities.
Imagine your next release changes the UI and breaks a locator. With this framework, you only need to update that one locator in the relevant Page Object (e.g., HomeScreenPO.java if the login button has changed). There’s no need to hunt through every test file, which saves you significant time and frustration.
This maintainability is one of the greatest strengths of the Page Object Model: you spend time upfront, but you save exponentially more time when your app evolves (which it always does!).

Change the Locator: After getting the right locator you just need to change it with an old and incorrect locator, so In HomeScreenPO.java file you just need to replace the old locator with the new locator.
@AndroidFindBy(xpath = "//android.widget.Button[@text='Login Screen']")
AndroidElement loginScreenTextView;That’s it! As you can see, we just need to change the locator in the Page Object class and everything works normally again – that is the beauty of using this Appium framework! If you are not using the Appium framework, then you might need to change the locator from every affected place in code, which is not advisable and can also break something else.
Structuring your test cases like this will make for a far more maintainable test automation suite. Learning the rigors to do it following this design pattern will benefit you and your organization for years to come!