

May 28, 2021
iOS Automation Testing: Best Practices & Top Frameworks

Adam Creamer
Read More

Appium is perhaps the most popular and widely-used engine for mobile test automation. As Kobiton allows managing real mobile devices, users can easily setup and perform automation tests using Appium. This tutorial provides step-by-step guidelines on how to create and execute automated test scripts using Appium on Kobiton.
To create and execute test scripts on a mobile device using Appium, you need to install Node.js and npm packages. You should also be familiar with JavaScript to write test scripts.
In this tutorial, we use MacOS to create a test case and scripts for a web application running on Android devices.
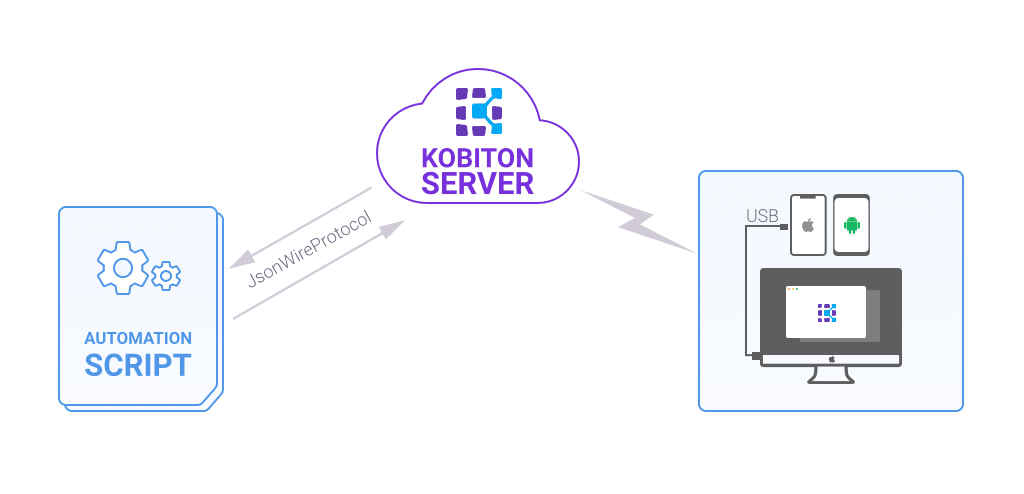
The diagram below shows the structure and connections among a Mac OS machine used to create test scripts, Android devices, and Kobiton server. Test scripts created from Mac are uploaded to Kobiton server which then executes the scripts on the target device.
You first need to install Homebrew if it is not available on your Mac. Homebrew is a software package used to simplify the installation of software packages on Mac OS. Open Terminal and type the following command:
ruby -e "$(curl -fsSL https://raw.githubusercontent.com/Homebrew/install/master/install)"
To check if Homebrew is installed correctly and which version it is, type the following command:
brew -v
Next, you have to install Node.js and npm. Type the following command to install Node.js and npm.
brew install node
To check if you have Node.js and npm installed, run this command in your terminal:
node -v
npm -v
You can also update the latest version of npm by using:
npm install npm@latest -g
In this tutorial, we create a test case to test the following scenario:
In this tutorial, we use a sample of test scripts provided in the Kobiton Sample Repository. Let’s download this sample test scripts from Github https://github.com/kobiton/samples
1. Open the Terminal application and enter the folder where you would like to copy the repository to, such as in “/Documents”.
cd ~/Documents/
2. Clone the repository. Run the following command to clone the repository to the current folder.
git clone https://github.com/kobiton/samples.git
3. Navigate into the “samples/javascript” folder (this is the test project folder).
cd samples/javascript
4. Then run the following command to install all libraries in the sample:
npm install
Inside the project folder, we can see android-web-test.js with the following contents:
import 'babel-polyfill'
import 'colors'
import wd from 'wd'
import {assert} from 'chai'
const username = 'your Kobiton username'
const apiKey = 'your Kobiton api key'
const kobitonServerConfig = {
  protocol: 'https',
  host: 'api.kobiton.com',
  auth: ${username}:${apiKey}
}
const desiredCaps = {
  sessionName: 'Automation test session',
  sessionDescription: 'This is an example for Android web',
  deviceOrientation: 'portrait',
  captureScreenshots: true,
  browserName: 'chrome',
  deviceGroup: 'KOBITON',
  deviceName: 'Galaxy',
  platformName: 'Android'
}
let driver
describe('Android Web sample', () => {
  before(async () => {
    driver = wd.promiseChainRemote(kobitonServerConfig)
    driver.on('status', (info) => {
      console.log(info.cyan)
    })
    driver.on('command', (meth, path, data) => {
      console.log(' > ' + meth.yellow, path.grey, data || '')
    })
    driver.on('http', (meth, path, data) => {
      console.log(' > ' + meth.magenta, path, (data || '').grey)
    })
    try {
      await driver.init(desiredCaps)
    }
    catch (err) {
      if (err.data) {
        console.error(init driver: ${err.data})
      }
     throw err
     }
  })
  it('should return the title that contains Kobiton', async () => {
    await driver.get('https://www.google.com')
    .waitForElementByName('q')
    .sendKeys('Kobiton')
    .sleep(3000)
    .waitForElementByName('btnG')
    .click()

    let msg = await driver.title()
    assert.include(msg, 'Kobiton - Google Search')
  })
  after(async () => {
    if (driver != null) {
      try {
        await driver.quit()
      }
      catch (err) {
        console.error(quit driver: ${err})
      }
    }
  })
})
This sample of test scripts uses several test frameworks and libraries, including Mocha, Chai, and WD. They are automatically installed with the command above.
Mocha – a JavaScript test framework for Node.js and the browser.
Chai – a BDD / TDD assertion library for Node and the browser.
WD – a library implementing the Selenium Webdriver protocol in Node.js
1. If you do not have a Kobiton account yet, go ahead to create a free trial account and sign in. It takes just a few moments.
2. After signing in, you should be on the Devices page. Hover over the device you want to test and select Show automation settings, as shown below.

3. Select NodeJS as the language.
4. Replace username and apiKey in the android-web-test.js file with the first and second part of the auth attribute (as shown below). This attribute is used for authenticating and accessing the Kobiton’s device.
As in the example, username and apiKey are set as follows:
const username = 'joeybrown'
const apiKey = 'cb73b9f7-da21-4e83-8ea7-71119749c038'
5. Replace the desiredCaps to indicate your target device to test.
const desiredCaps = {
  sessionName: 'Automation test session',
  sessionDescription: 'This is an example for Android web',
  deviceOrientation: 'portrait',
  captureScreenshots: true,
  browserName: 'chrome',
  deviceGroup: 'KOBITON',
  deviceName: 'Galaxy',
  platformName: 'Android'
}
Once you have everything set up, you can run the test project test simply by running the following command:
npm run android-web-test
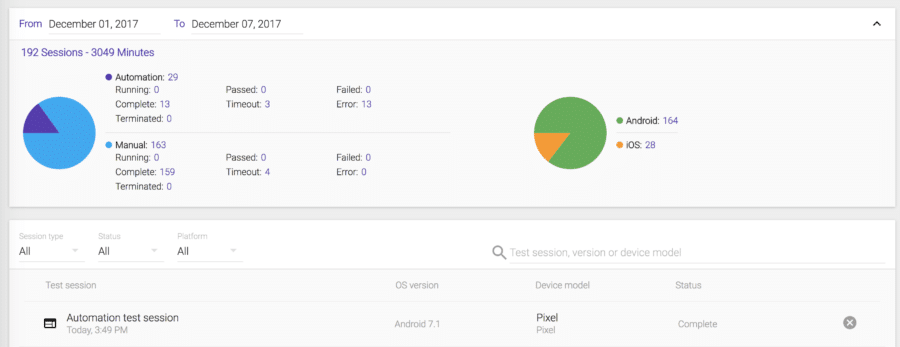
After the script is executed successfully in Terminal, you can access https://portal.kobiton.com/sessions to examine test results. This report shows an overview of test sessions and their results including the number of automated and manual test sessions and passed/failed statistics for each test type.
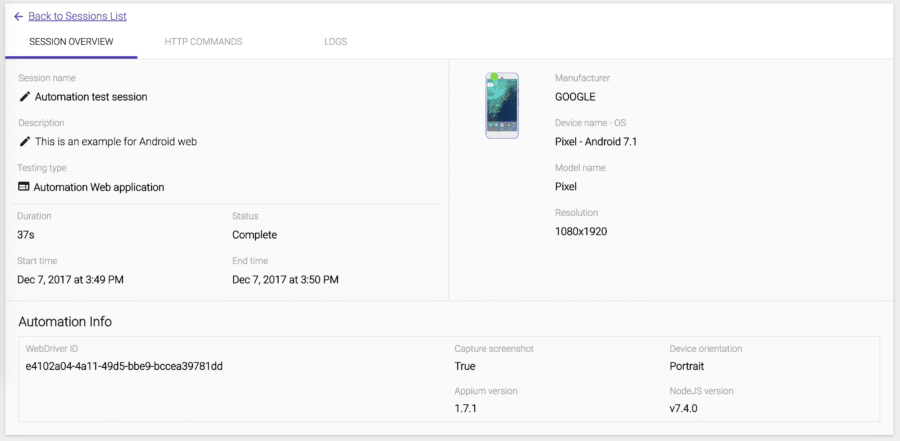
Clicking on the latest session, you can see its detailed information such as execution duration, status, and device.
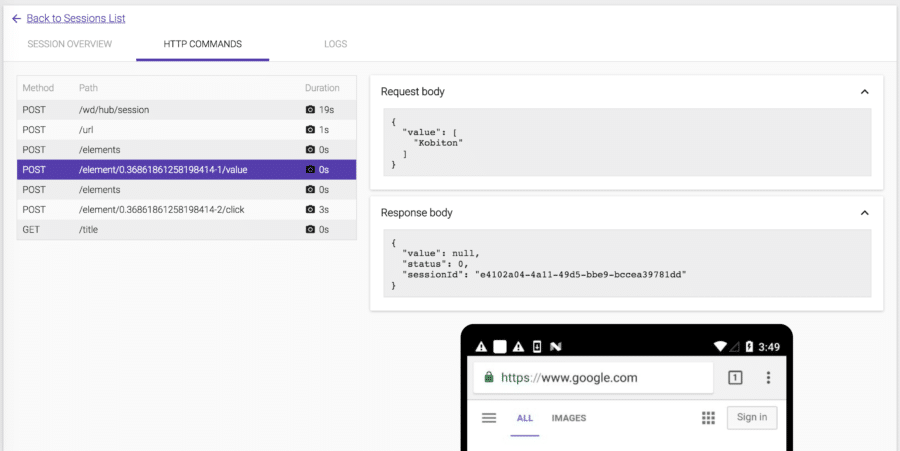
You can also view all HTTP requests by selecting the HTTP COMMANDS tab.
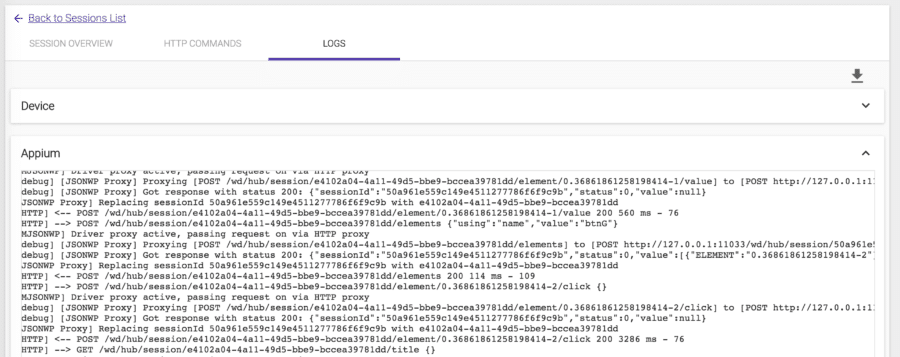
Testing logs are shown in the LOGS tab.
As a cloud-based mobile devices platform, Kobiton provides built-in capabilities for test automation using Appium. Its mobile devices are already configured to free you from many installations and environment preparation effort needed for both manual and automated tests.
Hopefully, you are now able to create other test projects using Appium and Kobiton on Mac. You can also perform similar steps to create and execute automated test cases from Windows.


