Navigating mobile app testing becomes easier when you can inspect an app’s UI elements before writing or debugging automation scripts. Appium Inspector provides a visual way to examine Android and iOS app elements, view their properties, and identify locators for automated tests.
Appium uses a modular, driver-based design: you install the core server once, then add only the drivers you need. That architecture arrived in Appium 2 and carries forward into Appium 3, which means Appium Inspector works the same way across both. Whether you are on Android or iOS, you can use Appium Inspector to inspect elements, verify attributes, identify locators, and troubleshoot sessions.
What changed in Appium 3
If you are upgrading, the good news is that Appium 3 is a far smaller jump than Appium 2 was. The driver and plugin model is unchanged, so your Inspector workflow stays the same. Five things do change:
- Node.js 20.19 and npm 10 are the new minimums. Check with node -v before upgrading.
- Security feature flags now need a driver prefix. adb_shell becomes uiautomator2:adb_shell.
- GET /sessions is replaced by GET /appium/sessions, and the new endpoint requires the session_discovery feature flag. The new endpoint also exists in Appium 2.19, so you can migrate before you upgrade.
- JSONWP parameters are gone. Appium 3 accepts W3C parameters only. In practice this means the appium: prefix on non-standard capabilities is mandatory, not optional.
- Deprecated legacy code has been removed. Anything Appium 2 warned you about is now an error.
Appium’s migration guide (https://appium.io/docs/en/3.4/guides/migrating-2-to-3/) covers the full list. For Inspector work specifically, the capability prefix is the change most likely to break your saved capability sets.
Upgrading from Appium 2 to Appium 3
If you are still on Appium 2, the upgrade is mostly painless with three traps that are worth knowing about, because none of them announce themselves clearly.
Update your drivers too. Appium 3 compatibility lives in the driver major versions xcuitest 12.x, uiautomator2 8.x. Because appium driver update installed applies only minor and patch versions, it can report success while leaving the compatibility warnings in place. If that happens, reinstall the drivers fresh.
Check Node first
Appium 3 requires Node 20.19+ and npm 10+. Appium 2 ran on Node 14, so if you have never upgraded Node, this is what will stop you.
node -v && npm -v
Upgrade the server
npm i -g appium
appium -v # 3.7.0 at time of writing
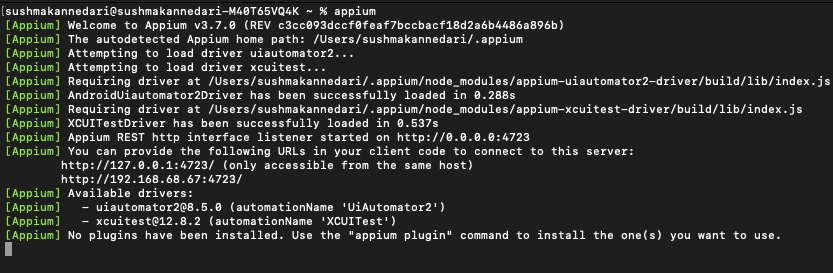
Confirm with a clean startup:
[Appium] Welcome to Appium v3.7.0
[Appium] Available drivers:
[Appium] – uiautomator2@8.5.0 (automationName ‘UiAutomator2’)
[Appium] – xcuitest@12.8.2 (automationName ‘XCUITest’)
Introduction to Appium Inspector
Inspector tools let engineers confirm that mobile app elements behave as expected. The ones in common use:
- Chrome and Safari DevTools, for web and hybrid contexts
- Appium Inspector, for native, hybrid, and mobile web across both platforms
- Android Studio’s Layout Inspector, for Android
- Accessibility Inspector in Xcode, for iOS
Appium Inspector’s advantage is that it covers Android and iOS from one interface, against the same driver stack your tests will use, so the locators you find are the locators your scripts will get.
What is Appium and what does it do?
Appium is an open-source mobile automation framework supporting multiple programming languages. Its purpose is to work around platform fragmentation when automating both Android and iOS apps through a single W3C WebDriver API.
Appium Inspector lets engineers examine an app’s UI hierarchy, the accessibility tree the automation driver actually sees rather than a browser DOM, for both platforms in one place. Native, hybrid, and web apps are all supported, using whichever drivers you have installed.
What is Appium Inspector and what is it for?
Appium Inspector is a standalone desktop application that lets developers and automation engineers inspect a mobile app’s UI on Android and iOS. You point it at an Appium server, start a session, and interact with UI elements in real time, reading their IDs, XPath, and accessibility attributes as you go.
Because drivers are installed separately, you only run what you need. Install the uiautomator2 driver for Android, xcuitest for iOS, or both.
How to download and install Appium Inspector
Appium Inspector is distributed separately from the Appium server. As of August 2026, the current release is 2026.7.1.
Download. Go to the Appium Inspector releases page (https://github.com/appium/appium-inspector/releases) and pick the installer for your OS:
- Windows: the .exe installer
- macOS: the .dmg, matching your Mac’s processor (Apple Silicon or Intel)
- Linux: the .AppImage package
Windows. Open the .exe and follow the prompts. If SmartScreen blocks it, open the file’s Properties and use the Unblock option, then launch again.
macOS. Open the .dmg and drag Appium Inspector into Applications. On first launch macOS may block it; open System Settings, then Privacy and Security, and allow the application.
A note on the web version. The Inspector was formerly hosted at inspector.appiumpro.com. The Appium team no longer has developer access to that site. It still loads, but it will not be updated and could be taken down without notice. Do not build a workflow on it. If you want a browser-based Inspector, use the Appium Inspector plugin (https://www.npmjs.com/package/appium-inspector-plugin) instead, which installs into your Appium server and has feature parity with the desktop app.
Install Appium before starting a session
The Inspector is only the interface. It still needs an Appium server and a platform driver to open a session.
npm i -g appium
appium driver install uiautomator2   # Android
appium driver install xcuitest # iOSAppium vs. UiAutomator2 vs. XCUITest
UiAutomator2 is Google’s UI testing framework for Android. XCUITest is Apple’s UI testing framework for iOS, written in Swift or Objective-C and run through Xcode. Both are powerful natively, and both are what Appium drives underneath: the uiautomator2 and xcuitest drivers are wrappers around them.
The difference is scope. Writing directly against UiAutomator2 or XCUITest means maintaining two separate suites in two languages. Appium gives you one API, one language, and one suite across both platforms, at the cost of a layer of indirection.
What about Appium Studio?
Appium Studio was a commercial IDE built by Experitest, later acquired and now maintained by Digital.ai. It is currently in maintenance mode and classified as a legacy product, receiving only critical bug fixes rather than new development.
If you are evaluating tooling in 2026, it is not a live alternative to weigh against open-source Appium. Teams looking for a GUI layer, managed devices, or enterprise support are generally better served by a current device cloud than by adopting a product in maintenance mode.
When to use Appium Inspector
The tool is most useful for:
- Identifying elements and reading their attributes
- Generating and validating XPath expressions and accessibility IDs
- Building automation scripts against real locators rather than guesses
- Cross-platform work, where one interface covers both platforms
- Debugging a failing session by seeing what the driver actually sees
Key features
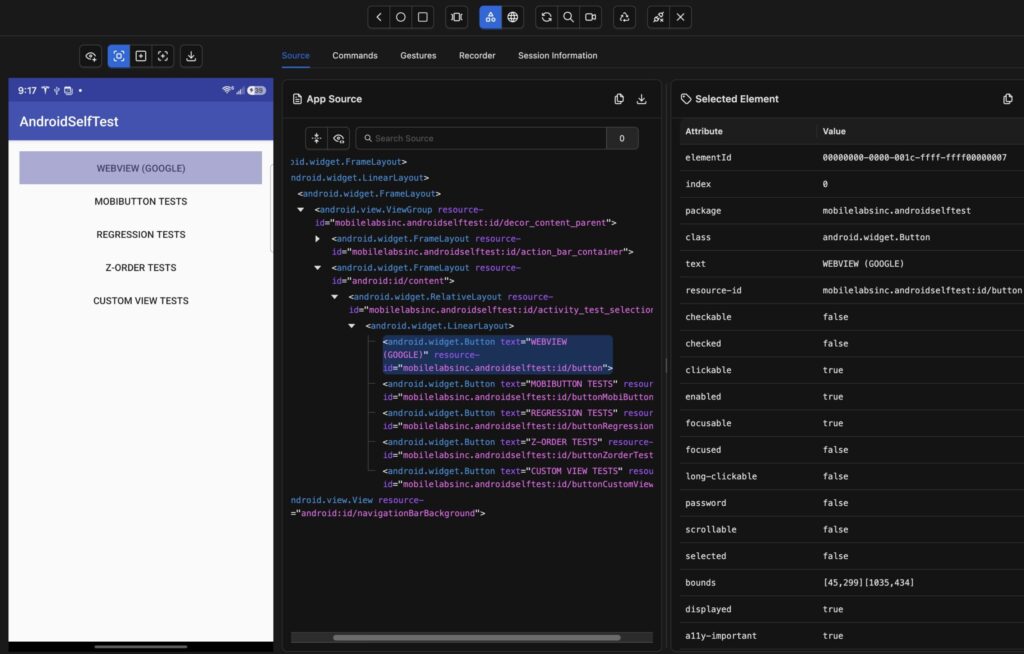
Element identification and attribute verification. The GUI shows element properties such as text, resource-id, accessibility identifier, bounds, and class, so you can confirm what is available before you commit to a locator.
Locator generation. The Inspector suggests accessibility IDs, IDs, and XPath expressions for any selected element. Prefer the first two. XPath is a fallback, and on iOS it is noticeably slower than a predicate string.
Session debugging. Screenshots, the live source tree, and the ability to interact with the app directly make it far quicker to work out why a locator is not resolving.
Getting started in five steps
1. Install Appium and a driver. Run npm i -g appium, then appium driver install uiautomator2 for Android or xcuitest for iOS.
2. Start the Appium server. Run appium in a terminal. Only the drivers you installed load, so startup stays fast.
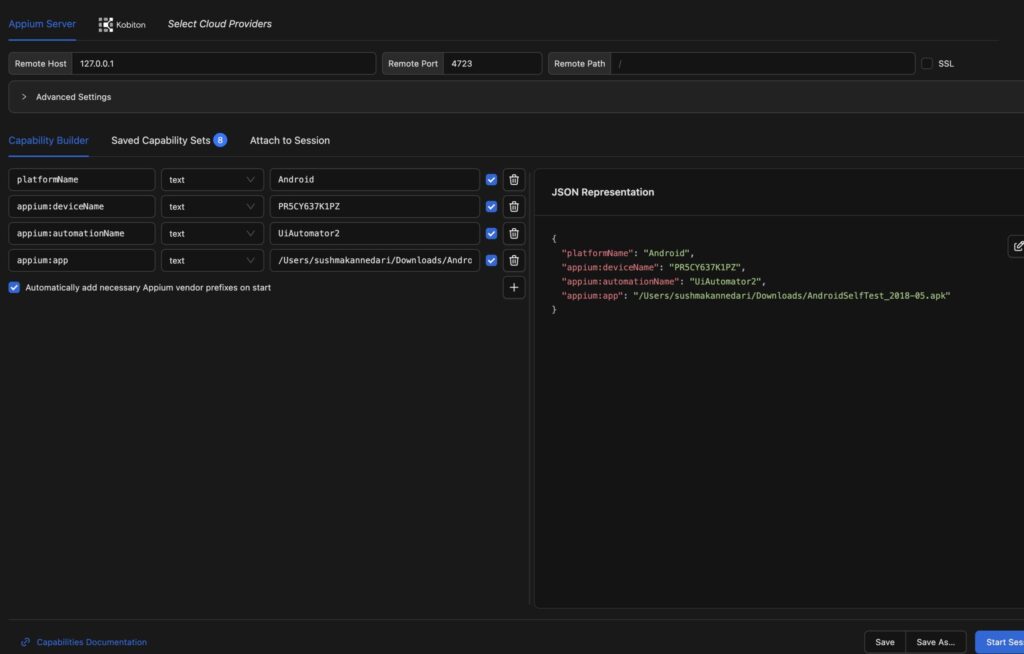
3. Connect the Inspector. Set the remote host to 127.0.0.1 and the port to 4723. Testing in the cloud? Point it at your Kobiton endpoint instead.
4. Set desired capabilities. Enter platformName, appium:deviceName, appium:automationName, and your app path. Save the set to reuse it.
{
  "platformName": "Android",
  "appium:deviceName": "PR5CY637K1PZ",
  "appium:automationName": "UiAutomator2",
  "appium:app": "/path/to/app.apk"
}Note the appium: prefix on every non-standard capability. This was recommended in Appium 2 and is required in Appium 3. Saved capability sets from older setups are the most common thing to break on upgrade.
5. Start a session and inspect. Click Start Session, then tap any element to read its ID, XPath, and accessibility attributes.
On iOS, lean on accessibility IDs and predicate strings rather than XPath, which is slow and brittle against the XCUITest hierarchy. Make sure the xcuitest driver is installed and your device or simulator is provisioned for automation before starting.
Troubleshooting common issues
Session will not start. Check the server is running and that the Inspector’s host and port match it (127.0.0.1, 4723). A mismatch is the most common cause.
“No driver found,” or the platform will not load. Install the driver for that platform, then restart the server.
Capabilities rejected. On Appium 3, check every non-standard capability carries the appium: prefix and that automationName is present. Both are mandatory now.
Element not found, or the source tree looks empty. Give the app time to finish rendering before refreshing the source. If the element still does not appear, it may be inside a WebView. Switch context in the Inspector to reach it.
A security feature stopped working after upgrading. Appium 3 requires driver prefixes on feature flags. adb_shell becomes uiautomator2:adb_shell.
Limitations
- Hybrid and WebView inspection requires context switching and is less smooth than native inspection.
- You need a working Appium server and driver setup before the Inspector is any use.
- The Inspector shows a static snapshot. Elements that appear during animation or scroll may need a manual refresh to show up.
Best practices
Prefer stable locators. Accessibility ID first, then resource-id or name. Reach for XPath only when nothing else exists, and anchor it on attributes rather than position: //android.widget.Button[@text=’Submit’], never (//android.widget.TextView)[3].
Save your capability sets. Switching between devices and apps is where most session-start friction comes from.
Use the Page Object Model. Keeping locators out of test logic means an Inspector session gives you one file to update, not twenty.
Inspect on the device that fails. Locators that resolve on a Pixel 8 can miss on a smaller viewport. This is the main argument for inspecting against a real device cloud rather than one handset on your desk.
Using Appium Inspector with a cloud device
You can point Appium Inspector at a cloud provider instead of a local server, which lets you inspect apps on devices you do not own. With Kobiton, set the remote host to your cloud endpoint, start a session, and inspect on real iPhones and Android phones. This is useful when reproducing an issue on a specific device or OS version.
Kobiton supports Appium, Espresso, and XCUITest. Try it with a free demo.