
Real device coverage shouldn’t require a physical lab. Between procurement delays, device fragmentation, and the operational burden of maintaining a rack of phones and tablets, most enterprise QA teams end up with either too few devices or none at all. The result is coverage exposure: shipping to users spread across Android 16 and 17 and iOS 26 and 27 when your regression suite only ever ran on a simulator.
This guide walks you through a complete workflow for running automated mobile tests on real Android and iOS devices using a Mobile Device Cloud, with no physical lab required. By the end, you’ll have executed your first Appium-based test session on real hardware, reviewed session evidence, triaged a failure, and wired the run into a CI/CD pipeline.
Who this is for: QA directors, test automation engineers, and mobile DevOps leads at organizations with a business-critical mobile app and a need for real-device coverage.
Prerequisites: A signed APK (Android) or IPA (iOS) build artifact, an existing Appium test project or a completed manual session you can convert, and either a local machine or a CI environment to act as your test runner.
Expected time: 60 to 120 minutes for your first run, depending on how test-ready your artifacts are.
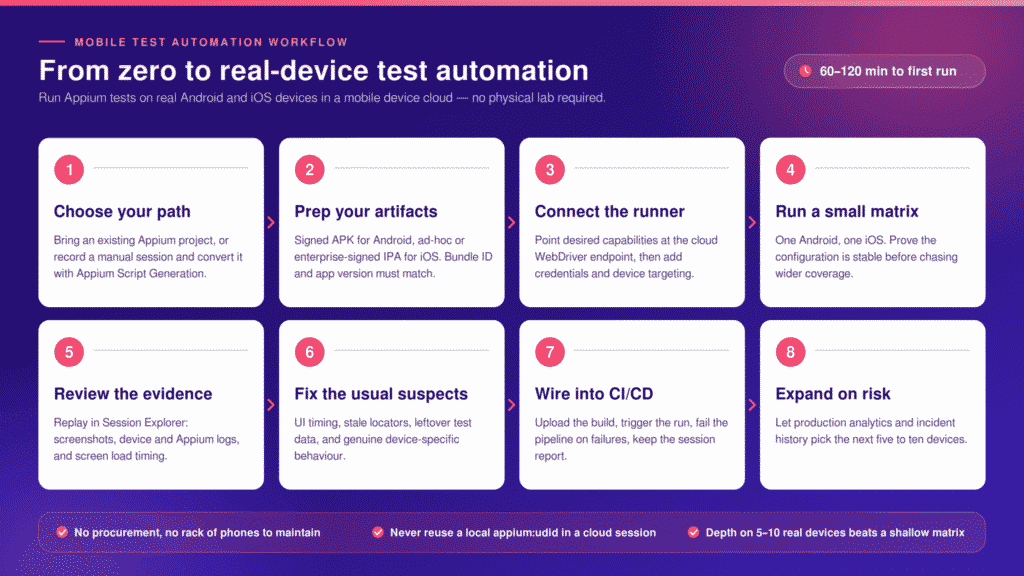
Step 1: Choose your automation path before writing a single line
Two paths get you to your first automated run on real devices.
Path A is for teams with an existing Appium project. You already have test code. The work here is configuring capabilities to point at a cloud endpoint instead of a local device.
Path B is for teams where authoring is the real bottleneck. You don’t have test code yet, but you can record a manual session and convert it. Kobiton’s Appium Script Generation feature automatically generates Appium scripts from a manual test session, so a tester who can walk through a user flow manually can produce a working script without writing automation from scratch.
For Path A, confirm you have: your test code, dependencies resolved, and a baseline run passing locally or on a connected device.
For Path B, confirm you have: a completed manual session recorded against your app, and access to Appium Script Generation in your Kobiton workspace.
Step 2: Prepare your app artifacts for real device execution
Android runs require an APK built in release or debug-signed mode, depending on your platform’s acceptance. iOS runs require an IPA that is either ad-hoc or enterprise-signed. A development-signed build is provisioned against a fixed list of registered device UDIDs, so it will not install on a cloud device that is not on that list. Use an ad-hoc profile that includes the cloud devices, or an enterprise-signed IPA.
For iOS, Appium uses XCUITest as the underlying driver for real device cloud iOS automation. Confirm your IPA’s bundle identifier matches what your test configuration expects. Mismatches here are one of the most common causes of session failures that look like infrastructure errors but are actually packaging problems.
Common pitfalls to fix before uploading:
- Android: wrong build type (unsigned release APK, or a build that requires Play Store installation)
- iOS: missing or expired provisioning profile, mismatched bundle ID between IPA and capabilities
- Both platforms: app version in the artifact doesn’t match the version your test locators were built against
Step 3: Connect your test runner to a real-device cloud
The execution model is straightforward. Your local machine or CI agent sends a WebDriver session request to Kobiton’s Appium endpoint at. Kobiton allocates a physical device from the pool, installs the build you uploaded to the Apps Repository, and streams video, screenshots and device logs back as the session runs. You never touch the hardware, you never wait on procurement, and the device is released back to the pool the moment the session closes.
To configure this, you’ll set three things in your Appium desired capabilities:
- The remote WebDriver URL pointing to your cloud provider’s endpoint
- Your Kobiton username and API key, passed either as capabilities or inline in the WebDriver URL
- Device-targeting capabilities: platformName, deviceName or a wildcard device query, platformVersion, and app pointing to your uploaded artifact
A minimal capability block looks like this:
- Open the page in a browser and confirm whether readers see one block or two.
- If two are visible, delete the second instance in the CMS and republish.
- If only one is visible, check another guide page that contains a code block. If the duplication appears there too, it is a site-wide template behaviour rather than an article defect — log it for the web team.
{
  "platformName": "Android",
  "appium:deviceName": "Galaxy S25",
  "appium:platformVersion": "16",
  "appium:app": "kobiton-store:v<your-app-version-id>",
  "appium:automationName": "UiAutomator2",
  "kobiton:sessionName": "Automated regression - real device",
  "kobiton:deviceGroup": "KOBITON"
}Your app version ID appears in the Apps Repository in the Kobiton Portal once the upload finishes — it is a number, so the capability resolves to something like kobiton-store:v722859. Kobiton also accepts a direct download URL in the same field if your build lives in an artifact store rather than the Apps Repository. The WebDriver endpoint is https://<username>:<apiKey>@api.kobiton.com/wd/hub, and your API key is generated under your profile in the Portal.
For iOS, swap platformName to "iOS", set automationName to "XCUITest", and reference your uploaded IPA.
One warning worth emphasizing: do not carry over appium:udid values from local device configurations. A UDID captured from a device plugged into your machine will not resolve to a cloud device, and the session will fail or route unpredictably. Kobiton supports two deliberate selection methods instead a flexible device query using appium:deviceName with a wildcard, such as Galaxy*, which lets Kobiton allocate any matching free device, or a specific Kobiton device UDID when a test has to run on one exact unit. Use the wildcard query for suites that need throughput, and the explicit UDID when you are reproducing a device-specific defect.
Step 4: Run your first session against a small device matrix
Start with one Android device and one iOS device. The goal at this stage is proving your configuration is stable, not maximizing coverage.
Upload your APK and IPA to your Mobile Device Cloud workspace. In Kobiton, the Mobile Device Cloud gives you on-demand access to real devices with broad OS coverage, so you can target a specific model and OS version without owning the hardware.
Trigger your test run. Kobiton executes sessions in parallel across your device matrix by launching concurrent WebDriver sessions, each targeting a different device. Once you are past the initial stability check, running two or three devices per OS simultaneously is the practical way to widen coverage without extending the wall-clock time of the run the suite finishes in roughly the time the slowest single device takes, not the sum of all of them.
Checkpoint: your session starts, the app installs, your test steps execute, and the session closes with a status. You should see session evidence available (video, screenshots, and logs) before moving on.
If you do not have a workspace yet, you can start testing for free and have your first real-device session running in minutes no procurement, no lab, no hardware.
Step 5: Review session results to pinpoint failures
Open the session in Kobiton’s Session Explorer. Session Explorer captures and surfaces issues from a test session, including automatic screen load time measurement. Use it to replay the execution step by step rather than guessing from a stack trace.
Look for three things:
- Visual evidence: Does the screenshot at the point of failure match what you expected? An unexpected modal, a loading spinner that didn’t dismiss, or a layout shift often shows up here before it appears in logs.
- Log output: Device-level and Appium server logs tell you whether a command was received, what the driver returned, and where the session diverged from your intent.
- Timing signals: Screen load time data helps you distinguish a slow app from a broken test. A 4-second wait on a UI element isn’t always a bug; sometimes it’s a performance issue in the app itself.
After reviewing session evidence, you should be able to answer one question with confidence: is the failure in my app, or in my test script?
Step 6: Fix the most common failure types
Most first-run failures on real devices fall into four categories.
Element not found due to UI timing. The test tried to interact with an element before it finished rendering. Fix: replace fixed sleeps with explicit waits tied to element visibility or interactability.
Stale locators. Your selectors were built against an older app version, and a UI change has broken them. Fix: Kobiton’s Appium Self-Healing detects the broken locator mid-session and substitutes a working alternative, so a routine UI change does not fail the run or block the pipeline behind it. Use that to keep the suite green while you catch up, then use Kobiton’s built-in element inspector to extract current locators from a live session and update the test code permanently.
Flaky test data. A test that passed once fails on retry because it left data in a modified state. Fix: add a precondition step that resets the app state before the core test logic runs.
Device environment differences. Behavior on a physical Samsung device running Android 16 can differ from what a Pixel device on Android 17 does.
Once you’ve applied a fix, rerun the same test against the same device before expanding to the full matrix.
Step 7: Wire the run into CI/CD
Manual runs confirm your setup works. CI/CD integration is what makes it operational.
Connect your pipeline (Jenkins, GitHub Actions, GitLab CI, or similar) to your device cloud by adding a step that uploads your latest build artifact and triggers a test run via the cloud’s API or CLI. Configure the pipeline to fail on test failures and to capture the session report as a build artifact.
Kobiton integrates directly into the DevOps toolchain rather than requiring you to build the integration yourself see Kobiton’s integrations for the current list. On Jenkins specifically, the Kobiton plugin uploads your APK or IPA to the Apps Repository, creates a new app version, and exposes KOBITON_APP_ID, KOBITON_USERNAME and KOBITON_API_KEY as environment variables your script reads straight into its desired capabilities. That removes the custom upload-and-poll shell step most teams write first and then maintain forever.
With Jenkins, a typical setup involves a shell step that calls the cloud API to upload the APK or IPA, a second step that triggers the run and polls for completion, and a post-build step that pulls the session summary. The session evidence (logs, screenshots, video) is accessible in the same workflow where your team already reviews build status.
Checkpoint: a CI-triggered run should produce the same session evidence you reviewed manually in Step 5. If your team can triage a failure directly from the pipeline without switching tools, the integration is working correctly.
Step 8: Expand coverage based on actual risk
Once your first run is stable and automated, the expansion question is which devices to add next. The answer should come from two sources: your production analytics (which device models and OS versions your users actually run) and your incident history (which devices have generated bug reports or app store complaints).
Adding devices to your matrix should be deliberate, not exhaustive. Broad coverage with shallow test depth is less useful than targeted coverage on the five to ten devices that represent the majority of your user base. As your test suite grows, add devices that cover new OS versions, different screen densities, or manufacturer-specific behavior you’ve seen cause issues in production.
This approach avoids coverage exposure without creating an unmanageable matrix.
A note on security and hybrid labs
Removing the physical lab does not mean giving up control of it. Kobiton is SOC 2 Type II certified, and private and dedicated device options are available for teams with data residency, regulatory or compliance requirements the questions that tend to arrive from security review rather than from QA.
There is also a middle path. If specific hardware genuinely has to stay in-house a device wired to a payment terminal, a pre-release handset under NDA, a certified medical accessory Device Lab Management connects those local devices to the same Kobiton workspace. The same scripts, session evidence, and CI/CD pipeline cover both, so “we need a few devices on-prem” stops being a reason to maintain the other sixty.
What you accomplished
You ran automated mobile tests on real Android and iOS devices without building or managing a physical lab. You configured Appium capabilities for cloud execution, executed tests in parallel across a small device matrix, reviewed session evidence in Session Explorer to pinpoint a failure, applied a fix, and connected the run to a CI/CD pipeline.
From here, the logical next steps are converting additional manual sessions using Appium Script Generation, expanding your device matrix to cover your highest-risk OS versions and manufacturers, and establishing a team triage workflow around session evidence so failures get resolved faster with less back-and-forth.