Mobile app performance testing can get messy quickly. Teams may need to validate user flows, backend calls, device behavior, network conditions, metrics, baselines, automation, and debugging evidence before they can make a confident release decision.
A checklist helps keep that work grounded.
The goal is not to run every possible performance test before every release. The goal is to confirm that the right risks have been covered, the right conditions have been tested, and the results are detailed enough for the team to act on.
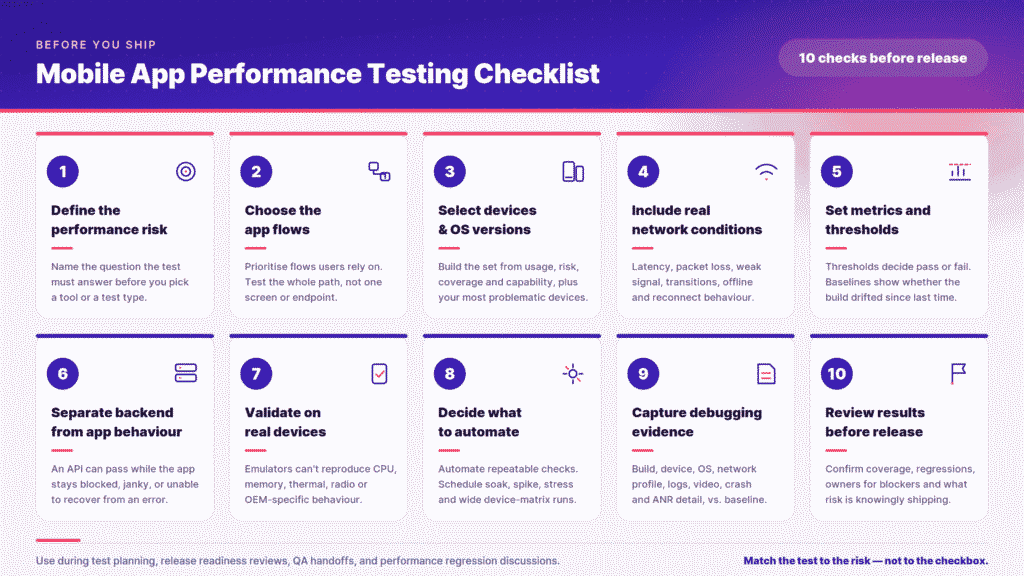
Use this mobile app performance testing checklist before release to validate the app flows, devices, networks, metrics, baselines, automation, and evidence that matter most for your product.
Why use a mobile app performance testing checklist?
A passing test does not always mean the app is ready for users. It may mean the test covered only one part of the performance picture.
A backend test may show that an API handled expected demand, but it does not prove the mobile app stayed responsive on a real device. A test on a stable network may not show what happens when latency increases or a request fails. A test on one current device may miss problems that appear on older models, lower-memory devices, or operating system versions still used by customers.
Mobile performance depends on the full environment around the app: device, OS, network, backend, test data, release changes, and user behavior. Android vitals tracks app quality signals such as stability, performance, battery use, crashes, ANRs, and excessive partial wake locks. Apple’s MetricKit collects performance data from real devices, including CPU usage, memory consumption, network activity, launch time, and disk I/O.
[Source: Android vitals]
[Source: Apple MetricKit]
A checklist helps teams avoid false confidence by forcing each result back to a practical question: did we test the right flow, under the right conditions, with enough evidence to decide what happens next?
How to use this checklist
Use the checklist during test planning, release readiness reviews, QA handoffs, or performance regression discussions. Teams do not need to check every item for every release. Instead, use it to confirm that the test plan matches the performance risk, covers the right app flows and devices, and captures enough evidence to support a release decision.
1. Define the performance risk
Start by identifying why the performance test is needed.
The risk might come from a new feature, a major release, a known regression, a high-traffic event, a customer escalation, a backend change, a new device requirement, or a performance issue that escaped in production.
Before choosing a tool or test type, define the question the team needs to answer:
- Can users complete this flow without delay or failure?
- Did this release make startup, rendering, or API response time worse?
- Does the app behave correctly on supported devices?
- Does performance hold up when the network changes?
- Can the backend support expected demand?
- Is there enough evidence to release, investigate, or block?
The checklist should make the test purpose explicit. A test tied to a clear risk is easier to design, easier to evaluate, and easier to explain when results come back.
2. Choose the app flows to test
Performance testing should begin with the app flows users depend on.
Metrics matter, but they need context. Startup time, API latency, memory usage, battery consumption, crash rate, and ANR rate are more useful when they connect to something users are trying to do.
Prioritize flows that are used often, carry business value, or create consequences when they fail. These may include app startup, login, account loading, search, checkout, payment, booking, messaging, media playback, data sync, or other product-specific workflows.
The checklist should also confirm that the test covers the full user path. Testing one endpoint or one screen may be useful, but it may not show whether the user can complete the whole flow. A checkout test, for example, should validate more than the payment API. It should show whether the user can move through cart review, authentication, payment submission, loading states, error recovery, and confirmation without confusion or duplicate actions.
3. Select devices and OS versions
Device selection should reflect real usage and real risk.
A useful device set usually comes from four inputs: usage, risk, coverage, and capability.
Usage tells you which devices customers actually rely on. Risk points to devices associated with crashes, ANRs, hangs, support tickets, or weaker hardware. Coverage keeps important OS versions, Android OEMs, and iOS generations represented. Capability adds devices needed for hardware-dependent flows such as camera, GPS, Bluetooth, biometrics, payments, wearables, or external hardware.
Android’s benchmarking guidance recommends running benchmarks on physical Android devices because emulators do not represent a realistic user experience and can produce numbers tied to the host machine rather than the device.
[Source: Android benchmarking in CI]
In one gaming customer conversation, the team described keeping both popular devices and “most problematic” devices in house, including devices associated with ANRs and crashes in their monitoring tools. That is the right instinct for performance testing. The device list should not only show what is popular. It should also show where performance problems are most likely to appear.
4. Include realistic network conditions
Mobile apps do not run on one clean connection.
Users move between Wi-Fi and cellular networks. They encounter latency, packet loss, weak connections, network transitions, congested public networks, and offline moments. Performance tests that run only on a fast, stable connection may miss the conditions that create real user frustration.
Network conditions can affect API latency, media loading, retries, timeouts, offline behavior, sync reliability, payload impact, perceived screen load time, and battery use.
Use the checklist to confirm that network conditions match the risk being tested. A media app may need playback validation under cellular conditions. A field app may need offline and reconnect behavior. A checkout or booking flow may need retry and duplicate-submission handling. A messaging app may need to preserve send, retry, and sync behavior when the connection changes.
The goal is not to simulate every possible network condition. The goal is to include the conditions most likely to affect critical flows.
5. Define metrics, thresholds, and baselines
Performance testing should produce a decision, not only a report.
Before running the test, define which metrics matter and what result is acceptable. Otherwise, the team may end up debating what the numbers mean after the test has already finished.
Useful metrics may include startup time, screen load time, API latency, p95 or p99 response time, error rate, crash rate, ANR rate, memory usage, CPU usage, battery consumption, frame rendering, jank, payload size, and transaction completion rate.
The checklist should connect each metric to the risk being tested. If the risk is slow startup, measure startup. If the risk is backend delay, measure API latency and error rate. If the risk is long-session degradation, measure memory growth, CPU, battery, stability, and crashes over time.
Grafana k6 defines thresholds as pass/fail criteria for test metrics. Thresholds help teams decide whether a result is acceptable, risky, or release-blocking.
[Source: Grafana k6 thresholds]
Baselines answer a related but different question. A threshold says whether the current result is acceptable. A baseline shows whether the app is performing better or worse than before. Android’s benchmarking documentation notes that benchmarks can run in CI to track performance over time and recognize regressions or improvements before release.
[Source: Android benchmarking in CI]
6. Separate backend/API performance from mobile app behavior
Backend performance and mobile app performance are connected, but they are not interchangeable.
A backend or API test can show whether services handle expected demand. It can measure latency, throughput, error rate, availability, payload behavior, and response time under load. That information is important, but it does not prove the mobile app stayed responsive while the flow ran.
The app still has to parse responses, render screens, handle retries, preserve state, prevent duplicate actions, and remain usable on the device. If the user cannot type into a field, tap a button, recover from a failed request, or continue to the next screen, the mobile experience has failed even if the backend responded correctly.
Use the checklist to confirm both layers where relevant:
- Backend or API performance is tested separately.
- The mobile client is validated during the same critical flow.
- The test checks whether the app remains responsive while API calls are in progress.
- Delayed responses, large payloads, retries, and errors are included when they affect the user flow.
This separation helps teams fix the right problem. A slow backend needs a different investigation than a blocked main thread, inefficient rendering, or device-specific memory pressure.
7. Validate performance on real devices
Real-device validation is especially important for performance-critical flows.
Emulators, simulators, and controlled environments are useful, but they cannot fully reproduce the hardware and operating system conditions users experience. Physical devices include real CPUs, GPUs, memory limits, batteries, thermal behavior, radios, sensors, touchscreens, and manufacturer-specific behavior.
Apple’s responsiveness guidance notes that code performing well on one hardware model can hang on another because devices have different hardware capabilities and performance characteristics.
[Source: Apple responsiveness / hangs]
Use the checklist to confirm that performance-critical flows are tested on physical devices, especially when results may be affected by memory, CPU, GPU, battery, thermal behavior, OS version, network radio, camera, GPS, Bluetooth, biometrics, payments, or other hardware-dependent behavior.
Real-device validation does not mean every test has to run on every device. It means the flows with the highest user or release risk should be validated in environments close enough to the real mobile experience to make the result useful.
8. Decide what to automate
Automation can make performance testing more consistent, but only when the test is repeatable, timely, and tied to a decision.
Some checks are good candidates for automation, such as startup checks, API performance checks, critical-flow regression checks, smoke performance tests, threshold-based checks, nightly runs, and release candidate validation.
Other tests may run less often because they take longer or require more controlled conditions. Stress tests, spike tests, soak tests, large-scale load tests, and broad device-matrix tests may be scheduled, triggered manually, or reserved for high-risk releases.
Grafana’s k6 automated performance testing documentation describes performance testing automation as a repeatable and consistent process across different stages of the development and release cycle. It also notes that automation can include CI/CD pipelines, nightly jobs, scheduled runs, and manual triggers, and that not every performance test is suited only for CI/CD or pass/fail release gates.
[Source: Grafana k6 automated performance testing]
A customer conversation showed this maturity path in practice. The team was already running regular performance tests with JMeter and wanted to move toward CI/CD, but first needed a stronger automation framework, stable test data, and more coverage in the sanity suite. Useful automation often starts with repeatable checks the team can trust, then expands as the workflow matures.
9. Capture evidence for debugging
A performance test should help the team understand what happened, not only whether the test passed or failed.
When a test result lacks context, teams can lose time debating whether the issue came from the app, backend, device, network, test data, automation script, or test environment. The checklist should confirm that results include enough evidence to support investigation.
Useful evidence may include:
- test steps
- app build
- device model and OS version
- network profile
- timestamps
- session video
- logs
- screenshots
- API details
- crash or ANR details
- memory, CPU, battery, or rendering data
- comparison against baseline results
This does not mean every test needs every artifact. It means the evidence should be detailed enough for the team to decide what to fix, what to retest, and whether the release can move forward.
10. Review results before release
The final checklist step is release review.
Before release, confirm that critical flows passed under the required conditions, known failures are documented, regressions have been reviewed against baselines, and blocking issues have clear ownership. Non-blocking issues should also be documented so the team knows whether to monitor, retest, or add follow-up work.
This review should answer a practical question:
Can the team explain why the app is ready to release, what risks remain, and what evidence supports that decision?
If the answer is unclear, the issue may not be the app alone. The test may need better scope, better conditions, clearer thresholds, stronger evidence, or a more relevant device set.
Download the mobile app performance testing checklist
Use the downloadable checklist to review performance testing coverage before release. It includes sections for performance risk, app flows, devices and OS versions, network conditions, metrics and baselines, backend/API performance, real-device validation, automation, debugging evidence, and release review.
The checklist can be used during test planning, release readiness reviews, QA handoffs, or performance regression discussions. It is designed to help teams ask better questions before the test runs and make better decisions when results come back.
Final takeaway
A mobile app performance testing checklist helps teams keep performance testing specific, realistic, and actionable.
The value is in making sure the test matches the risk, not just in checking every box for every release. When teams define the performance question, choose the right flows, include relevant devices and network conditions, set clear thresholds, and capture useful evidence, performance testing becomes easier to trust.
Specific tests with specific targets are more useful than a cloud of results no one can interpret. A checklist gives teams a practical way to keep the work focused before release pressure makes every decision harder.