")
Oct 8, 2018
Develop, Deploy, and Test Apps with Expo Development Client

Erin Bailey
Read More

Flutter is Google’s mobile app SDK for crafting high-quality native interfaces on iOS and Android in record time. Flutter works with existing code, is used by developers and organizations around the world, and is free and open source.
For users, Flutter makes beautiful app UIs come to life. For developers, Flutter lowers the bar to entry for building mobile apps. It speeds up the development of mobile apps and reduces the cost and complexity of app production across iOS and Android. For designers, Flutter helps deliver the original design vision, without loss of fidelity or compromises. It also acts as a productive prototyping tool.
To install and run Flutter, your development environment must meet these minimum requirements:
[crayon-6a560bde6461e011219772 inline="true" class="highlighter-rouge"]<code class="highlighter-rouge"><br />[/crayon]
[crayon-6a560bde64622935383898 inline="true" class="highlighter-rouge"]<code class="highlighter-rouge"><br />[/crayon]
[crayon-6a560bde64626993591565 inline="true" class="highlighter-rouge"]<code class="highlighter-rouge"><br />[/crayon]
[crayon-6a560bde6462a682495876 inline="true" class="highlighter-rouge"]<code class="highlighter-rouge">[/crayon]
[crayon-6a560bde6462e379087111 inline="true" class="highlighter-rouge"]<code class="highlighter-rouge"><code class="highlighter-rouge">[/crayon]
[crayon-6a560bde64631661078062 inline="true" class="highlighter-rouge"]<code class="highlighter-rouge"><code class="highlighter-rouge">[/crayon]
Clone alpha branch from Flutter repository using Git and add bin folder to your PATH.
[crayon-6a560bde64635041750165 inline="true" class="highlighter-rouge"]<code class="highlighter-rouge"><code class="highlighter-rouge">[/crayon]
|
1 2 |
<em>$ git clone https://github.com/flutter/flutter.git -b alpha $ export PATH=`pwd`/flutter/bin:$PATH</em> |
[crayon-6a560bde6463a651847427 inline="true" class="highlighter-rouge"]<code class="highlighter-rouge"><code class="highlighter-rouge">[/crayon]
The above command sets your PATH variable temporarily, for the current terminal window. You are now ready to run Flutter commands!
[crayon-6a560bde6463d077763472 inline="true" class="highlighter-rouge"]<code class="highlighter-rouge"><code class="highlighter-rouge">[/crayon]
Note: To permanently add Flutter to your path, see the reference https://flutter.io/setup-macos/#update-your-path.
[crayon-6a560bde64641210142035 inline="true" class="highlighter-rouge"]<code class="highlighter-rouge"><code class="highlighter-rouge">[/crayon]
[crayon-6a560bde64645778536775 inline="true" class="highlighter-rouge"]<code class="highlighter-rouge"><code class="highlighter-rouge">[/crayon]
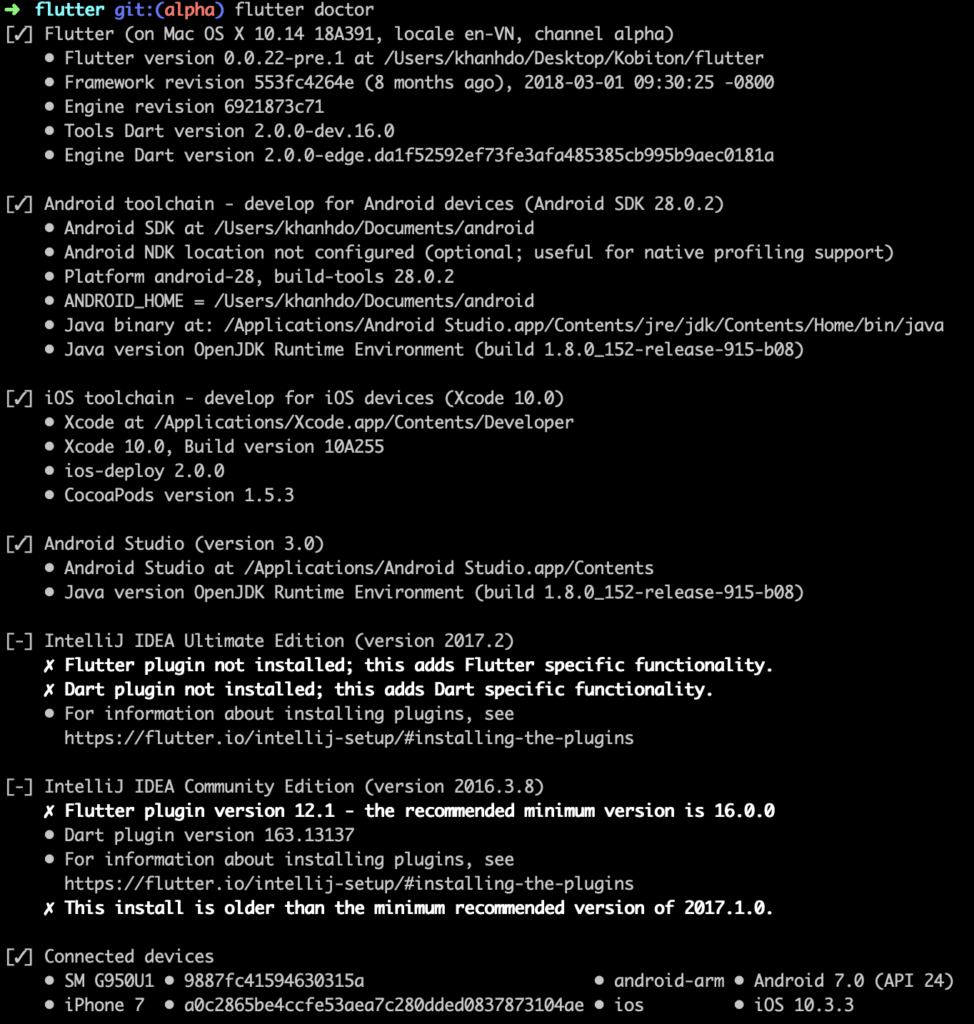
Run the following command to see if there are any dependencies you need to install to complete the setup:
[crayon-6a560bde64648609142142 inline="true" class="highlighter-rouge"]<code class="highlighter-rouge"><code class="highlighter-rouge">[/crayon]
|
1 |
<em>$ flutter doctor</em> |
[crayon-6a560bde6464d468851738 inline="true" class="highlighter-rouge"]<code class="highlighter-rouge"><code class="highlighter-rouge">[/crayon]
This command checks your environment and displays a report to the terminal window. The Dart SDK is bundled with Flutter; it is not necessary to install Dart separately.
[crayon-6a560bde64651505908449 inline="true" class="highlighter-rouge"]<code class="highlighter-rouge"><code class="highlighter-rouge">[/crayon]
For example:
[crayon-6a560bde64655156372528 inline="true" class="highlighter-rouge"]<code class="highlighter-rouge"><code class="highlighter-rouge">[/crayon]
[crayon-6a560bde64659360481351 inline="true" class="highlighter-rouge"]<code class="highlighter-rouge"><code class="highlighter-rouge">[/crayon]
[crayon-6a560bde6465d179432486 inline="true" class="highlighter-rouge"]<code class="highlighter-rouge"><code class="highlighter-rouge">[/crayon]
macOS supports developing Flutter apps for both iOS and Android. Complete at least one of the two platform setup steps now, to be able to build and run your first Flutter app.
[crayon-6a560bde64660065226216 inline="true" class="highlighter-rouge"]<code class="highlighter-rouge"><code class="highlighter-rouge">[/crayon]
[crayon-6a560bde64663067861536 inline="true" class="highlighter-rouge"]<code class="highlighter-rouge"><code class="highlighter-rouge">[/crayon]
[crayon-6a560bde64665932776272 inline="true" class="highlighter-rouge"]<code class="highlighter-rouge"><code class="highlighter-rouge">[/crayon]
To develop Flutter apps for iOS, you need a Mac with Xcode 9.0 or newer:
[crayon-6a560bde64668363956016 inline="true" class="highlighter-rouge"]<code class="highlighter-rouge"><code class="highlighter-rouge">[/crayon]
[crayon-6a560bde64671629283860 inline="true" class="highlighter-rouge"]<br />[/crayon]
[crayon-6a560bde64674192685147 inline="true" class="highlighter-rouge"]<code class="highlighter-rouge"><code class="highlighter-rouge">[/crayon]
[crayon-6a560bde64677629939905 inline="true" class="highlighter-rouge"][/crayon]
[crayon-6a560bde64679571477547 inline="true" class="highlighter-rouge"]<code class="highlighter-rouge"><code class="highlighter-rouge"><code class="highlighter-rouge"><code class="highlighter-rouge">[/crayon]
With Xcode, you’ll be able to run Flutter apps on an iOS device or on the simulator.
[crayon-6a560bde6467c961831644 inline="true" class="highlighter-rouge"]<code class="highlighter-rouge"><code class="highlighter-rouge"><code class="highlighter-rouge"><code class="highlighter-rouge">[/crayon]
[crayon-6a560bde6467f682069669 inline="true" class="highlighter-rouge"]<code class="highlighter-rouge"><code class="highlighter-rouge"><code class="highlighter-rouge"><code class="highlighter-rouge">[/crayon]
To deploy your Flutter app to a physical iOS device, you’ll need some additional tools and an Apple account. You’ll also need to set up physical device deployment in Xcode.
[crayon-6a560bde64681608577040 inline="true" class="highlighter-rouge"]<code class="highlighter-rouge"><code class="highlighter-rouge"><code class="highlighter-rouge"><code class="highlighter-rouge">[/crayon]
[crayon-6a560bde64684648655229 inline="true" class="highlighter-rouge"]<code class="highlighter-rouge"><code class="highlighter-rouge"><code class="highlighter-rouge"><code class="highlighter-rouge">[/crayon]
|
1 2 3 4 |
<em>$ brew</em> update $<em> brew install --HEAD libimobiledevice $ brew install ideviceinstaller ios-deploy cocoapods $ pod setup</em> |
[crayon-6a560bde64688288366175 inline="true" class="highlighter-rouge"]<code class="highlighter-rouge"><code class="highlighter-rouge"><code class="highlighter-rouge"><code class="highlighter-rouge">[/crayon]
If any of these commands fails with an error, run brew doctor and follow the instructions for resolving the issue.
[crayon-6a560bde6468c505204184 inline="true" class="highlighter-rouge"]<code class="highlighter-rouge"><code class="highlighter-rouge"><code class="highlighter-rouge"><code class="highlighter-rouge">[/crayon]
[crayon-6a560bde64690708291839 inline="true" class="highlighter-rouge"]<code class="highlighter-rouge"><code class="highlighter-rouge"><code class="highlighter-rouge"><code class="highlighter-rouge"><code class="highlighter-rouge">[/crayon]
[crayon-6a560bde6469c614119989 inline="true" class="highlighter-rouge"][/crayon]


[crayon-6a560bde646ac594878199 inline="true" class="highlighter-rouge"]<code class="highlighter-rouge"><br />[/crayon]
[crayon-6a560bde646af675017442 inline="true" class="highlighter-rouge"]<code class="highlighter-rouge"><code class="highlighter-rouge"><code class="highlighter-rouge"><code class="highlighter-rouge"><code class="highlighter-rouge">[/crayon]
[crayon-6a560bde646b1152706321 inline="true" class="highlighter-rouge"]<code class="highlighter-rouge">[/crayon]
[crayon-6a560bde646b4493366963 inline="true" class="highlighter-rouge"]<code class="highlighter-rouge"><code class="highlighter-rouge"><code class="highlighter-rouge"><code class="highlighter-rouge"><code class="highlighter-rouge"><code class="highlighter-rouge"><code class="highlighter-rouge"><code class="highlighter-rouge">[/crayon]
[crayon-6a560bde646b7548546438 inline="true" class="highlighter-rouge"]<code class="highlighter-rouge"><code class="highlighter-rouge"><code class="highlighter-rouge"><code class="highlighter-rouge"><code class="highlighter-rouge"><code class="highlighter-rouge"><code class="highlighter-rouge"><code class="highlighter-rouge">[/crayon]
[crayon-6a560bde646b9444414186 inline="true" class="highlighter-rouge"]<code class="highlighter-rouge"><code class="highlighter-rouge"><code class="highlighter-rouge"><code class="highlighter-rouge"><code class="highlighter-rouge"><code class="highlighter-rouge"><code class="highlighter-rouge"><code class="highlighter-rouge">[/crayon]
[crayon-6a560bde646bc360752958 inline="true" class="highlighter-rouge"]<code class="highlighter-rouge"><code class="highlighter-rouge"><code class="highlighter-rouge"><code class="highlighter-rouge"><code class="highlighter-rouge"><code class="highlighter-rouge"><code class="highlighter-rouge"><code class="highlighter-rouge">[/crayon]
[crayon-6a560bde646bf078412556 inline="true" class="highlighter-rouge"]<code class="highlighter-rouge"><code class="highlighter-rouge"><code class="highlighter-rouge"><code class="highlighter-rouge"><code class="highlighter-rouge"><code class="highlighter-rouge"><code class="highlighter-rouge"><code class="highlighter-rouge">[/crayon]
[crayon-6a560bde646c1230898606 inline="true" class="highlighter-rouge"]<code class="highlighter-rouge"><code class="highlighter-rouge"><code class="highlighter-rouge"><code class="highlighter-rouge"><code class="highlighter-rouge"><code class="highlighter-rouge"><code class="highlighter-rouge"><code class="highlighter-rouge">[/crayon]
To prepare to run and test the Flutter app on an Android device, you’ll need an Android device running Android 4.1 (API level 16) or higher.
[crayon-6a560bde646c4409588043 inline="true" class="highlighter-rouge"]<code class="highlighter-rouge"><code class="highlighter-rouge"><code class="highlighter-rouge"><code class="highlighter-rouge"><code class="highlighter-rouge"><code class="highlighter-rouge"><code class="highlighter-rouge"><code class="highlighter-rouge">[/crayon]
[crayon-6a560bde646c8147570674 inline="true" class="highlighter-rouge"]<code class="highlighter-rouge"><code class="highlighter-rouge"><code class="highlighter-rouge"><code class="highlighter-rouge"><code class="highlighter-rouge"><code class="highlighter-rouge"><code class="highlighter-rouge"><code class="highlighter-rouge">[/crayon]
[crayon-6a560bde646cc345898214 inline="true" class="highlighter-rouge"]<code class="highlighter-rouge"><code class="highlighter-rouge"><code class="highlighter-rouge"><code class="highlighter-rouge"><code class="highlighter-rouge"><code class="highlighter-rouge"><code class="highlighter-rouge"><code class="highlighter-rouge"><code class="highlighter-rouge">[/crayon]
By default, Flutter uses the version of the Android SDK where your adb tool is based. If you want Flutter to use a different installation of the Android SDK, you must set the environment[crayon-6a560bde646cf983613105 inline="true" class="highlighter-rouge"]ANDROID_HOME variable to that installation directory.[/crayon]
[crayon-6a560bde646d1373919814 inline="true" class="highlighter-rouge"]<code class="highlighter-rouge"><code class="highlighter-rouge"><code class="highlighter-rouge"><code class="highlighter-rouge"><code class="highlighter-rouge"><code class="highlighter-rouge"><code class="highlighter-rouge"><code class="highlighter-rouge"><code class="highlighter-rouge">[/crayon]
[crayon-6a560bde646d4617458749 inline="true" class="highlighter-rouge"][/crayon]
[crayon-6a560bde646d7223133266 inline="true" class="highlighter-rouge"]<code class="highlighter-rouge"><code class="highlighter-rouge"><code class="highlighter-rouge"><code class="highlighter-rouge"><code class="highlighter-rouge"><code class="highlighter-rouge"><code class="highlighter-rouge"><code class="highlighter-rouge"><code class="highlighter-rouge"><code class="highlighter-rouge"><code class="highlighter-rouge">[/crayon]
[crayon-6a560bde646d9109759880 inline="true" class="highlighter-rouge"]<code class="highlighter-rouge"><code class="highlighter-rouge"><code class="highlighter-rouge"><code class="highlighter-rouge"><code class="highlighter-rouge"><code class="highlighter-rouge"><code class="highlighter-rouge"><code class="highlighter-rouge"><code class="highlighter-rouge"><code class="highlighter-rouge"><code class="highlighter-rouge">[/crayon]
Here I created a sample flutter_app project using following terminal command:
[crayon-6a560bde646dc395993892 inline="true" class="highlighter-rouge"]<code class="highlighter-rouge"><code class="highlighter-rouge"><code class="highlighter-rouge"><code class="highlighter-rouge"><code class="highlighter-rouge"><code class="highlighter-rouge"><code class="highlighter-rouge"><code class="highlighter-rouge"><code class="highlighter-rouge"><code class="highlighter-rouge"><code class="highlighter-rouge">[/crayon]
|
1 2 |
<em>flutter create flutter_app cd flutter_app</em> |
[crayon-6a560bde646e0759176400 inline="true" class="highlighter-rouge"]<code class="highlighter-rouge"><code class="highlighter-rouge"><code class="highlighter-rouge"><code class="highlighter-rouge"><code class="highlighter-rouge"><code class="highlighter-rouge"><code class="highlighter-rouge"><code class="highlighter-rouge"><code class="highlighter-rouge"><code class="highlighter-rouge"><code class="highlighter-rouge">[/crayon]
[crayon-6a560bde646e3368198315 inline="true" class="highlighter-rouge"]<code class="highlighter-rouge"><code class="highlighter-rouge"><code class="highlighter-rouge"><code class="highlighter-rouge"><code class="highlighter-rouge"><code class="highlighter-rouge"><code class="highlighter-rouge"><code class="highlighter-rouge"><code class="highlighter-rouge"><code class="highlighter-rouge"><code class="highlighter-rouge">[/crayon]
To list out all connected devices, please use the commandflutter devices to show all:
[crayon-6a560bde646e5678824288 inline="true" class="highlighter-rouge"]<code class="highlighter-rouge"><code class="highlighter-rouge"><code class="highlighter-rouge"><code class="highlighter-rouge"><code class="highlighter-rouge"><code class="highlighter-rouge"><code class="highlighter-rouge"><code class="highlighter-rouge"><code class="highlighter-rouge"><code class="highlighter-rouge"><code class="highlighter-rouge">[/crayon]
|
1 2 |
<em>SM G950U1 • 9887fc41594630315a • android-arm • Android 7.0 (API 24) iPhone 7 • a0c2865be4ccfe53aea7c280dded0837873104ae • ios • iOS 10.3.3</em> |
[crayon-6a560bde646e9165572646 inline="true" class="highlighter-rouge"]<code class="highlighter-rouge"><code class="highlighter-rouge"><code class="highlighter-rouge"><code class="highlighter-rouge"><code class="highlighter-rouge"><code class="highlighter-rouge"><code class="highlighter-rouge"><code class="highlighter-rouge"><code class="highlighter-rouge"><code class="highlighter-rouge"><code class="highlighter-rouge">[/crayon]
If you have only one device is connected, just use the command flutter run to install your app into the device.
[crayon-6a560bde646ec079268591 inline="true" class="highlighter-rouge"]<code class="highlighter-rouge"><code class="highlighter-rouge"><code class="highlighter-rouge"><code class="highlighter-rouge"><code class="highlighter-rouge"><code class="highlighter-rouge"><code class="highlighter-rouge"><code class="highlighter-rouge"><code class="highlighter-rouge"><code class="highlighter-rouge"><code class="highlighter-rouge">[/crayon]
Otherwise, if have more than one device connected; please specify a device with the ‘-d <deviceId>’ flag, or use ‘-d all’ to act on all devices.
[crayon-6a560bde646ef769213420 inline="true" class="highlighter-rouge"]<code class="highlighter-rouge"><code class="highlighter-rouge"><code class="highlighter-rouge"><code class="highlighter-rouge"><code class="highlighter-rouge"><code class="highlighter-rouge"><code class="highlighter-rouge"><code class="highlighter-rouge"><code class="highlighter-rouge"><code class="highlighter-rouge"><code class="highlighter-rouge">[/crayon]
|
1 2 |
<em>flutter run -d 9887fc41594630315a flutter run -d a0c2865be4ccfe53aea7c280dded0837873104ae</em> |
[crayon-6a560bde646f3390213623 inline="true" class="highlighter-rouge"]<code class="highlighter-rouge"><code class="highlighter-rouge"><code class="highlighter-rouge"><code class="highlighter-rouge"><code class="highlighter-rouge"><code class="highlighter-rouge"><code class="highlighter-rouge"><code class="highlighter-rouge"><code class="highlighter-rouge"><code class="highlighter-rouge"><code class="highlighter-rouge">[/crayon]
Note: For iOS device, if you see the error as below, please double check the iOS Setup step to fix it.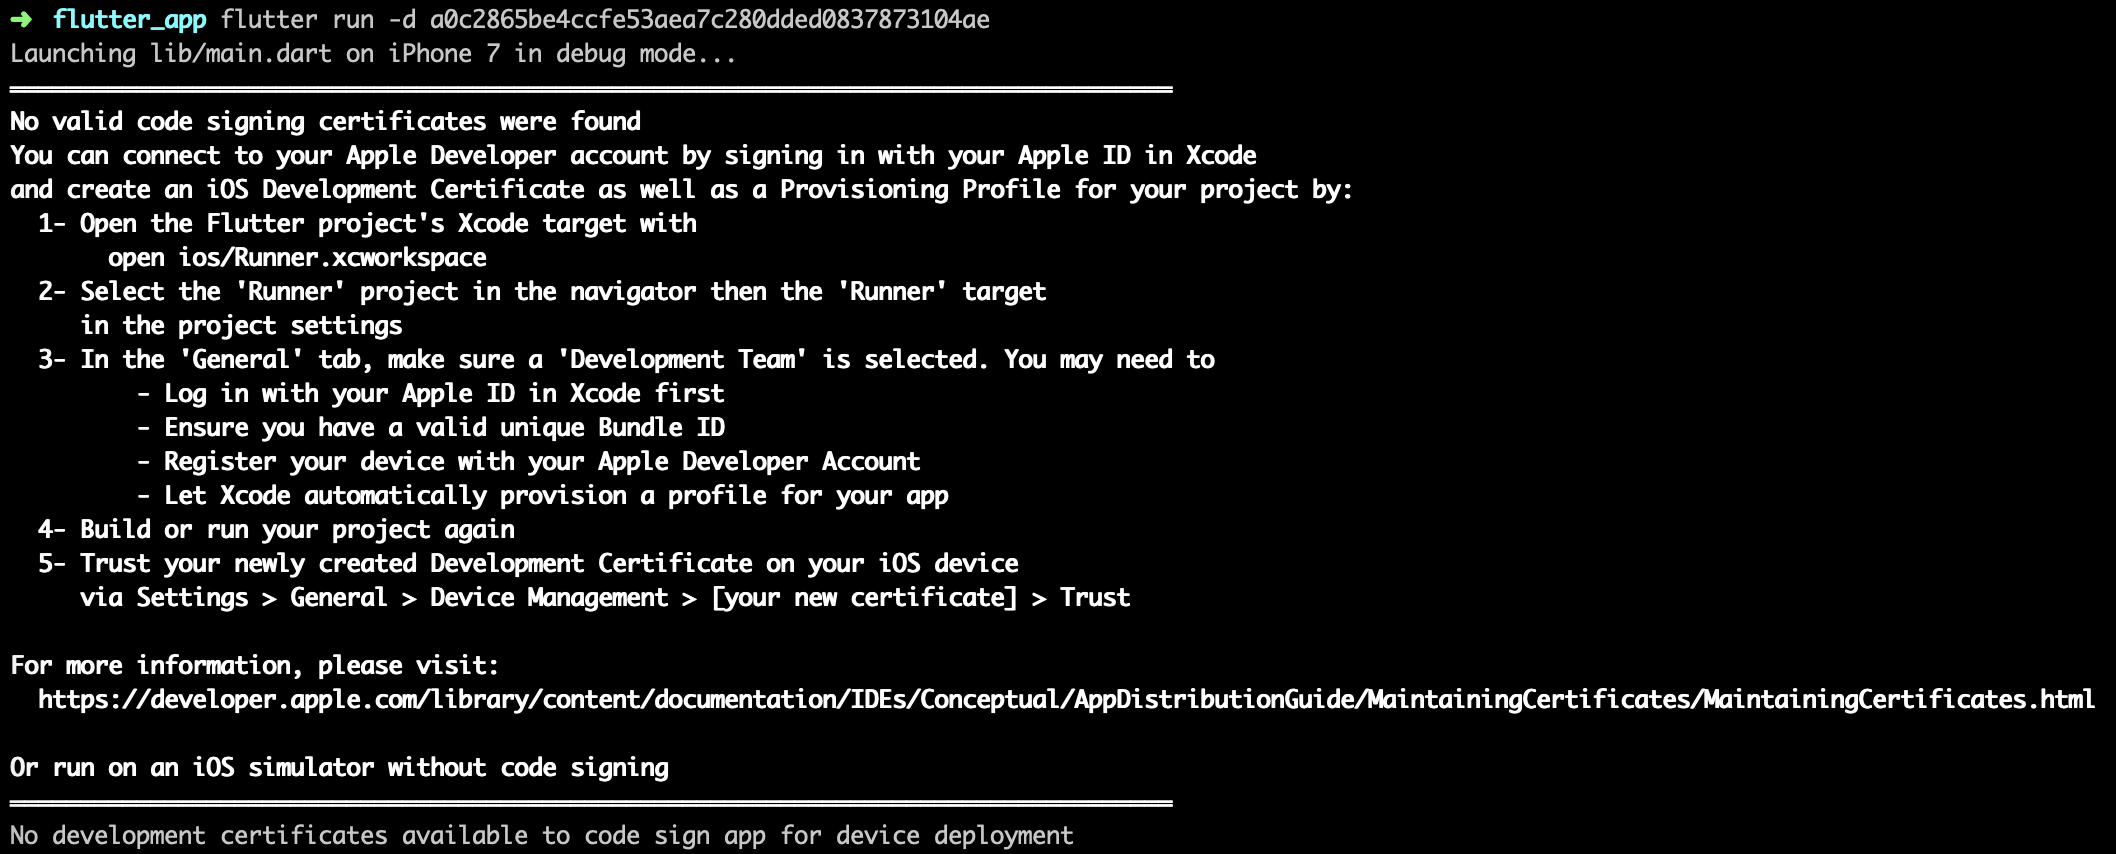
[crayon-6a560bde646f5041817267 inline="true" class="highlighter-rouge"]<code class="highlighter-rouge"><code class="highlighter-rouge"><code class="highlighter-rouge"><code class="highlighter-rouge"><code class="highlighter-rouge"><code class="highlighter-rouge"><code class="highlighter-rouge"><code class="highlighter-rouge"><code class="highlighter-rouge"><code class="highlighter-rouge"><code class="highlighter-rouge">[/crayon]
[crayon-6a560bde646f8502538548 inline="true" class="highlighter-rouge"]<code class="highlighter-rouge"><code class="highlighter-rouge"><code class="highlighter-rouge"><code class="highlighter-rouge"><code class="highlighter-rouge"><code class="highlighter-rouge"><code class="highlighter-rouge"><code class="highlighter-rouge"><code class="highlighter-rouge"><code class="highlighter-rouge"><code class="highlighter-rouge">[/crayon]
To generate an APK file, run:
[crayon-6a560bde646fb881771795 inline="true" class="highlighter-rouge"]<code class="highlighter-rouge"><code class="highlighter-rouge"><code class="highlighter-rouge"><code class="highlighter-rouge"><code class="highlighter-rouge"><code class="highlighter-rouge"><code class="highlighter-rouge"><code class="highlighter-rouge"><code class="highlighter-rouge"><code class="highlighter-rouge"><code class="highlighter-rouge">[/crayon]
|
1 |
flutter build apk |
[crayon-6a560bde646ff596521982 inline="true" class="highlighter-rouge"]<code class="highlighter-rouge"><code class="highlighter-rouge"><code class="highlighter-rouge"><code class="highlighter-rouge"><code class="highlighter-rouge"><code class="highlighter-rouge"><code class="highlighter-rouge"><code class="highlighter-rouge"><code class="highlighter-rouge"><code class="highlighter-rouge"><code class="highlighter-rouge">[/crayon]
The output looks like:
[crayon-6a560bde64701887154675 inline="true" class="highlighter-rouge"]<code class="highlighter-rouge"><code class="highlighter-rouge"><code class="highlighter-rouge"><code class="highlighter-rouge"><code class="highlighter-rouge"><code class="highlighter-rouge"><code class="highlighter-rouge"><code class="highlighter-rouge"><code class="highlighter-rouge"><code class="highlighter-rouge"><code class="highlighter-rouge">[/crayon]
|
1 2 3 4 5 |
Initializing gradle... 4.4s Resolving dependencies... 2.2s Running 'gradlew assembleRelease'... Skipping AOT snapshot build. Fingerprint match. Built build/app/outputs/apk/release/app-release.apk (7.6MB). |
[crayon-6a560bde64705260240429 inline="true" class="highlighter-rouge"]<code class="highlighter-rouge"><code class="highlighter-rouge"><code class="highlighter-rouge"><code class="highlighter-rouge"><code class="highlighter-rouge"><code class="highlighter-rouge"><code class="highlighter-rouge"><code class="highlighter-rouge"><code class="highlighter-rouge"><code class="highlighter-rouge"><code class="highlighter-rouge">[/crayon]
To generate an IPA file, run:
[crayon-6a560bde64708063818811 inline="true" class="highlighter-rouge"]<code class="highlighter-rouge"><code class="highlighter-rouge"><code class="highlighter-rouge"><code class="highlighter-rouge"><code class="highlighter-rouge"><code class="highlighter-rouge"><code class="highlighter-rouge"><code class="highlighter-rouge"><code class="highlighter-rouge"><code class="highlighter-rouge"><code class="highlighter-rouge">[/crayon]
|
1 |
flutter build ios |
[crayon-6a560bde6470c176461492 inline="true" class="highlighter-rouge"]<code class="highlighter-rouge"><code class="highlighter-rouge"><code class="highlighter-rouge"><code class="highlighter-rouge"><code class="highlighter-rouge"><code class="highlighter-rouge"><code class="highlighter-rouge"><code class="highlighter-rouge"><code class="highlighter-rouge"><code class="highlighter-rouge"><code class="highlighter-rouge">[/crayon]
The output looks like:
[crayon-6a560bde6470f716224037 inline="true" class="highlighter-rouge"]<code class="highlighter-rouge"><code class="highlighter-rouge"><code class="highlighter-rouge"><code class="highlighter-rouge"><code class="highlighter-rouge"><code class="highlighter-rouge"><code class="highlighter-rouge"><code class="highlighter-rouge"><code class="highlighter-rouge"><code class="highlighter-rouge"><code class="highlighter-rouge">[/crayon]
|
1 2 3 4 |
Building com.example.flutterApp for device (ios-release)... Automatically signing iOS for device deployment using specified development team in Xcode project: 4X2699XXXX Running Xcode build... 23.5s Built /build/ios/Release-iphoneos/Runner.app |
[crayon-6a560bde64713099421669 inline="true" class="highlighter-rouge"]<code class="highlighter-rouge"><code class="highlighter-rouge"><code class="highlighter-rouge"><code class="highlighter-rouge"><code class="highlighter-rouge"><code class="highlighter-rouge"><code class="highlighter-rouge"><code class="highlighter-rouge"><code class="highlighter-rouge"><code class="highlighter-rouge"><code class="highlighter-rouge">[/crayon]
[crayon-6a560bde64715377736922 inline="true" class="highlighter-rouge"]<code class="highlighter-rouge"><code class="highlighter-rouge"><code class="highlighter-rouge"><code class="highlighter-rouge"><code class="highlighter-rouge"><code class="highlighter-rouge"><code class="highlighter-rouge"><code class="highlighter-rouge"><code class="highlighter-rouge"><code class="highlighter-rouge"><code class="highlighter-rouge">[/crayon]
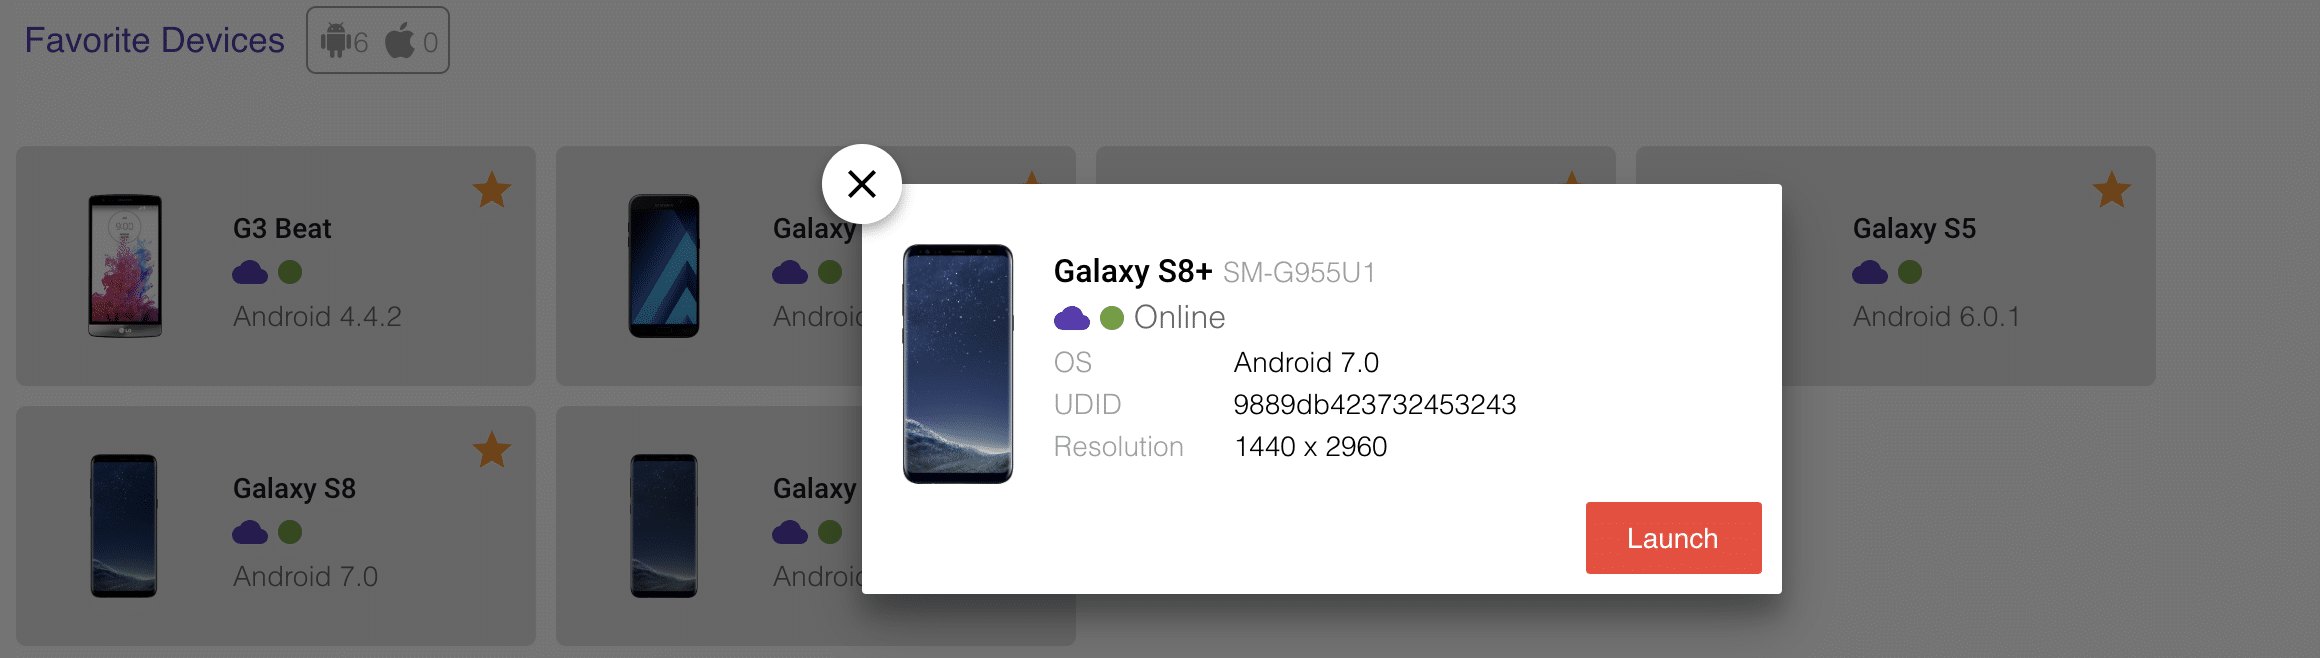
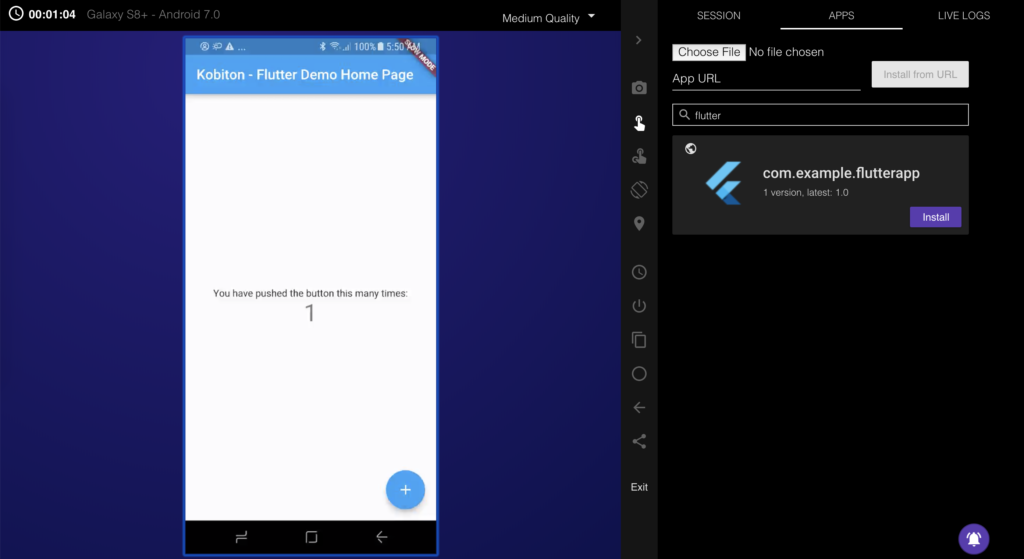
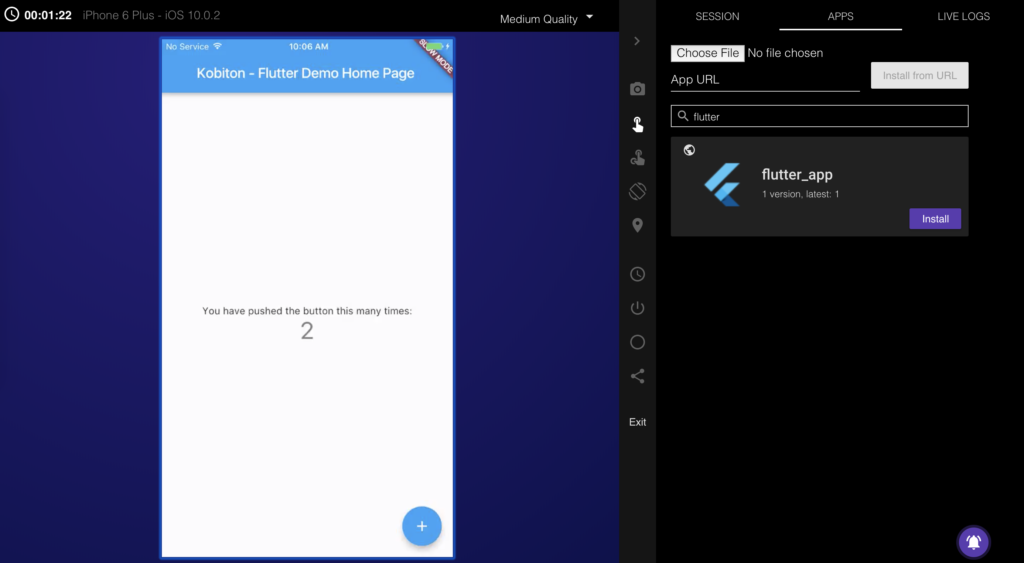
In this part, I will guide you how to use Kobiton Cloud to test your apps. A Kobiton account is required to access Kobiton system. If you do not have a Kobiton account yet, go ahead to create a free trial account and sign in. It takes just a few moments.
[crayon-6a560bde64718404182355 inline="true" class="highlighter-rouge"]<code class="highlighter-rouge"><code class="highlighter-rouge"><code class="highlighter-rouge"><code class="highlighter-rouge"><code class="highlighter-rouge"><code class="highlighter-rouge"><code class="highlighter-rouge"><code class="highlighter-rouge"><code class="highlighter-rouge"><code class="highlighter-rouge"><code class="highlighter-rouge">[/crayon]

|
1 2 3 4 5 6 7 |
<em>DesiredCapabilities capabilities = new DesiredCapabilities(); capabilities.setCapability("app", "kobiton-store:1024"); capabilities.setCapability("deviceGroup", "KOBITON"); capabilities.setCapability("deviceName", "Galaxy S8+"); capabilities.setCapability("platformVersion", "7.0"); capabilities.setCapability("platformName", "Android"); </em> |
|
1 2 3 4 5 6 |
<em>DesiredCapabilities capabilities = new DesiredCapabilities(); capabilities.setCapability("app", "kobiton-store:1024"); capabilities.setCapability("deviceGroup", "KOBITON"); capabilities.setCapability("deviceName", "iPhone 6 Plus"); capabilities.setCapability("platformVersion", "10.0.2"); capabilities.setCapability("platformName", "iOS");</em> |
[crayon-6a560bde64721934235516 inline="true" class="highlighter-rouge"]<code class="highlighter-rouge"><code class="highlighter-rouge"><code class="highlighter-rouge"><code class="highlighter-rouge"><code class="highlighter-rouge"><code class="highlighter-rouge"><code class="highlighter-rouge"><code class="highlighter-rouge"><code class="highlighter-rouge"><code class="highlighter-rouge"><code class="highlighter-rouge">[/crayon]
[crayon-6a560bde64724590431116 inline="true" class="highlighter-rouge"]<code class="highlighter-rouge">[/crayon]
[crayon-6a560bde64726346610202 inline="true" class="highlighter-rouge"]<code class="highlighter-rouge"><code class="highlighter-rouge"><code class="highlighter-rouge"><code class="highlighter-rouge"><code class="highlighter-rouge"><code class="highlighter-rouge"><code class="highlighter-rouge">[/crayon]
")


