
Oct 8, 2018
Develop, Deploy, and Test Apps with Expo Development Client

Erin Bailey
Read More
Flutter is Google’s mobile app SDK for crafting high-quality native interfaces on iOS and Android in record time. Flutter works with existing code, is used by developers and organizations around the world, and is free and open source.
For users, Flutter makes beautiful app UIs come to life. For developers, Flutter lowers the bar to entry for building mobile apps. It speeds up the development of mobile apps and reduces the cost and complexity of app production across iOS and Android. For designers, Flutter helps deliver the original design vision, without loss of fidelity or compromises. It also acts as a productive prototyping tool.
To install and run Flutter, your development environment must meet these minimum requirements:
[crayon-69c3b0d3f013d827324224 inline="true" class="highlighter-rouge"]<code class="highlighter-rouge"><br />[/crayon]
[crayon-69c3b0d3f0142239688702 inline="true" class="highlighter-rouge"]<code class="highlighter-rouge"><br />[/crayon]
[crayon-69c3b0d3f0146216382992 inline="true" class="highlighter-rouge"]<code class="highlighter-rouge"><br />[/crayon]
[crayon-69c3b0d3f014b037404145 inline="true" class="highlighter-rouge"]<code class="highlighter-rouge">[/crayon]
[crayon-69c3b0d3f014f590195557 inline="true" class="highlighter-rouge"]<code class="highlighter-rouge"><code class="highlighter-rouge">[/crayon]
[crayon-69c3b0d3f0153063986833 inline="true" class="highlighter-rouge"]<code class="highlighter-rouge"><code class="highlighter-rouge">[/crayon]
Clone alpha branch from Flutter repository using Git and add bin folder to your PATH.
[crayon-69c3b0d3f0157742156088 inline="true" class="highlighter-rouge"]<code class="highlighter-rouge"><code class="highlighter-rouge">[/crayon]
|
1 2 |
<em>$ git clone https://github.com/flutter/flutter.git -b alpha $ export PATH=`pwd`/flutter/bin:$PATH</em> |
[crayon-69c3b0d3f015d264542505 inline="true" class="highlighter-rouge"]<code class="highlighter-rouge"><code class="highlighter-rouge">[/crayon]
The above command sets your PATH variable temporarily, for the current terminal window. You are now ready to run Flutter commands!
[crayon-69c3b0d3f0161704143440 inline="true" class="highlighter-rouge"]<code class="highlighter-rouge"><code class="highlighter-rouge">[/crayon]
Note: To permanently add Flutter to your path, see the reference https://flutter.io/setup-macos/#update-your-path.
[crayon-69c3b0d3f0166969923033 inline="true" class="highlighter-rouge"]<code class="highlighter-rouge"><code class="highlighter-rouge">[/crayon]
[crayon-69c3b0d3f016a469190460 inline="true" class="highlighter-rouge"]<code class="highlighter-rouge"><code class="highlighter-rouge">[/crayon]
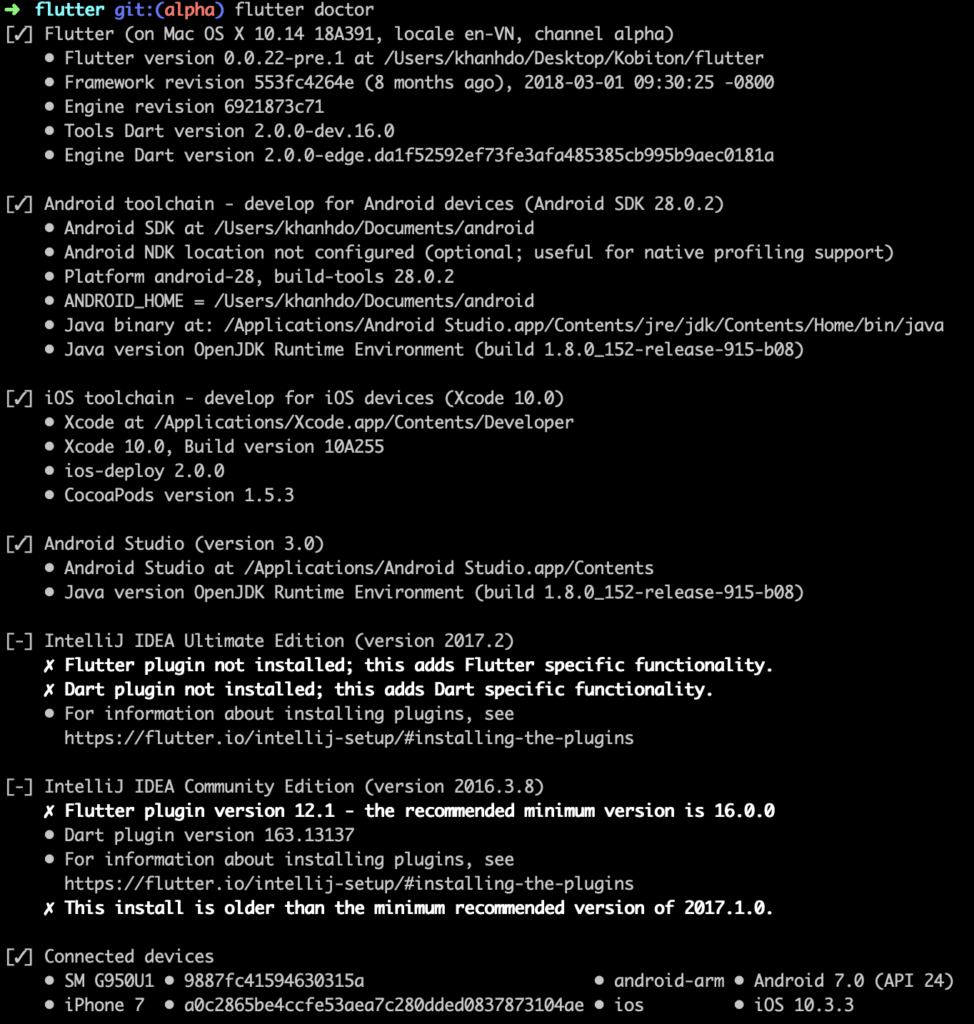
Run the following command to see if there are any dependencies you need to install to complete the setup:
[crayon-69c3b0d3f016e082089242 inline="true" class="highlighter-rouge"]<code class="highlighter-rouge"><code class="highlighter-rouge">[/crayon]
|
1 |
<em>$ flutter doctor</em> |
[crayon-69c3b0d3f0174061406579 inline="true" class="highlighter-rouge"]<code class="highlighter-rouge"><code class="highlighter-rouge">[/crayon]
This command checks your environment and displays a report to the terminal window. The Dart SDK is bundled with Flutter; it is not necessary to install Dart separately.
[crayon-69c3b0d3f0178390333249 inline="true" class="highlighter-rouge"]<code class="highlighter-rouge"><code class="highlighter-rouge">[/crayon]
For example:
[crayon-69c3b0d3f017c678150719 inline="true" class="highlighter-rouge"]<code class="highlighter-rouge"><code class="highlighter-rouge">[/crayon]
[crayon-69c3b0d3f0180447111600 inline="true" class="highlighter-rouge"]<code class="highlighter-rouge"><code class="highlighter-rouge">[/crayon]
[crayon-69c3b0d3f0185323355619 inline="true" class="highlighter-rouge"]<code class="highlighter-rouge"><code class="highlighter-rouge">[/crayon]
macOS supports developing Flutter apps for both iOS and Android. Complete at least one of the two platform setup steps now, to be able to build and run your first Flutter app.
[crayon-69c3b0d3f0189348257839 inline="true" class="highlighter-rouge"]<code class="highlighter-rouge"><code class="highlighter-rouge">[/crayon]
[crayon-69c3b0d3f018d424610479 inline="true" class="highlighter-rouge"]<code class="highlighter-rouge"><code class="highlighter-rouge">[/crayon]
[crayon-69c3b0d3f0191909932772 inline="true" class="highlighter-rouge"]<code class="highlighter-rouge"><code class="highlighter-rouge">[/crayon]
To develop Flutter apps for iOS, you need a Mac with Xcode 9.0 or newer:
[crayon-69c3b0d3f0195791119167 inline="true" class="highlighter-rouge"]<code class="highlighter-rouge"><code class="highlighter-rouge">[/crayon]
[crayon-69c3b0d3f01a3773863087 inline="true" class="highlighter-rouge"]<br />[/crayon]
[crayon-69c3b0d3f01a7212454760 inline="true" class="highlighter-rouge"]<code class="highlighter-rouge"><code class="highlighter-rouge">[/crayon]
[crayon-69c3b0d3f01ab881765715 inline="true" class="highlighter-rouge"][/crayon]
[crayon-69c3b0d3f01af221898031 inline="true" class="highlighter-rouge"]<code class="highlighter-rouge"><code class="highlighter-rouge"><code class="highlighter-rouge"><code class="highlighter-rouge">[/crayon]
With Xcode, you’ll be able to run Flutter apps on an iOS device or on the simulator.
[crayon-69c3b0d3f01b4460664762 inline="true" class="highlighter-rouge"]<code class="highlighter-rouge"><code class="highlighter-rouge"><code class="highlighter-rouge"><code class="highlighter-rouge">[/crayon]
[crayon-69c3b0d3f01b7312868504 inline="true" class="highlighter-rouge"]<code class="highlighter-rouge"><code class="highlighter-rouge"><code class="highlighter-rouge"><code class="highlighter-rouge">[/crayon]
To deploy your Flutter app to a physical iOS device, you’ll need some additional tools and an Apple account. You’ll also need to set up physical device deployment in Xcode.
[crayon-69c3b0d3f01bb625907667 inline="true" class="highlighter-rouge"]<code class="highlighter-rouge"><code class="highlighter-rouge"><code class="highlighter-rouge"><code class="highlighter-rouge">[/crayon]
[crayon-69c3b0d3f01c0813512403 inline="true" class="highlighter-rouge"]<code class="highlighter-rouge"><code class="highlighter-rouge"><code class="highlighter-rouge"><code class="highlighter-rouge">[/crayon]
|
1 2 3 4 |
<em>$ brew</em> update $<em> brew install --HEAD libimobiledevice $ brew install ideviceinstaller ios-deploy cocoapods $ pod setup</em> |
[crayon-69c3b0d3f01c6899379724 inline="true" class="highlighter-rouge"]<code class="highlighter-rouge"><code class="highlighter-rouge"><code class="highlighter-rouge"><code class="highlighter-rouge">[/crayon]
If any of these commands fails with an error, run brew doctor and follow the instructions for resolving the issue.
[crayon-69c3b0d3f01cc232409635 inline="true" class="highlighter-rouge"]<code class="highlighter-rouge"><code class="highlighter-rouge"><code class="highlighter-rouge"><code class="highlighter-rouge">[/crayon]
[crayon-69c3b0d3f01d2003440497 inline="true" class="highlighter-rouge"]<code class="highlighter-rouge"><code class="highlighter-rouge"><code class="highlighter-rouge"><code class="highlighter-rouge"><code class="highlighter-rouge">[/crayon]
[crayon-69c3b0d3f01e4752714368 inline="true" class="highlighter-rouge"][/crayon]


[crayon-69c3b0d3f01fd725943254 inline="true" class="highlighter-rouge"]<code class="highlighter-rouge"><br />[/crayon]
[crayon-69c3b0d3f0201008844172 inline="true" class="highlighter-rouge"]<code class="highlighter-rouge"><code class="highlighter-rouge"><code class="highlighter-rouge"><code class="highlighter-rouge"><code class="highlighter-rouge">[/crayon]
[crayon-69c3b0d3f0205592619945 inline="true" class="highlighter-rouge"]<code class="highlighter-rouge">[/crayon]
[crayon-69c3b0d3f0209366409022 inline="true" class="highlighter-rouge"]<code class="highlighter-rouge"><code class="highlighter-rouge"><code class="highlighter-rouge"><code class="highlighter-rouge"><code class="highlighter-rouge"><code class="highlighter-rouge"><code class="highlighter-rouge"><code class="highlighter-rouge">[/crayon]
[crayon-69c3b0d3f020d724970296 inline="true" class="highlighter-rouge"]<code class="highlighter-rouge"><code class="highlighter-rouge"><code class="highlighter-rouge"><code class="highlighter-rouge"><code class="highlighter-rouge"><code class="highlighter-rouge"><code class="highlighter-rouge"><code class="highlighter-rouge">[/crayon]
[crayon-69c3b0d3f0211257512888 inline="true" class="highlighter-rouge"]<code class="highlighter-rouge"><code class="highlighter-rouge"><code class="highlighter-rouge"><code class="highlighter-rouge"><code class="highlighter-rouge"><code class="highlighter-rouge"><code class="highlighter-rouge"><code class="highlighter-rouge">[/crayon]
[crayon-69c3b0d3f0216481841681 inline="true" class="highlighter-rouge"]<code class="highlighter-rouge"><code class="highlighter-rouge"><code class="highlighter-rouge"><code class="highlighter-rouge"><code class="highlighter-rouge"><code class="highlighter-rouge"><code class="highlighter-rouge"><code class="highlighter-rouge">[/crayon]
[crayon-69c3b0d3f021a384907409 inline="true" class="highlighter-rouge"]<code class="highlighter-rouge"><code class="highlighter-rouge"><code class="highlighter-rouge"><code class="highlighter-rouge"><code class="highlighter-rouge"><code class="highlighter-rouge"><code class="highlighter-rouge"><code class="highlighter-rouge">[/crayon]
[crayon-69c3b0d3f021e329140203 inline="true" class="highlighter-rouge"]<code class="highlighter-rouge"><code class="highlighter-rouge"><code class="highlighter-rouge"><code class="highlighter-rouge"><code class="highlighter-rouge"><code class="highlighter-rouge"><code class="highlighter-rouge"><code class="highlighter-rouge">[/crayon]
To prepare to run and test the Flutter app on an Android device, you’ll need an Android device running Android 4.1 (API level 16) or higher.
[crayon-69c3b0d3f0222947875338 inline="true" class="highlighter-rouge"]<code class="highlighter-rouge"><code class="highlighter-rouge"><code class="highlighter-rouge"><code class="highlighter-rouge"><code class="highlighter-rouge"><code class="highlighter-rouge"><code class="highlighter-rouge"><code class="highlighter-rouge">[/crayon]
[crayon-69c3b0d3f0228947279152 inline="true" class="highlighter-rouge"]<code class="highlighter-rouge"><code class="highlighter-rouge"><code class="highlighter-rouge"><code class="highlighter-rouge"><code class="highlighter-rouge"><code class="highlighter-rouge"><code class="highlighter-rouge"><code class="highlighter-rouge">[/crayon]
[crayon-69c3b0d3f022f710059705 inline="true" class="highlighter-rouge"]<code class="highlighter-rouge"><code class="highlighter-rouge"><code class="highlighter-rouge"><code class="highlighter-rouge"><code class="highlighter-rouge"><code class="highlighter-rouge"><code class="highlighter-rouge"><code class="highlighter-rouge"><code class="highlighter-rouge">[/crayon]
By default, Flutter uses the version of the Android SDK where your adb tool is based. If you want Flutter to use a different installation of the Android SDK, you must set the environment[crayon-69c3b0d3f0233819090566 inline="true" class="highlighter-rouge"]ANDROID_HOME variable to that installation directory.[/crayon]
[crayon-69c3b0d3f0237070593565 inline="true" class="highlighter-rouge"]<code class="highlighter-rouge"><code class="highlighter-rouge"><code class="highlighter-rouge"><code class="highlighter-rouge"><code class="highlighter-rouge"><code class="highlighter-rouge"><code class="highlighter-rouge"><code class="highlighter-rouge"><code class="highlighter-rouge">[/crayon]
[crayon-69c3b0d3f023c430086683 inline="true" class="highlighter-rouge"][/crayon]
[crayon-69c3b0d3f0240548217099 inline="true" class="highlighter-rouge"]<code class="highlighter-rouge"><code class="highlighter-rouge"><code class="highlighter-rouge"><code class="highlighter-rouge"><code class="highlighter-rouge"><code class="highlighter-rouge"><code class="highlighter-rouge"><code class="highlighter-rouge"><code class="highlighter-rouge"><code class="highlighter-rouge"><code class="highlighter-rouge">[/crayon]
[crayon-69c3b0d3f0244902361663 inline="true" class="highlighter-rouge"]<code class="highlighter-rouge"><code class="highlighter-rouge"><code class="highlighter-rouge"><code class="highlighter-rouge"><code class="highlighter-rouge"><code class="highlighter-rouge"><code class="highlighter-rouge"><code class="highlighter-rouge"><code class="highlighter-rouge"><code class="highlighter-rouge"><code class="highlighter-rouge">[/crayon]
Here I created a sample flutter_app project using following terminal command:
[crayon-69c3b0d3f0248304925723 inline="true" class="highlighter-rouge"]<code class="highlighter-rouge"><code class="highlighter-rouge"><code class="highlighter-rouge"><code class="highlighter-rouge"><code class="highlighter-rouge"><code class="highlighter-rouge"><code class="highlighter-rouge"><code class="highlighter-rouge"><code class="highlighter-rouge"><code class="highlighter-rouge"><code class="highlighter-rouge">[/crayon]
|
1 2 |
<em>flutter create flutter_app cd flutter_app</em> |
[crayon-69c3b0d3f024e320573025 inline="true" class="highlighter-rouge"]<code class="highlighter-rouge"><code class="highlighter-rouge"><code class="highlighter-rouge"><code class="highlighter-rouge"><code class="highlighter-rouge"><code class="highlighter-rouge"><code class="highlighter-rouge"><code class="highlighter-rouge"><code class="highlighter-rouge"><code class="highlighter-rouge"><code class="highlighter-rouge">[/crayon]
[crayon-69c3b0d3f0253557340866 inline="true" class="highlighter-rouge"]<code class="highlighter-rouge"><code class="highlighter-rouge"><code class="highlighter-rouge"><code class="highlighter-rouge"><code class="highlighter-rouge"><code class="highlighter-rouge"><code class="highlighter-rouge"><code class="highlighter-rouge"><code class="highlighter-rouge"><code class="highlighter-rouge"><code class="highlighter-rouge">[/crayon]
To list out all connected devices, please use the commandflutter devices to show all:
[crayon-69c3b0d3f0257348088451 inline="true" class="highlighter-rouge"]<code class="highlighter-rouge"><code class="highlighter-rouge"><code class="highlighter-rouge"><code class="highlighter-rouge"><code class="highlighter-rouge"><code class="highlighter-rouge"><code class="highlighter-rouge"><code class="highlighter-rouge"><code class="highlighter-rouge"><code class="highlighter-rouge"><code class="highlighter-rouge">[/crayon]
|
1 2 |
<em>SM G950U1 • 9887fc41594630315a • android-arm • Android 7.0 (API 24) iPhone 7 • a0c2865be4ccfe53aea7c280dded0837873104ae • ios • iOS 10.3.3</em> |
[crayon-69c3b0d3f025d286723937 inline="true" class="highlighter-rouge"]<code class="highlighter-rouge"><code class="highlighter-rouge"><code class="highlighter-rouge"><code class="highlighter-rouge"><code class="highlighter-rouge"><code class="highlighter-rouge"><code class="highlighter-rouge"><code class="highlighter-rouge"><code class="highlighter-rouge"><code class="highlighter-rouge"><code class="highlighter-rouge">[/crayon]
If you have only one device is connected, just use the command flutter run to install your app into the device.
[crayon-69c3b0d3f0261427679537 inline="true" class="highlighter-rouge"]<code class="highlighter-rouge"><code class="highlighter-rouge"><code class="highlighter-rouge"><code class="highlighter-rouge"><code class="highlighter-rouge"><code class="highlighter-rouge"><code class="highlighter-rouge"><code class="highlighter-rouge"><code class="highlighter-rouge"><code class="highlighter-rouge"><code class="highlighter-rouge">[/crayon]
Otherwise, if have more than one device connected; please specify a device with the ‘-d <deviceId>’ flag, or use ‘-d all’ to act on all devices.
[crayon-69c3b0d3f0266254176775 inline="true" class="highlighter-rouge"]<code class="highlighter-rouge"><code class="highlighter-rouge"><code class="highlighter-rouge"><code class="highlighter-rouge"><code class="highlighter-rouge"><code class="highlighter-rouge"><code class="highlighter-rouge"><code class="highlighter-rouge"><code class="highlighter-rouge"><code class="highlighter-rouge"><code class="highlighter-rouge">[/crayon]
|
1 2 |
<em>flutter run -d 9887fc41594630315a flutter run -d a0c2865be4ccfe53aea7c280dded0837873104ae</em> |
[crayon-69c3b0d3f026c208567701 inline="true" class="highlighter-rouge"]<code class="highlighter-rouge"><code class="highlighter-rouge"><code class="highlighter-rouge"><code class="highlighter-rouge"><code class="highlighter-rouge"><code class="highlighter-rouge"><code class="highlighter-rouge"><code class="highlighter-rouge"><code class="highlighter-rouge"><code class="highlighter-rouge"><code class="highlighter-rouge">[/crayon]
Note: For iOS device, if you see the error as below, please double check the iOS Setup step to fix it.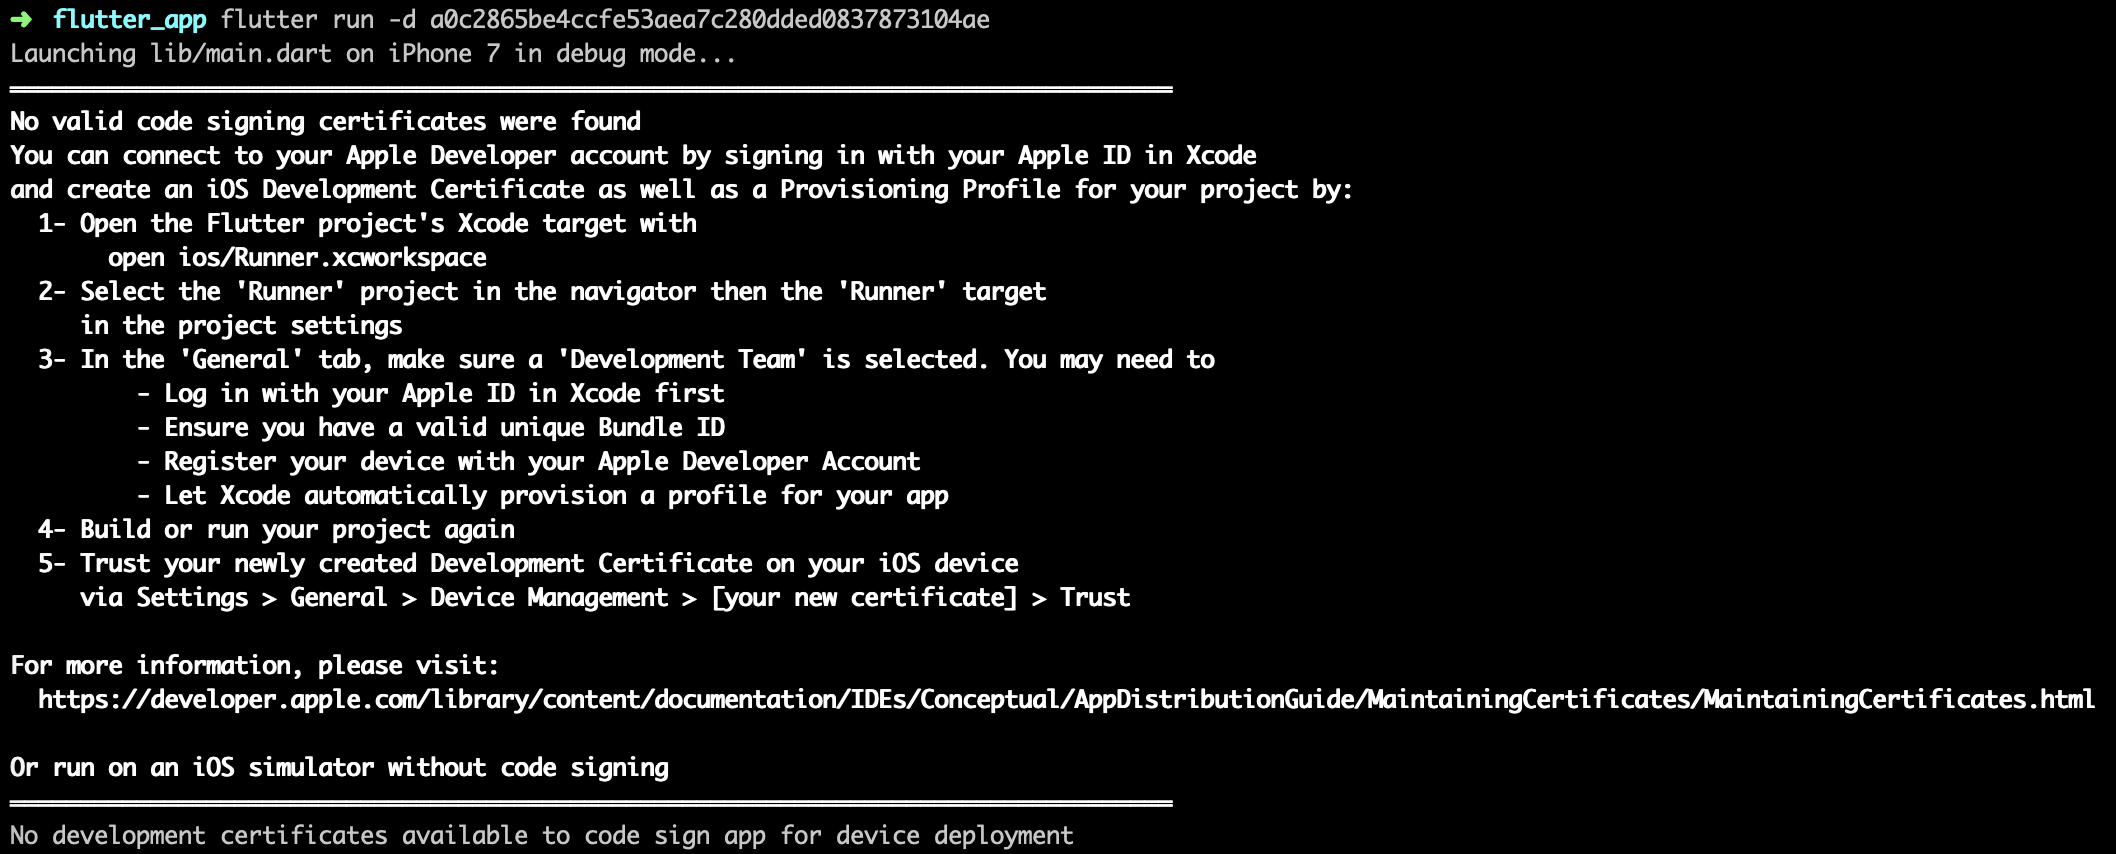
[crayon-69c3b0d3f0270523306390 inline="true" class="highlighter-rouge"]<code class="highlighter-rouge"><code class="highlighter-rouge"><code class="highlighter-rouge"><code class="highlighter-rouge"><code class="highlighter-rouge"><code class="highlighter-rouge"><code class="highlighter-rouge"><code class="highlighter-rouge"><code class="highlighter-rouge"><code class="highlighter-rouge"><code class="highlighter-rouge">[/crayon]
[crayon-69c3b0d3f0274077355716 inline="true" class="highlighter-rouge"]<code class="highlighter-rouge"><code class="highlighter-rouge"><code class="highlighter-rouge"><code class="highlighter-rouge"><code class="highlighter-rouge"><code class="highlighter-rouge"><code class="highlighter-rouge"><code class="highlighter-rouge"><code class="highlighter-rouge"><code class="highlighter-rouge"><code class="highlighter-rouge">[/crayon]
To generate an APK file, run:
[crayon-69c3b0d3f0278202376426 inline="true" class="highlighter-rouge"]<code class="highlighter-rouge"><code class="highlighter-rouge"><code class="highlighter-rouge"><code class="highlighter-rouge"><code class="highlighter-rouge"><code class="highlighter-rouge"><code class="highlighter-rouge"><code class="highlighter-rouge"><code class="highlighter-rouge"><code class="highlighter-rouge"><code class="highlighter-rouge">[/crayon]
|
1 |
flutter build apk |
[crayon-69c3b0d3f027e633785146 inline="true" class="highlighter-rouge"]<code class="highlighter-rouge"><code class="highlighter-rouge"><code class="highlighter-rouge"><code class="highlighter-rouge"><code class="highlighter-rouge"><code class="highlighter-rouge"><code class="highlighter-rouge"><code class="highlighter-rouge"><code class="highlighter-rouge"><code class="highlighter-rouge"><code class="highlighter-rouge">[/crayon]
The output looks like:
[crayon-69c3b0d3f0282832169120 inline="true" class="highlighter-rouge"]<code class="highlighter-rouge"><code class="highlighter-rouge"><code class="highlighter-rouge"><code class="highlighter-rouge"><code class="highlighter-rouge"><code class="highlighter-rouge"><code class="highlighter-rouge"><code class="highlighter-rouge"><code class="highlighter-rouge"><code class="highlighter-rouge"><code class="highlighter-rouge">[/crayon]
|
1 2 3 4 5 |
Initializing gradle... 4.4s Resolving dependencies... 2.2s Running 'gradlew assembleRelease'... Skipping AOT snapshot build. Fingerprint match. Built build/app/outputs/apk/release/app-release.apk (7.6MB). |
[crayon-69c3b0d3f0289351659064 inline="true" class="highlighter-rouge"]<code class="highlighter-rouge"><code class="highlighter-rouge"><code class="highlighter-rouge"><code class="highlighter-rouge"><code class="highlighter-rouge"><code class="highlighter-rouge"><code class="highlighter-rouge"><code class="highlighter-rouge"><code class="highlighter-rouge"><code class="highlighter-rouge"><code class="highlighter-rouge">[/crayon]
To generate an IPA file, run:
[crayon-69c3b0d3f028d953012407 inline="true" class="highlighter-rouge"]<code class="highlighter-rouge"><code class="highlighter-rouge"><code class="highlighter-rouge"><code class="highlighter-rouge"><code class="highlighter-rouge"><code class="highlighter-rouge"><code class="highlighter-rouge"><code class="highlighter-rouge"><code class="highlighter-rouge"><code class="highlighter-rouge"><code class="highlighter-rouge">[/crayon]
|
1 |
flutter build ios |
[crayon-69c3b0d3f0293022237021 inline="true" class="highlighter-rouge"]<code class="highlighter-rouge"><code class="highlighter-rouge"><code class="highlighter-rouge"><code class="highlighter-rouge"><code class="highlighter-rouge"><code class="highlighter-rouge"><code class="highlighter-rouge"><code class="highlighter-rouge"><code class="highlighter-rouge"><code class="highlighter-rouge"><code class="highlighter-rouge">[/crayon]
The output looks like:
[crayon-69c3b0d3f0297005229085 inline="true" class="highlighter-rouge"]<code class="highlighter-rouge"><code class="highlighter-rouge"><code class="highlighter-rouge"><code class="highlighter-rouge"><code class="highlighter-rouge"><code class="highlighter-rouge"><code class="highlighter-rouge"><code class="highlighter-rouge"><code class="highlighter-rouge"><code class="highlighter-rouge"><code class="highlighter-rouge">[/crayon]
|
1 2 3 4 |
Building com.example.flutterApp for device (ios-release)... Automatically signing iOS for device deployment using specified development team in Xcode project: 4X2699XXXX Running Xcode build... 23.5s Built /build/ios/Release-iphoneos/Runner.app |
[crayon-69c3b0d3f029d599029562 inline="true" class="highlighter-rouge"]<code class="highlighter-rouge"><code class="highlighter-rouge"><code class="highlighter-rouge"><code class="highlighter-rouge"><code class="highlighter-rouge"><code class="highlighter-rouge"><code class="highlighter-rouge"><code class="highlighter-rouge"><code class="highlighter-rouge"><code class="highlighter-rouge"><code class="highlighter-rouge">[/crayon]
[crayon-69c3b0d3f02a1906406680 inline="true" class="highlighter-rouge"]<code class="highlighter-rouge"><code class="highlighter-rouge"><code class="highlighter-rouge"><code class="highlighter-rouge"><code class="highlighter-rouge"><code class="highlighter-rouge"><code class="highlighter-rouge"><code class="highlighter-rouge"><code class="highlighter-rouge"><code class="highlighter-rouge"><code class="highlighter-rouge">[/crayon]
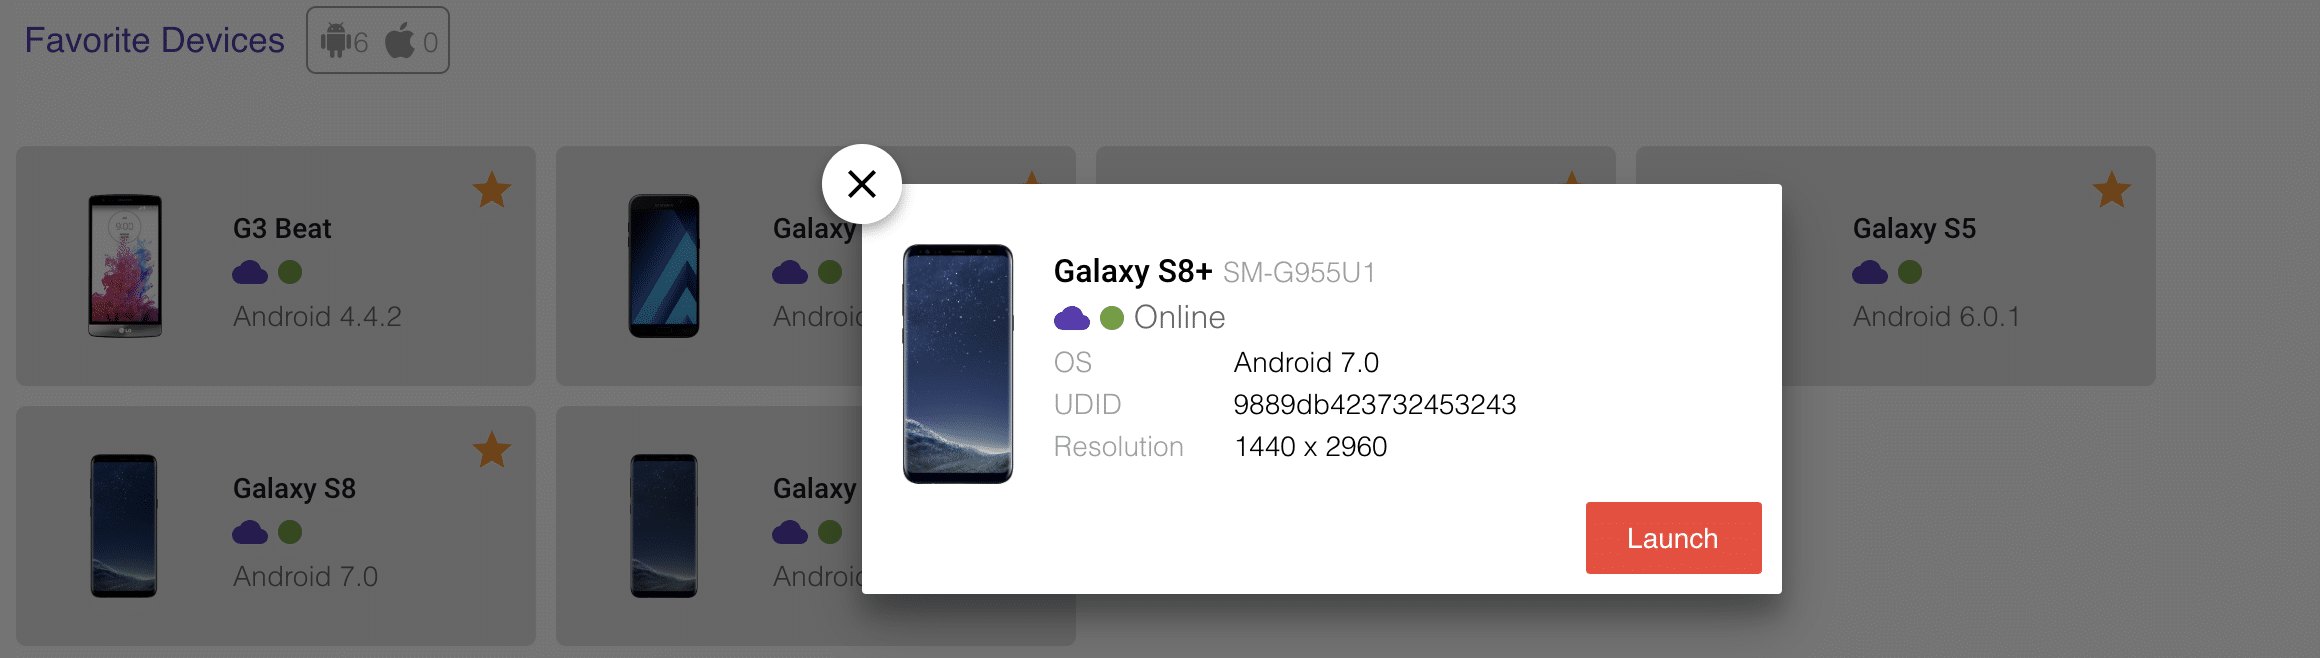
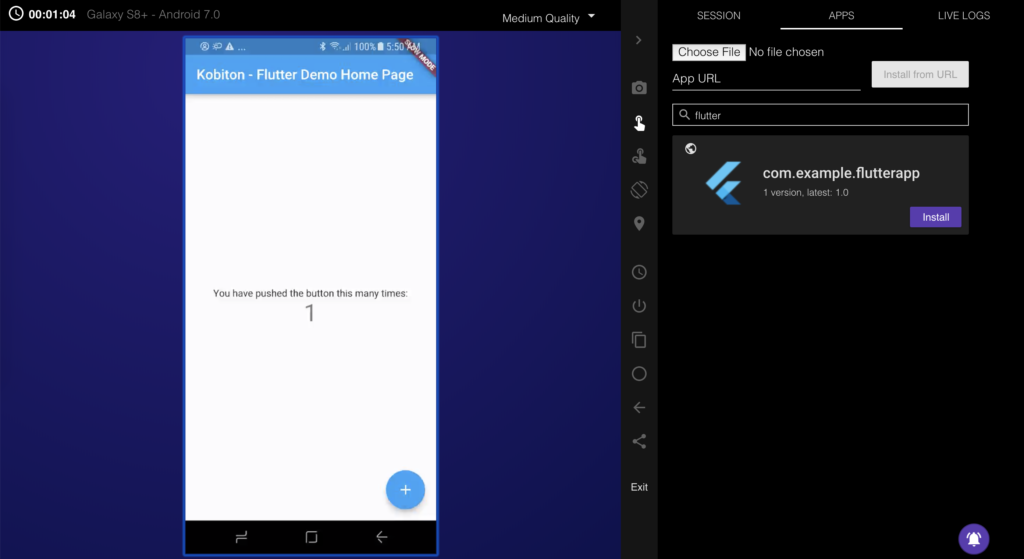
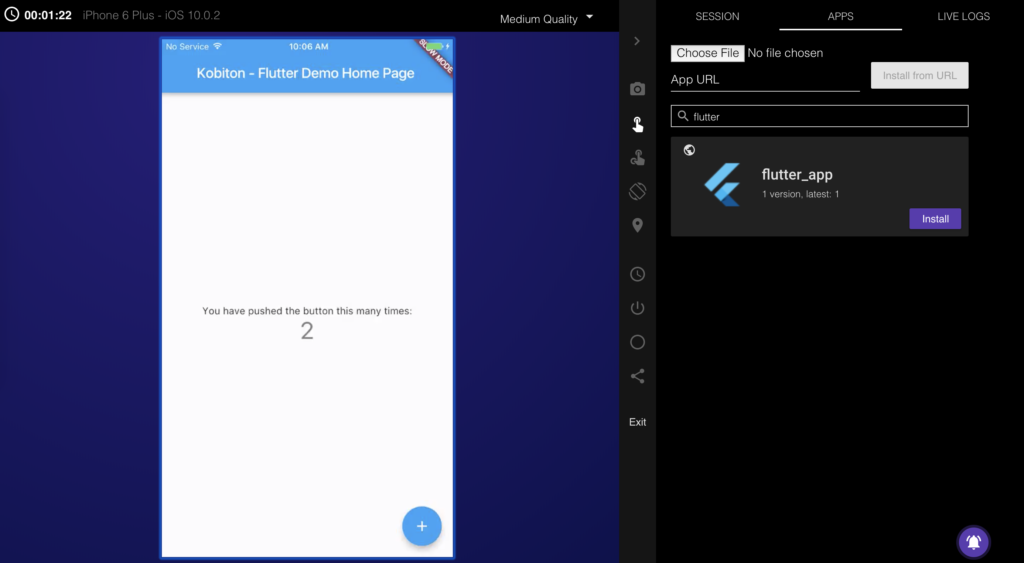
In this part, I will guide you how to use Kobiton Cloud to test your apps. A Kobiton account is required to access Kobiton system. If you do not have a Kobiton account yet, go ahead to create a free trial account and sign in. It takes just a few moments.
[crayon-69c3b0d3f02c7874096120 inline="true" class="highlighter-rouge"]<code class="highlighter-rouge"><code class="highlighter-rouge"><code class="highlighter-rouge"><code class="highlighter-rouge"><code class="highlighter-rouge"><code class="highlighter-rouge"><code class="highlighter-rouge"><code class="highlighter-rouge"><code class="highlighter-rouge"><code class="highlighter-rouge"><code class="highlighter-rouge">[/crayon]

|
1 2 3 4 5 6 7 |
<em>DesiredCapabilities capabilities = new DesiredCapabilities(); capabilities.setCapability("app", "kobiton-store:1024"); capabilities.setCapability("deviceGroup", "KOBITON"); capabilities.setCapability("deviceName", "Galaxy S8+"); capabilities.setCapability("platformVersion", "7.0"); capabilities.setCapability("platformName", "Android"); </em> |
|
1 2 3 4 5 6 |
<em>DesiredCapabilities capabilities = new DesiredCapabilities(); capabilities.setCapability("app", "kobiton-store:1024"); capabilities.setCapability("deviceGroup", "KOBITON"); capabilities.setCapability("deviceName", "iPhone 6 Plus"); capabilities.setCapability("platformVersion", "10.0.2"); capabilities.setCapability("platformName", "iOS");</em> |
[crayon-69c3b0d3f02d0472809740 inline="true" class="highlighter-rouge"]<code class="highlighter-rouge"><code class="highlighter-rouge"><code class="highlighter-rouge"><code class="highlighter-rouge"><code class="highlighter-rouge"><code class="highlighter-rouge"><code class="highlighter-rouge"><code class="highlighter-rouge"><code class="highlighter-rouge"><code class="highlighter-rouge"><code class="highlighter-rouge">[/crayon]
[crayon-69c3b0d3f02d4611875670 inline="true" class="highlighter-rouge"]<code class="highlighter-rouge">[/crayon]
[crayon-69c3b0d3f02db067196158 inline="true" class="highlighter-rouge"]<code class="highlighter-rouge"><code class="highlighter-rouge"><code class="highlighter-rouge"><code class="highlighter-rouge"><code class="highlighter-rouge"><code class="highlighter-rouge"><code class="highlighter-rouge">[/crayon]


