

Dec 13, 2020
Get ready to Pioneer the next era of Visual Testing with the NOVA AI Engine

Erin Bailey
Read More
In the last few years we have seen much of the software development world embracing the new practices of continuous integration/continuous delivery (CI/CD), and, as an essential part of that, a new focus on automated testing. The games industry, however, is dragging its feet on this, as it tends to do in the adoption of new development practices. Some of this resistance to new practices is well-founded as game development has very unique components, such as a more iterative process, a much larger amount of binary assets, and, generally, a more complex codebase than most traditional software development areas. This means that what might work well for most software fields, may not make sense in the gaming industry.
In the case of CI/CD, however, the potential benefits could significantly improve many of the worse problems that have plagued the games industry for decades — specifically, reducing the number and impact of bugs, minimizing crunch overtime, always having a build ready to show investors, and being able to act on player feedback much more quickly.
In this article, we will focus on the automated testing segment of the continuous integration pipeline, which is arguably the core part of the practice that will yield the most benefits. We will specifically be using the Unreal Engine test automation which has been used for major games like Star Wars Jedi: Fallen Order, Final Fantasy 7 Remake, Ark: Survival Evolved, Fortnite, and many more, as well as thousands of indie games.
An automated test is a segment of code that checks a particular piece of software is behaving as expected. The most obvious benefit of them is that, in theory, you no longer have to manually test this specific piece of software that you developed. Instead, you can just click a button and let your computer (or the build system) test all your code several orders of magnitude faster than you can. In a large project, that releases updates regularly, you can run thousands of these tests, called regression tests, to make sure your recent changes haven’t broken anything in the existing software.
Various forms of automated testing have been popular in software development for decades. From the late ‘90s until up until today a process called Test-driven development (TDD), puts tests at the heart of all development. The idea is that when you start to implement or improve a feature you first create a test that checks for the most fundamental aspect of the feature, then you write the feature code to satisfy that test, then you improve the test to check for the next requirement of the feature, and repeat.
This means that not only do you have ready to use regression tests at the end, but the practice generally improves code quality, helps developers focus on satisfying the requirements from the interface point of view rather than from the perspective of implementation alone, and it encourages very short development cycles which increase productivity. It is worth notating that these tests are usually not as thorough as full-functionality tests, and as it is the developers who are writing their own tests they sometimes suffer from blind spots in their testing. Therefore there are usually additional sets of tests developed to complement the developer tests. The developer also needs to have a very clear idea of the requirements, and they will likely spend a substantial amount of time writing test code rather than developing features, although the organization as a whole should theoretically spend less time catching and fixing bugs as a result.
Now that we have outlined automated testing, in general, let’s see how it can apply to game development.
One of the first issues is that games are generally much more difficult to test than most types of software. There are just usually many more actions a user could take and more steps to take that action in say, for example, an open-world game vs a web app. This is a significant hurdle for game development, but in the later sections of this article, we will describe the various types of testing that are used to provide coverage over the majority of game scenarios.
The most prominent hurdles game developers hit when attempting to apply TTD or even just trying to regularly write tests for their game is that it slows the feature development speed and that it works best with solid requirements. Game development in general, but especially at the beginning and middle of the creation process, is very dynamic and iterative at best, and extremely chaotic at worst. Designers and programmers might have ideas for features but the requirements are generally pretty fuzzy and it is unclear if those features will be a fit for the game. In game development, unlike any other software industry, you can listen to the customer, design an amazing feature with requirements based on that feedback, spend thousands of dollars to execute to those requirements perfectly, and in the end scrap the entire concept because it’s just not fun to play. As a result, the best studios spend a lot of time upfront in “preproduction” just iterating though many gameplay prototypes trying to find those that work together. Adding automated tests at this stage in development generally doesn’t make much sense. First, it takes developer time away from implementing features to writing tests thus slowing the integration cycle. Secondly, much of these prototype features will be scrapped anyway so the time writing tests will be a waste. There is an argument that using TDD in this environment will ensure that the features are built with quality and that the developers look at the features from a player’s perspective. This could be valuable for some studios that think it’s worth the time, however, most will want to build their prototypes quick and dirty just to play with the feature idea.
Once at least the prototypes of the core mechanics, libraries, and systems of the game all seem to work together in terms of simulating the experience that you want to create, it’s time to re-implement or refactor those features with code quality in mind, and create tests along with it. This often doesn’t happen because much of the rest of the game still needs to be built and managers want to see progress. It is common for games to not really come together until the last several months of development, especially for games with larger teams.
For most studios the number of open bug tickets usually increases in a steady linear upward trajectory from the end of preproduction to the last 10-20% of development. That is until the team focus shifts to polish, then the number of bugs falls drastically as the team crunches with many overtime hours and hopes they can get the majority fixed by release day. The peak number of bugs for large studios who observe this pattern is regularly in the thousands or tens of thousands. However if automated testing, orchestrated in tandem with a solid CI/CD pipeline, is done throughout the process after preproduction, the developers can address a significant portion of bugs as soon as they are created and therefore those bugs can be fixed much more easily. If a studio does take the automated testing approach, it means development will be slower or the studio will have to pay extra for specific test engineers, but the number of bugs throughout the process should be relatively small. This not only avoids a large number of crunch hours, but also means that you can have a build of your game ready very quickly if you need to show it off to a publisher or potential new investors.
There will always be some about of wasted tests. It’s very common for major game studios to cut entire levels, mechanics, and characters late in development because they didn’t have the time to give them that extra bit of polish before release. The additional development time on test in that case will also be a waste, but overall the process will likely produce a net benefit for both development and release periods.
Once the game is released and the team starts to update it, the value of all those tests significantly increases, especially for larger complex games that follow the games as a service model, like many open-world MMOs. The first major benefit is that you can run all your regression tests before you push any new changes to your, now small, manual QA team or directly to your players. This means that future releases are much less likely to break the existing game. The second major benefit is that as you can trust that the builds you have are relatively stable, so you can release more often, especially if coupled with a solid CI/CD pipeline. Releasing more often means you can respond to player feedback much more quickly, before they get frustrated or bored, which is vital for the gaming business.
So automated tests seem like a good idea at a certain point in development? Good! Let’s go over the types of tests that are implemented in the Unreal Engine specifically, although similar concepts will be found in other game engines.
For reference this article we will be Unreal version 4.25.1.
To enable Unreal’s test plugins, go to the plugins tab (Edit-> Plugins) and enable the areas of tests appropriate for you. Most of the time this will include the Editor Tests, Functional Testing Editor, and Runtime Tests.
Once you have restarted the editor you can go to Window -> Test Automation. You should then see an interface similar to the one below.
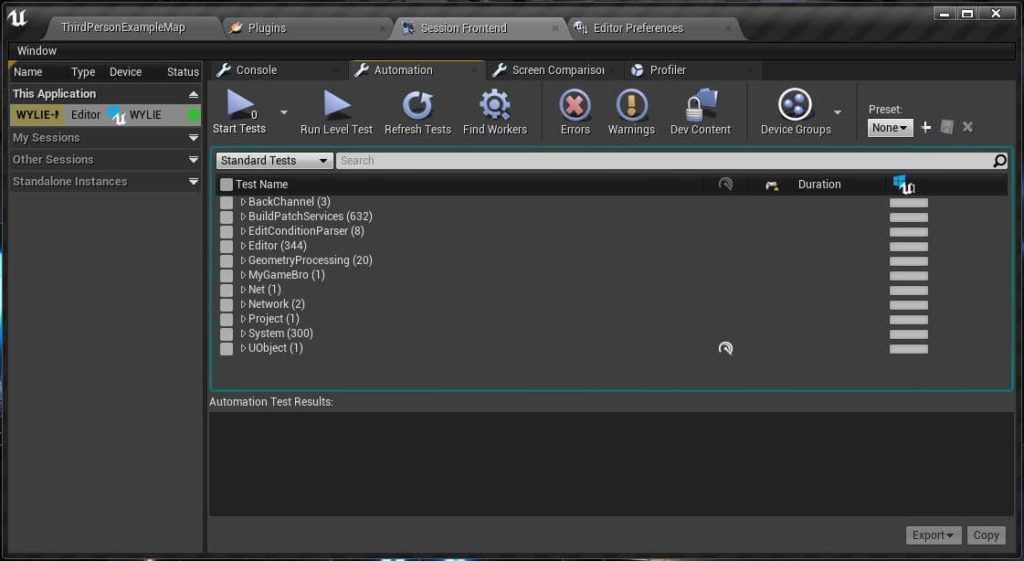
As you can see Unreal already comes with hundreds of tests that will make sure all the base functions and classes are performing as expected. This is particularly useful if you are modifying engine code.
In order to run these tests you just need to select the group or individual tests you want, then click start tests. The tests that pass will be green, and the tests that fail will be red. Most will also give you an error message if they fail. The editor will also show a nice breakdown of how long each test took so you know where to focus your test optimization efforts.
Most of the tests Unreal shows by default are called Unit Tests. Although the term does vary, it generally means a snippet of code that tests a specific small unit/component of code usually a function, structure, etc. Unit tests are not used to test big components like gameplay mechanics or systems that include art assets. More modern unit tests try to minimize the amount of dependencies they use, as a higher number of dependences makes the test more likely to break, as well as, causes longer compile and run times.
An example of a unit test from Unreal’s source code is in the file UE_4.25\Engine\Source\Runtime\Core\Private\Tests\Misc\TimespanTest.cpp.
Here is a snippet of some of the code:
// Copyright Epic Games, Inc. All Rights Reserved.
#include "CoreTypes.h"
#include "Containers/UnrealString.h"
#include "Misc/Timespan.h"
#include "Misc/AutomationTest.h"
#if WITH_DEV_AUTOMATION_TESTS
IMPLEMENT_SIMPLE_AUTOMATION_TEST(FTimespanTest, "System.Core.Misc.Timespan", EAutomationTestFlags::ApplicationContextMask | EAutomationTestFlags::SmokeFilter)
bool FTimespanTest::RunTest(const FString& Parameters)
{
	// constructors must create equal objects
	{
		FTimespan ts1_1 = FTimespan(3, 2, 1);
		FTimespan ts1_2 = FTimespan(0, 3, 2, 1);
		FTimespan ts1_3 = FTimespan(0, 3, 2, 1, 0);
		TestEqual(TEXT("Constructors must create equal objects (Hours/Minutes/Seconds vs. Days/Hours/Minutes/Seconds)"), ts1_1, ts1_2);
		TestEqual(TEXT("Constructors must create equal objects (Hours/Minutes/Seconds vs. Days/Hours/Minutes/Seconds/FractionNano)"), ts1_1, ts1_3);
	}
We can see that this unit test is checking if the FTimespan constructor is producing the same correct object using various optional parameters. We can also see that this test does have some dependencies, but they are fairly light.
If you want to create a unit test for yourself be sure:
#if WITH_DEV_AUTOMATION_TESTS macro before the function definition.IMPLEMENT_SIMPLE_AUTOMATION_TEST.A quick tip: Sometimes you need to close the editor, regenerate the project files, recompile, and reopen the editor for them to show up in the Session Frontend.
The other major type of tests are integration tests, these tests generally evaluate larger pieces of software such as gameplay mechanics or specific actions in game systems, for example, AI behavior or dropping an inventory item. Even if all the unit tests pass successfully the way those pieces of code work with each other may not result in what was intended, integration tests fill this gap. You can implement these tests in C++ with some of the same macros that we used for the unit test above. However, in UE4 it is quite common and often more convenient to implement these tests in Blueprint.
Below we will set up an example of an integration test that checks if a player can reach a platform of a specific height with their double jump ability. This height could be a standard for this type of cliff in our game maps, so the player needs to easily be able to clear it.
Jump Max Count of 1. We need to change that to enable the double jump. Off the Begin Play node, right click to find and set the Jump Max Count to 2.Timeout is something appropriate for the test, in our case 10 seconds is plenty.
As with most testing code we break it up into three steps. First set up the test: Here we are setting the actor location to beside the platform and rotation to face the platform so that when the test runs we will be able to see the characters’ feet easily clear the top of it. Second, is the code that runs the test, in this case we set the character to jump once, then wait for 0.5 seconds to reach a high elevation, then repeat for the even higher elevation of the second jump. Lastly, the block to check the results of the test: In this case, we are checking that at close to the maximum height of the double jump the player’s Z coordinate is equal to or above 400. We do this with the Assert node where we can also provide a string as an explication of the test. We then execute the Finish Test node to let Unreal know the test has completed and not to time it out.
You should see your character automatically double jump to reach a height that is above that of the platform, specifically greater than or equal to 400. See the screenshot below. Note that the character will not land on the platform as we specifically did not add any forward movement component. The platform is here for visual demonstration purposes only.
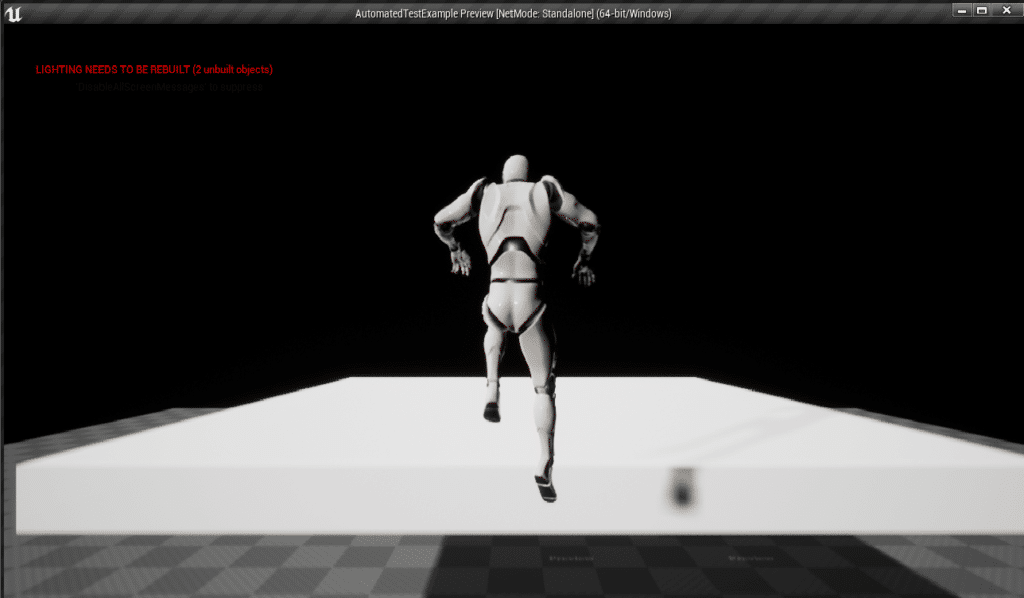
The Session Frontend should also notify you that the test has passed successfully. You may also notice that the test took 1-2 seconds, compared to the above unit test usually takes about 0.005 seconds. That difference is the major downside of these heavy integration tests. Most gameplay integration tests take closer to 10-20 seconds depending on your game. When you have thousands or tens of thousands of tests that can discourage you from running the tests regularly or even block your development team. Integration tests take longer because 1) They have to load more assets and dependencies 2) The nature of the gameplay often requires us to wait until a condition is met before we can proceed. In our case, we had to wait until the character was at the peak of the jump before either starting the next jump or checking it had reached the correct height.
Just to note, using a delay node here is actually not best practice, because there might be a lag in the jump code if you are say, loading some other heavy assets in the scene. This may cause the second jump to happen when the first jump is not near maximum elevation and hence the character will not reach the intended height. We used the delay node here to make the code simpler. A better strategy would be to check when the jump is at max elevation then fire the second jump or height test. Even using that better method still involves waiting for the max elevation of both jumps so the entire test will still be close to 1-2 seconds.
Although these kinds of gameplay tests are the truest to real gameplay as we can augment, we should try to implement the tests in different ways so as to reduce the runtime.
Keep in mind above types of tests are more guidelines than strict rules. You should have some tests that clearly fall in either category where appropriate, but you can have tests that are a bit of both. They may have large dependencies, like when spawning in a character, but also rely on UE4 to set up a very minimal test world behind the scenes, as well as, only change and test the state during a few ticks (frames). Most of these kinds of tests will be closer to unit test times rather than the integration test times we saw above.
While unit test and integration (or feature) tests are the most used types of code tests, Unreal also supports: Content Stress Tests and Screen Shot Comparisions
Content Stress Tests are what they sound like, loading lots of assets or measuring values under a heavly load to check for unexpected dips in performace or crashes. These tests can be created using similar macros to those used in unit test example.
Screenshot Comparison is just an automated tool that allows your manual QA team to quickly interate through visuals to spot any rendering issues.
Smoke tests are not a separate type of test but a filter that can be added to any essential automated code test so that it can run every time the game or editor starts. Use this sparingly, as it is only for fast essential tests. Unreal’s documentation mentions that all Smoke tests should complete within 1 second.
Technical:
Organizational:
Hopefully this article has helped you understand why, when, and where automated testing can be useful in game development. We have shown you how to use the fundamental tools of Unreal’s automated testing system so you can start implementing them in your own game or experience. We have also outlined many of the technical and managerial challenges, as well as the massive benefits you will gain if you persist with the practice. It’s a long road, but worth it in the end.


