
Mobile automation testing has become essential for modern software teams that need to ensure their applications work reliably across multiple devices and operating systems. One of the most widely used frameworks for this purpose is Appium, an open-source automation tool designed for testing native, hybrid, and mobile web applications.
When working with tools like Katalon Studio, Appium acts as the underlying automation engine that communicates with Android or iOS devices. This becomes even more powerful when combined with cloud device platforms such as Kobiton, which allow testers to execute tests on real devices without maintaining physical hardware.
However, setting up Appium on a local machine can be challenging because it requires multiple dependencies, environment variables, and proper configuration. Even experienced developers often spend several hours resolving installation issues.
This guide provides a complete, experience-based walkthrough for installing Appium on Windows, including all required dependencies and verification steps to ensure everything works correctly for mobile automation testing.
Why Appium Is Required for Mobile Automation
Appium serves as a bridge between your test automation tool and mobile devices. When a test script runs in Katalon Studio, the script sends commands to the Appium server. The Appium server then translates those commands into actions on the device, such as tapping buttons, entering text, or validating UI elements.
Without Appium installed and running, tools like Katalon Studio cannot interact with mobile devices or emulators.
In most mobile automation setups, Appium works alongside several other technologies, including:
- Node.js – Required because Appium is built on Node.js
- Android Studio – Provides Android SDK tools and emulators
- Java Development Kit – Required for Android automation drivers
These components must all be properly installed before Appium can function correctly.
Step 1: Install Node.js
Since Appium is built using Node.js, the first step is to install Node.js on your machine.
Visit the official Node.js website and download the LTS (Long Term Support) version, which is the most stable release recommended for development environments.
After downloading the installer:
- Run the installation file.
- Follow the default installation steps.
- Restart your computer (recommended).
Once installation is complete, verify that Node.js is working by opening Command Prompt and running:
node -v
npm -v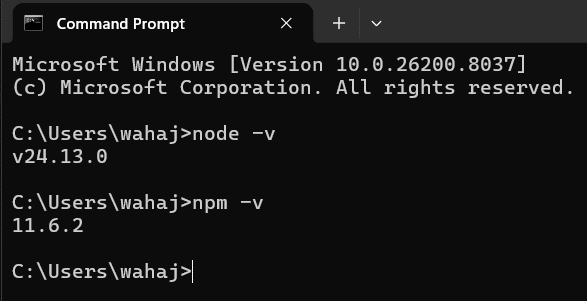
If version numbers appear for both commands, Node.js and the Node Package Manager (npm) have been installed successfully.
Step 2: Install Appium Globally
After Node.js is installed, Appium can be installed using npm.
Open Command Prompt and run:
npm install -g appiumThe -g flag installs Appium globally so it can be accessed from anywhere on your system.
Once the installation finishes, confirm that Appium was installed correctly by running:
appium -v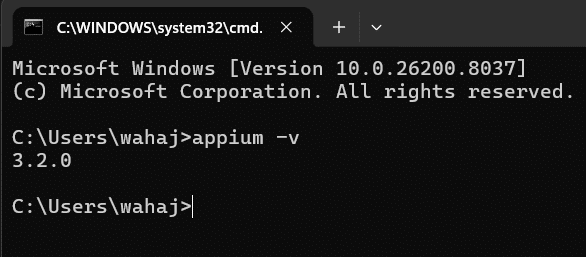
If the command returns an Appium version number (for example, 3.x.x), then Appium has been installed successfully.
Step 3: Install Appium Doctor
Appium requires multiple dependencies, and manually verifying each one can be time-consuming. This is where Appium Doctor becomes extremely useful.
Appium Doctor is a diagnostic tool that scans your system and identifies missing or misconfigured dependencies required for mobile automation.
Install it using:
npm install -g appium-doctorAfter installation, verify it by running:
appium-doctor --version
This tool will later help confirm whether your Android automation environment is correctly configured.
Step 4: Install Android Studio and Android SDK
To automate Android applications, you must install the Android SDK, which provides essential tools such as ADB (Android Debug Bridge) and emulators.
The easiest way to obtain these tools is by installing Android Studio.
After installing Android Studio:
- Open Android Studio.
- Select More Actions → SDK Manager.
Inside the SDK Manager, configure the following components.

Under SDK Platforms
Select one of the latest Android versions such as:
- Android 14
- Android 15
Using recent Android versions ensures compatibility with modern devices.

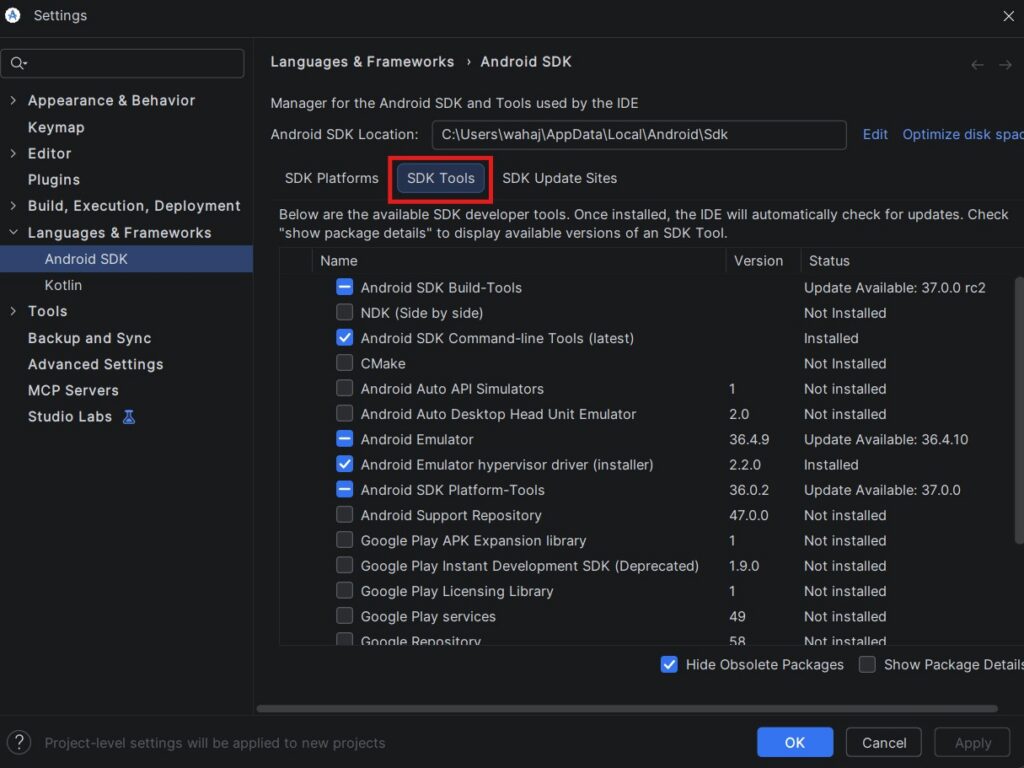
Under SDK Tools
Enable the following tools:
- Android SDK Platform Tools
- Android SDK Build Tools
- Android Emulator
- Android SDK Command-line Tools (latest)
After selecting these options, click Apply to begin the installation.
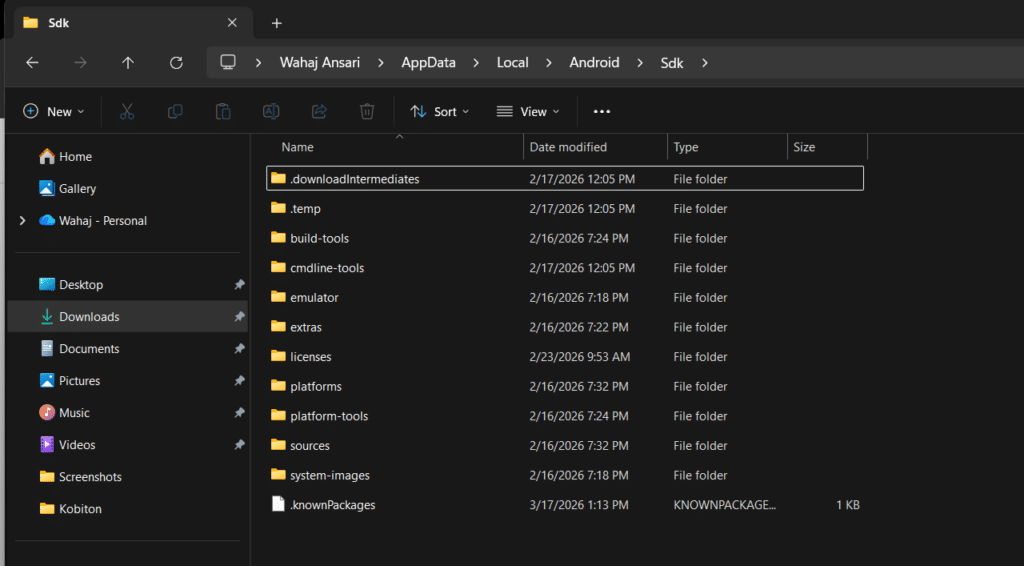
By default, the Android SDK will be installed in the following location:
C:\Users\YOUR_USERNAME\AppData\Local\Android\SdkMake note of this path because it will be needed when configuring environment variables.
Step 5: Install Java JDK 17
Android automation drivers rely on Java, so installing the Java Development Kit (JDK) is another essential step.
Download and install JDK 17, which is widely supported for Android automation environments.
During installation, enable the option to automatically configure the JAVA_HOME environment variable if available.
Once installation finishes, verify Java by running:
java -versionYou should see the installed Java version printed in the terminal.
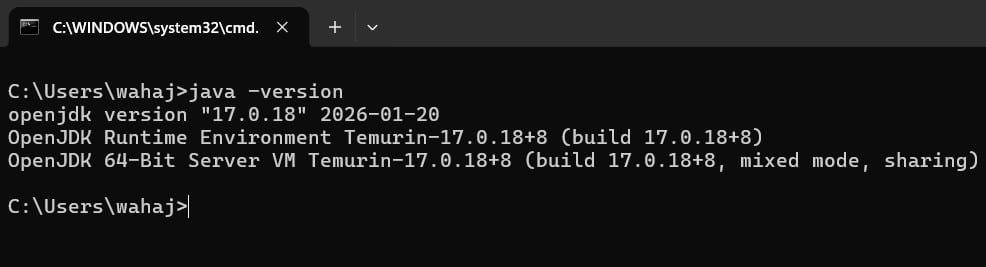
To confirm the JAVA_HOME variable, run:
echo %JAVA_HOME%If a valid installation path appears, Java has been configured correctly.
Step 6: Configure Android Environment Variables
For Appium to communicate with Android devices, the system must know where the Android SDK is located. This is done using environment variables.
Open Windows Search and type:
Environment VariablesThen open Edit the system environment variables and click Environment Variables.
Under User Variables, create a new variable with the following values:
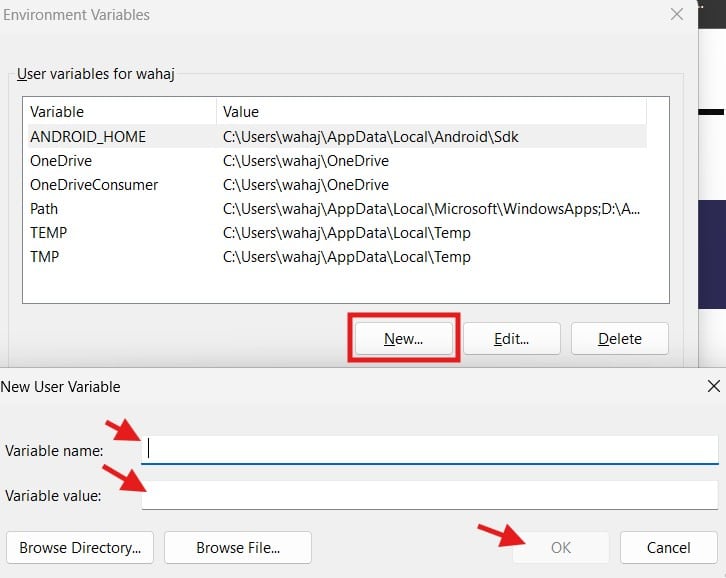
Variable name
ANDROID_HOMEVariable value
C:\Users\YOUR_USERNAME\AppData\Local\Android\SdkThis tells Appium where to find the Android SDK.
Step 7: Add Android Tools to the System PATH
Next, Android tools must be added to the system PATH so they can be accessed from the command line.
Edit the Path variable and add the following entries:
%ANDROID_HOME%\platform-tools
%ANDROID_HOME%\emulator
%ANDROID_HOME%\cmdline-tools\latest\bin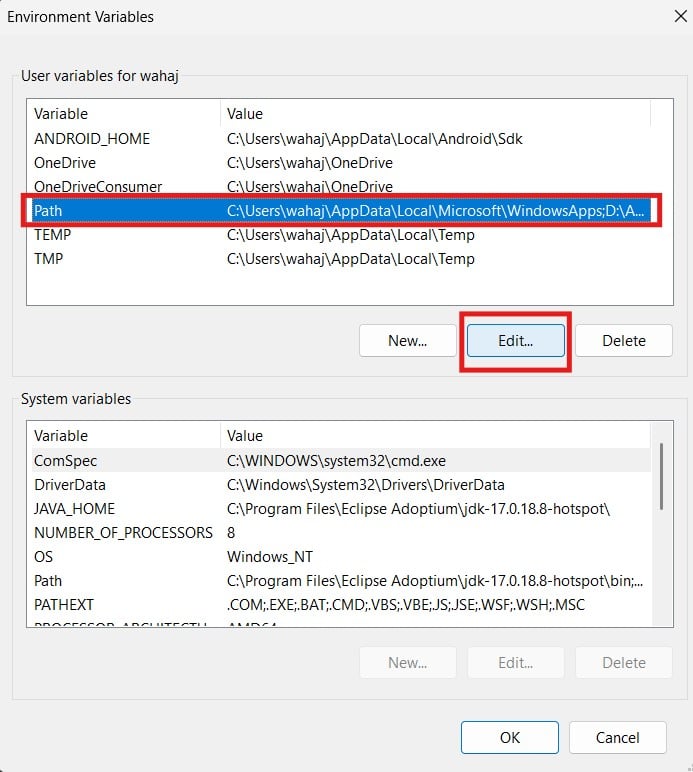
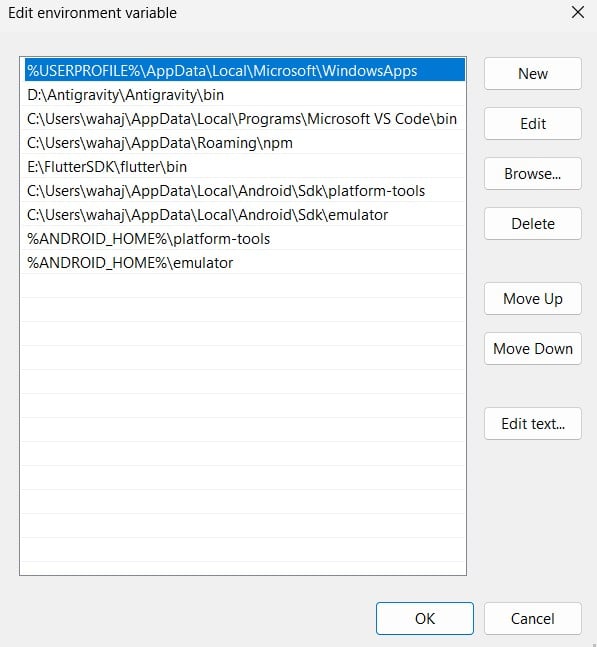
After adding these entries, click OK to save the changes and restart Command Prompt.
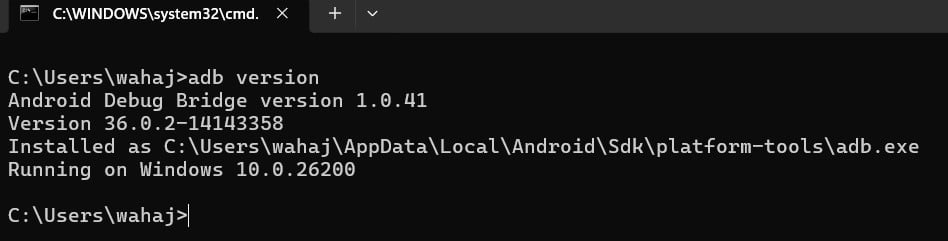
Step 8: Verify Android Debug Bridge
ADB is a command-line tool used to communicate with Android devices.
Verify that ADB works correctly by running:
adb versionIf the ADB version appears in the terminal, the Android SDK tools are properly configured.
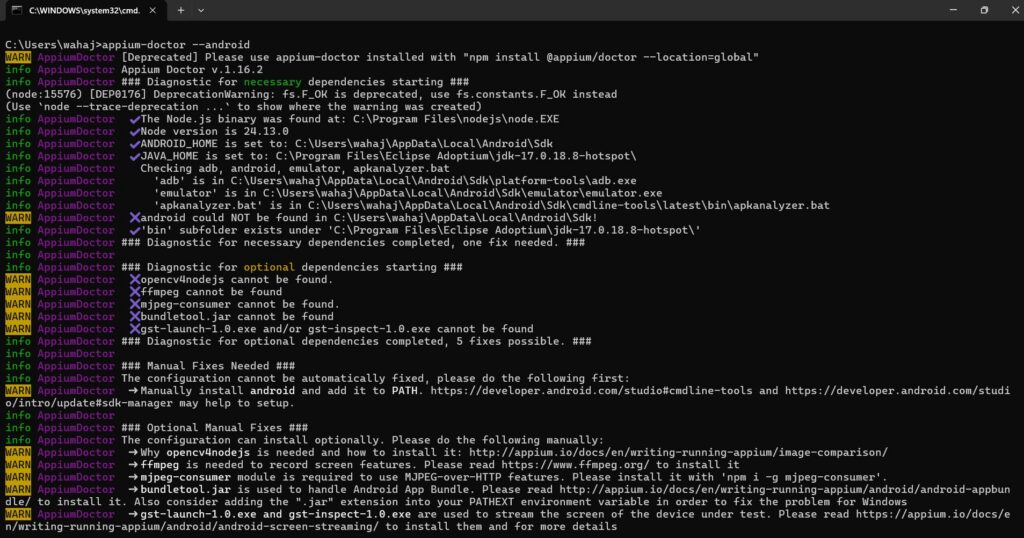
Step 9: Run Appium Doctor
Now that all dependencies have been installed, run Appium Doctor to check whether the system is fully prepared for Android automation.
Execute the following command:
appium-doctor --androidIf the setup is correct, you should see confirmations such as:
- ANDROID_HOME is set
- JAVA_HOME is set
- adb found
- emulator found
Some warnings may appear for optional dependencies, such as ffmpeg. These are not required for most automation setups.
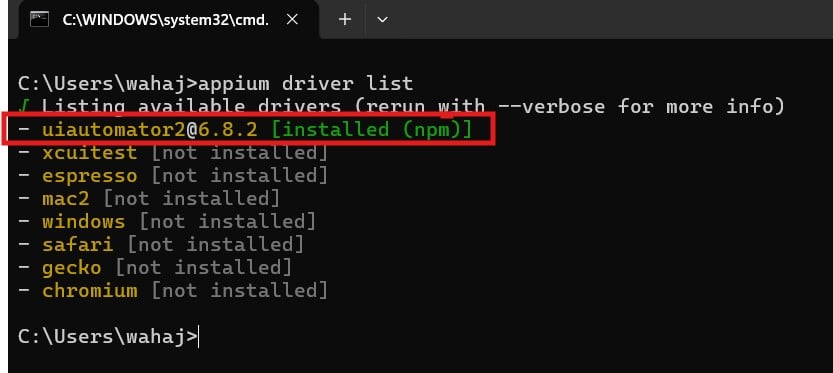
Step 10: Install the Appium Android Driver
Modern versions of Appium separate drivers from the core installation. For Android automation, the UiAutomator2 driver must be installed manually.
Run the following command:
appium driver install uiautomator2To verify the installation, run:
appium driver listYou should see the UiAutomator2 driver listed as installed.
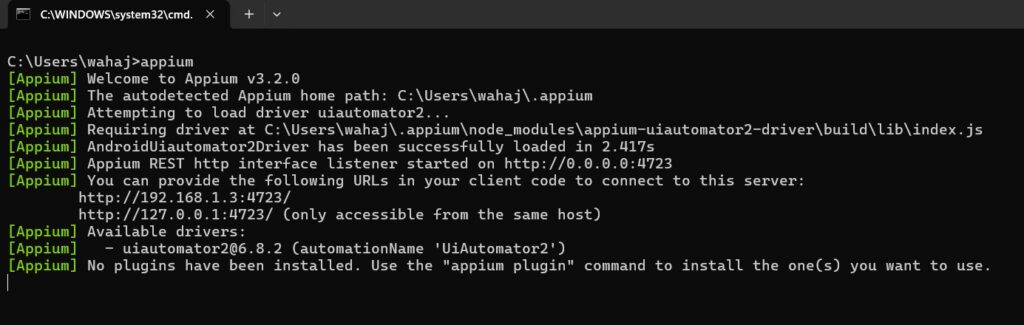
Step 11: Start the Appium Server
Once all dependencies are installed and verified, you can start the Appium server.
Run the following command:
appiumIf everything is configured correctly, you should see a message similar to:
Appium REST http interface listener started on http://0.0.0.0:4723
AndroidUiAutomator2Driver successfully loadedThis confirms that the Appium server is running successfully.
Common Challenges During Appium Installation
Installing Appium can sometimes be frustrating because it relies on several dependencies working together correctly.
One common challenge is missing or incorrectly configured environment variables, such as JAVA_HOME or ANDROID_HOME. If these variables are not set properly, Appium will fail to detect the Android SDK.
Another frequent issue occurs when Android SDK tools are installed but not added to the system PATH, preventing commands such as adb from working in the terminal.
Additionally, many users are unaware that newer versions of Appium require drivers to be installed separately. Without installing the UiAutomator2 driver, Android automation tests cannot run.
Tools like Appium Doctor significantly simplify troubleshooting because they automatically detect missing dependencies and configuration issues.
Final Verification Checklist
Before using Appium with your automation tools, confirm that the following commands work successfully:
node -v
appium -v
java -version
echo %JAVA_HOME%
echo %ANDROID_HOME%
adb version
appium-doctor --android
appiumIf all commands execute without errors, your system is fully configured for mobile automation testing.
Troubleshooting Common Appium Installation Issues
Even when following all steps correctly, installing Appium can sometimes fail due to hidden configuration issues or missing dependencies. Below are the most common problems encountered during setup and how to resolve them.
Appium Command Not Recognized
Problem:
When running appium -v, you see:
'appium' is not recognized as an internal or external commandCause:
Appium is either not installed globally or npm global packages are not added to the system PATH.
Solution:
- Reinstall Appium globally:
npm install -g appium- Restart Command Prompt
- Ensure npm global path is added to PATH:
C:\Users\YOUR_USERNAME\AppData\Roaming\npmNode.js Installed but npm Not Working
Problem:
npm -v does not return a version.
Cause:
Incomplete installation of Node.js or PATH misconfiguration.
Solution:
- Reinstall Node.js (LTS version)
- Restart your PC
- Verify again using:
node -v
npm -vJAVA_HOME Not Set or Incorrect
Problem:
Appium Doctor shows:
JAVA_HOME is NOT setCause:
Java is installed but environment variable is missing or incorrect.
Solution:
- Install Java Development Kit (JDK 17 recommended)
- Set environment variable:
JAVA_HOME = C:\Program Files\Java\jdk-17- Restart CMD and verify:
echo %JAVA_HOME%ANDROID_HOME Not Detected
Problem:
Appium Doctor shows:
ANDROID_HOME is NOT setCause:
Android SDK path is not configured.
Solution:
- Install Android Studio
- Set environment variable:
ANDROID_HOME = C:\Users\YOUR_USERNAME\AppData\Local\Android\Sdk- Restart CMD and verify:
echo %ANDROID_HOME%ADB Command Not Found
Problem:
Running adb version results in:
'adb' is not recognizedCause:
Android SDK platform-tools are not added to PATH.
Solution:
Add this to PATH:
%ANDROID_HOME%\platform-toolsRestart CMD and run:
adb versionAppium Doctor Shows Multiple Errors
Problem:
appium-doctor –android returns multiple ❌ errors.
Cause:
Missing dependencies or incorrect configuration.
Solution:
- Carefully read each error message
- Fix one issue at a time (Java, Android SDK, PATH, etc.)
- Re-run:
appium-doctor --androidThis iterative approach is the fastest way to resolve setup issues.
UiAutomator2 Driver Not Installed
Problem:
Appium starts but Android tests fail.
Cause:
Required driver is not installed (common in Appium 2+).
Solution:
Install the driver manually:
appium driver install uiautomator2Verify:
appium driver listAppium Server Starts but Tests Do Not Run
Problem:
Appium runs successfully, but Katalon Studio cannot execute tests.
Possible Causes:
- Wrong server URL
- Device/emulator not connected
- Missing permissions
Solution:
- Use correct server URL:
http://127.0.0.1:4723/- Ensure device is detected:
adb devicesEmulator Not Detected
Problem:
No emulator found during testing.
Cause:
Emulator not installed or not started.
Solution:
- Open Android Studio
- Start an emulator from Device Manager
- Verify:
adb devicesInstallation Works After Retry (Real-World Insight)
In some cases, installation may fail initially but succeed on retry without any changes. This usually happens due to:
- Temporary npm/network issues
- Background processes interfering
- PATH updates not applied yet
Recommendation:
If something fails unexpectedly:
- Restart your PC
- Open a fresh Command Prompt
- Try the command again
This simple step often resolves unexplained issues.
Final Tip
If you’re stuck, the most effective approach is:
- Run:
appium-doctor --android- Fix issues one by one
- Re-run the command
This ensures your environment is fully aligned with Appium requirements.
Conclusion
Installing Appium for mobile automation testing involves multiple components, including Node.js, Java, and Android SDK tools. Although the setup process may initially seem complex, following the steps in this guide ensures a stable and reliable environment for Android test automation.
Once Appium is successfully installed and configured, it can be integrated with automation platforms such as Katalon Studio and cloud testing services like Kobiton, enabling teams to run scalable mobile tests across a wide range of devices.
With the correct setup in place, Appium becomes a powerful foundation for building efficient and maintainable mobile automation workflows.