
Ensuring your mobile app is usable by everyone, including people with disabilities, is no longer optional it is essential. With regulations such as WCAG, ADA, and Section 508 shaping digital accessibility standards, businesses must adopt robust testing practices for their mobile applications. This is where iOS and Android accessibility testing play a critical role.
In this blog, we will explore how to perform accessibility testing for both platforms, the tools you can use, and how to integrate these checks into your development workflow.
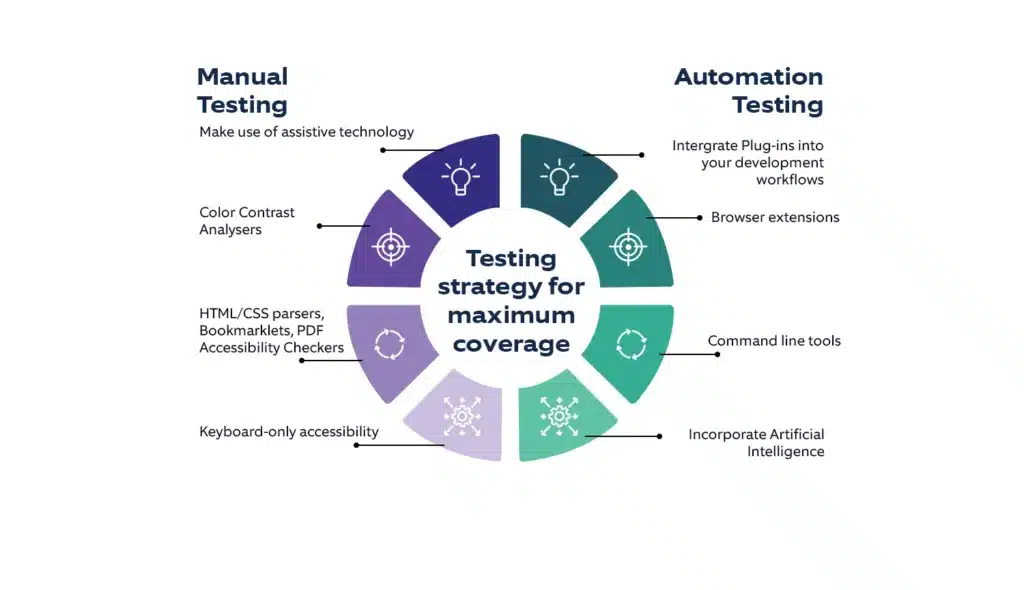
Understanding the differences between iOS and Android accessibility testing
While the end goal remains the same, building inclusive and compliant applications, the testing approach varies between platforms.
iOS accessibility testing focuses heavily on Apple’s native assistive technologies, such as VoiceOver, Zoom, and Dynamic Type. Testers must ensure that all UI elements are properly labeled, the focus order is logical, and gestures are accessible and intuitive.
Android accessibility testing, on the other hand, relies on tools like TalkBack, Switch Access, and the Android Accessibility Suite. Testers need to validate that interactive elements are keyboard-accessible, touch targets are sufficiently large, and visual contrast meets recommended accessibility ratios.
By tailoring your strategy to each operating system, you can deliver a more consistent and accessible user experience across devices.
Step 1: Choose the right iOS accessibility testing tools
Testing accessibility on iOS typically begins with Apple’s Accessibility Inspector, which helps identify issues such as missing labels, incorrect roles, and insufficient color contrast. In addition, developers and QA testers often rely on:
- VoiceOver to simulate the screen reader experience
- XCUITest with accessibility checks to integrate validation into automated test suites
- Third-party frameworks like GTXiLib for XCTest-based accessibility testing
These tools enable teams to detect accessibility issues early in the development cycle and avoid costly fixes later.
Step 2: Select the right tools for Android accessibility
Google provides a strong suite of native accessibility testing tools. The most commonly used include:
- Accessibility Scanner, which runs on real devices and suggests improvements such as larger touch targets and clearer labels
- Accessibility Insights for Android, an open-source tool that integrates well with development environments
- TalkBack, the built-in screen reader that helps simulate real-world usage for visually impaired users
Using these tools together ensures a balanced approach, covering both automated checks and real user interactions.
Step 3: Design effective accessibility testing workflows
Accessibility is not a one-time task it is an ongoing process. High-performing teams establish structured accessibility testing workflows that combine both manual and automated checks. A typical workflow may include:
- Early-stage scans using automated tools
- Manual testing with VoiceOver on iOS and TalkBack on Android
- Accessibility audits using tools like GTXiLib or Accessibility Insights
- Sharing reports across design, QA, and development teams to prioritize fixes
- Regression testing before release to ensure issues do not reappear
By following a well-defined workflow, teams can maintain efficiency while staying aligned with accessibility standards and compliance requirements.
Step 4: Embed accessibility testing into CI/CD pipelines
As mobile teams increasingly adopt DevOps practices, embedding accessibility checks into CI/CD pipelines has become a best practice. CI/CD accessibility testing ensures that every code change triggers automated accessibility scans.
For example, iOS teams can run Appium-based accessibility testing scripts on simulators or real devices, while Android teams can configure automated scans using tools like Accessibility Scanner in cloud-based environments. This proactive approach helps catch accessibility regressions before they reach production.
Step 5: Validate with real users
While automation and simulated testing are powerful, they cannot fully replicate real-world experiences. Accessibility testing with real users, especially individuals with disabilities, provides invaluable insights.
These users can uncover usability challenges that automated tools often miss, such as confusing gestures, unclear navigation patterns, or inconsistent focus behavior. This makes Mobile Usability Testing an essential part of understanding how different users interact with an application and where improvements are needed.
Involving real users in your testing process not only improves accessibility but also demonstrates a genuine commitment to inclusivity.
Final thoughts
Performing accessibility testing across iOS and Android requires a balanced approach that combines automated scans, manual validation, and real-world feedback. By leveraging platform-specific tools, establishing strong workflows, embedding accessibility into CI/CD pipelines, and incorporating real user testing, your team can build mobile applications that are inclusive, compliant, and user-friendly.
Ultimately, accessibility is not just about meeting legal requirements, it is about creating digital experiences that serve everyone. By making accessibility a core part of your development strategy, you move beyond compliance and embrace inclusivity as a fundamental value.
FAQs
What is mobile accessibility testing?
Mobile accessibility testing checks whether an app can be used easily by people with disabilities, including users who rely on screen readers, larger text, keyboard navigation, or assistive gestures.
How is iOS accessibility testing different from Android accessibility testing?
iOS testing mainly focuses on tools like VoiceOver, Zoom, Dynamic Type, and Accessibility Inspector, while Android testing uses TalkBack, Switch Access, Accessibility Scanner, and Android Accessibility Suite.
Which tools are used for iOS accessibility testing?
Common iOS accessibility testing tools include Apple Accessibility Inspector, VoiceOver, XCUITest accessibility checks, and third-party frameworks such as GTXiLib.
Which tools are used for Android accessibility testing?
Android accessibility testing often uses Accessibility Scanner, Accessibility Insights for Android, TalkBack, and the Android Accessibility Suite to identify usability and accessibility issues.
Why should accessibility testing be added to CI/CD pipelines?
Adding accessibility testing to CI/CD helps teams catch accessibility issues early whenever new code is added, reducing the risk of problems reaching production