Your First Appium Test Case: IOS and Android

Reading Time : 26 min read
Appium iOS test example showing automated iOS app testing workflow

What Is an Appium Test Case?

An Appium test case is a set of instructions, written in a language like Java, Python or JavaScript, that drives a mobile app the way a real user would — tapping buttons, typing into fields, reading what comes back, and checking it against what you expected. Appium sends those instructions to the device through a single API that works on both Android and iOS, which is why one test case can often cover both platforms with only its configuration changed.

  • Everything in this guide uses Java with TestNG, running from IntelliJ IDEA. Before you start, make sure you have:
  • Appium installed, with the UiAutomator2 driver for Android and the XCUITest driver for iOS
  • The Java Development Kit and an IDE — we use IntelliJ IDEA
  • Android Studio and the Android SDK for Android testing, or Xcode on a Mac for iOS testing
  • A real device, emulator or simulator you can connect to
  • The app you want to test, as an .apk, .app or .ipa file — or already installed on the device

If any of that is missing, work through Your First Appium Test Case: Setting up the IDE first and come back — the rest of this guide assumes a working environment.

Setting Up the Project and Dependencies

Before writing a test case we need a project to write it in. We will use IntelliJ IDEA and Maven — open IntelliJ, click New Project, give it a name, pick your JDK, and select Maven as the build system. Gradle works equally well if you prefer it; the only difference is how you declare the dependencies below.

Maven will build the project once and download what it needs. The first build takes a while, since it is fetching everything for the first time. After that, open pom.xml and add the two libraries every Appium test case needs — the Appium Java Client, which is the Java binding for talking to the Appium server, and TestNG, the testing framework we use for annotations and assertions.

 <properties>
          <maven.compiler.source>17</maven.compiler.source>
          <maven.compiler.target>17</maven.compiler.target>
          <appium.java.client.version>REPLACE</appium.java.client.version>
          <testng.version>REPLACE</testng.version>
      </properties>
       
      <dependencies>
          <!-- Appium Java Client -->
          <dependency>
              <groupId>io.appium</groupId>
              <artifactId>java-client</artifactId>
              <version>${appium.java.client.version}</version>
          </dependency>
       
          <!-- TestNG -->
          <dependency>
              <groupId>org.testng</groupId>
              <artifactId>testng</artifactId>
              <version>${testng.version}</version>
              <scope>test</scope>
          </dependency>
       
          <!-- SLF4J Simple Logger, to silence SLF4J warnings on startup -->
          <dependency>
              <groupId>org.slf4j</groupId>
              <artifactId>slf4j-simple</artifactId>
              <version>${slf4j.version}</version>
          </dependency>
      </dependencies>

You do not need to declare Selenium separately. The Appium Java Client already depends on it, and pinning your own version alongside it is the most common cause of the version conflicts beginners hit on their first build. Add Selenium explicitly only if your framework needs tighter control over which version you get.

We put our test classes under src/test, which is why TestNG is declared with test scope. Once Maven finishes syncing you will be able to import the Appium and TestNG classes in that directory, and we are ready to write a test case.

The TestNG annotations we use

TestNG uses annotations to control when each method runs. Five cover almost everything you need in a mobile test case:

AnnotationWhen it runsWhat to put in it
@BeforeTestOnce, before any test method in the <test> tag.Driver initialisation and Desired Capabilities — the setup you only want to pay for once. This is where our setUp() method sits.
@BeforeMethodBefore every test method.Preconditions each individual test needs, such as returning to a known screen.
@TestAs a test.The actual test case: the actions and the assertions.
@AfterMethodAfter every test method.Per-test cleanup, such as resetting app state or logging a result.
@AfterTestOnce, after all test methods have finished.Closing the session with driver.quit().

Because @BeforeTest runs once, the driver object it creates stays available to every test method in the class — which is why both of our test cases can call driver directly without creating a new session each time. You can read more about the full set of annotations in the TestNG documentation.

Understanding Desired Capabilities

Desired Capabilities are a set of key-value pairs your test sends to the Appium server when it starts a session. They tell the server which platform to target, which automation engine to use, which device to connect to and which app to launch. Get them wrong and the session never opens, so it is worth understanding each one before you run anything.

These are the capabilities we use for the two test cases in this guide:

CapabilityPlatformWhat it doesExample value
platformNameBothThe mobile operating system under test.Android / iOS
automationNameBothThe automation engine Appium hands your commands to. UiAutomator2 for Android, XCUITest for iOS.UiAutomator2
deviceNameBothThe device, emulator or simulator to run on. Run $ adb devices to list connected Android devices, and $ xcrun simctl list devices for iOS simulators.9B151FFAZ004ZQ
platformVersionBothThe OS version on the device. Required for iOS, optional for Android.18.0
appBothAbsolute path to the build you want Appium to install and launch — an .apk for Android, an .app or .ipa for iOS./path/to/TestApp.app
appPackageAndroidPackage name of an app that is already installed. Use this instead of app when you do not want Appium to reinstall.io.appium.android.apis
appActivityAndroidThe activity Appium should launch inside that package.io.appium.android.apis.ApiDemos
bundleIdiOSThe iOS equivalent of appPackage — the unique identifier of an already-installed app.com.kannedari.testapp
noResetBothWhen true, keeps app data and state between sessions instead of resetting it.true

Use app when you want Appium to install a fresh build before the test runs. Use appPackage and appActivity (or bundleId on iOS) when the app is already on the device and you only need Appium to open it. Our Android test case uses the second approach, because API Demos is already installed; the iOS test case uses the first, because we are pointing at a freshly built .app.

A note on the appium: prefix

You will see capabilities written two ways online, and the difference trips people up. Appium follows the W3C WebDriver standard, which allows only a fixed set of standard capability names. platformName is one of them; everything else specific to Appium has to be namespaced with an appium: prefix — appium:automationName, appium:deviceName, appium:app, and so on. Older tutorials written for Appium 1 use the bare names, and those will be rejected by a modern server.

The good news is that when you use the Java options builders as we do in this guide, you do not have to write the prefix yourself. UiAutomator2Options and XCUITestOptions add it for you, which is exactly why setDeviceName() and setApp() work without any prefix in the code above. If you ever build capabilities by hand as raw JSON, add the prefix:

Correct: { "platformName": "Android", "appium:automationName": "UiAutomator2", "appium:deviceName": "9B151FFAZ004ZQ", "appium:appPackage": "io.appium.android.apis" }

Correct: { "platformName": "iOS", "appium:automationName": "XCUITest", "appium:deviceName": "iPhone 16 Plus", "appium:platformVersion": "18.0", "appium:app": "/path/to/TestApp.app" }

Exploring Test Cases for Both IOS and Android 

In this article, we will examine test cases for both IOS and Android platforms. Even if you are not currently testing on a specific platform, it’s beneficial to review both sections. Each example showcases different scenarios and features, enriching your understanding of Appium’s capabilities.

  • iOS Test Case: Similarly, we will look at an automation scenario for iOS , demonstrating how to leverage Appium’s capabilities in a different environment.
  • Android Test Case: We will explore a specific automation scenario tailored for Android devices, highlighting unique features and functionalities available on this platform.

iOS

Let’s make our test case a little more sophisticated, while also looking at how we can work with iOS. If you are not planning on using iOS, we still suggest you read this section as we’ll be introducing new concepts applicable to both iOS and Android. For our iOS sample test case we will create a separate Test Case file named SampleIOS.java.

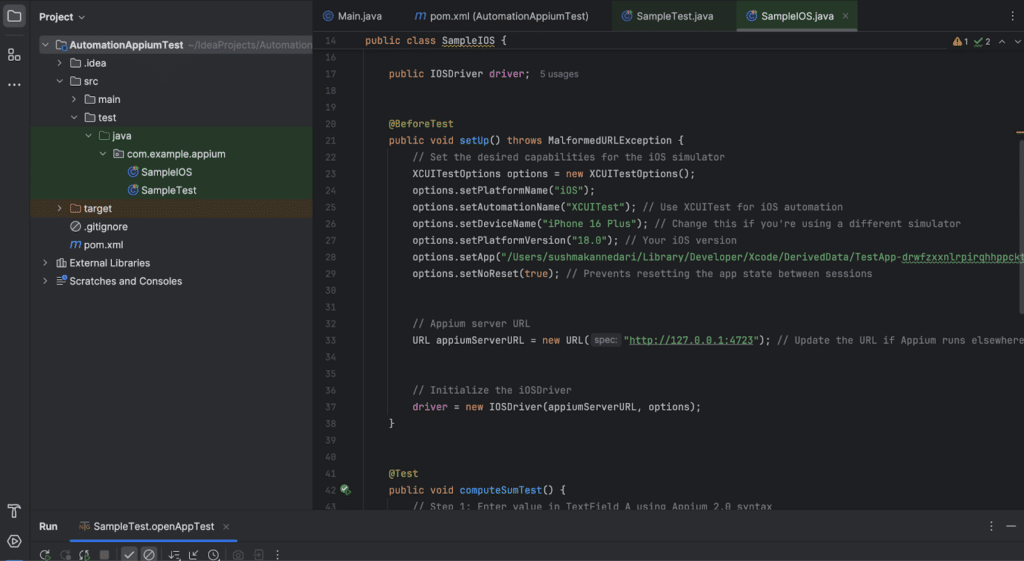
As we discussed above we need to put the iOS capabilities instead of Android capabilities, and define an IOSDriver class instead of an AndroidDriver class.

Screenshot of IntelliJ IDEA showing the setup of an iOS test case using the IOSDriver class with XCUITestOptions for iOS automation. The code specifies the iOS platform version, device name, and app path for the test. The project explorer on the left shows the structure of the test files
iOSDriver initialization and Desired Capabilities.

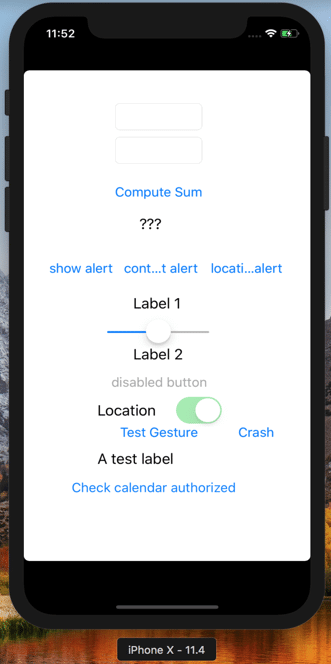
After specifying the desired capabilities, we can write the Automation test case. We have a sample app (.app file, which will work on iOS Simulator only) for automation. In this app, there is a feature where you can add 2 integer numbers and can get the results. So, we will automate this feature.

Screenshot of an iOS sample application. The app screen displays various UI elements, including text fields, a 'Compute Sum' button, alerts, labels, a disabled button, a location switch, and other test controls like 'Test Gesture' and 'Crash.
iOS Sample Application

The steps to automate this would be:

1. Find the locator of TextField A and enter the value (ie. Send keys) from the keyboard.

driver.findElement(AppiumBy.id("IntegerA")).sendKeys(5 + "");

NOTE: The sendKeys() method accepts only String parameter, so we have converted the Integer value to a String by appending a blank String value.

2. Find the locator of TextField B and enter the second value from the keyboard.

driver.findElement(AppiumBy.id("IntegerB")).sendKeys(10 + "");

3. Find the locator of ‘Compute Sum’ and click on it, so the result would be displayed below the ‘Compute Sum’ textview.

driver.findElement(AppiumBy.id("ComputeSumButton")).click();

String answer = driver.findElement(AppiumBy.id("Answer")).getText();

NOTE: The getText() method is used to get the Text(in String format) from UI Elements.

4. Get the text of  the result and compare it with the expected result, so if you enter 5 into TextField A, 10 into TextField B and when you click on ‘Compute Sum’ textview the result 15 should be displayed under ‘Compute Sum’.

Assert.assertEquals(answer, 15 + "", "Expected and Actual Result didn't match!");

NOTE: Assert.assertEquals(expected, actual, error_message) is a TestNG method used to compare the Expected and Actual values. This is the most important step of any test case, because this is how an automation test will know whether values being rendered on UI are correct and as expected or not. You will see us using Assertions throughout this guide.

TestNG is the Testing framework and works best with Appium (Mobile Automation) and Selenium (Website Automation), you can learn more about the TestNG Annotations and methods here.

5. Below is the full  code of our test which will enter 2 values into text fields. Click on ‘Compute Result’, get the result from the app, and compare it with the expected result.

package com.example.appium;

import io.appium.java_client.AppiumBy;

import io.appium.java_client.ios.IOSDriver;

import io.appium.java_client.ios.options.XCUITestOptions;

import org.testng.Assert;

import org.testng.annotations.BeforeTest;

import org.testng.annotations.Test;

import java.net.MalformedURLException;

import java.net.URL;

public class SampleIOS {

   public IOSDriver driver;

   @BeforeTest

   public void setUp() throws MalformedURLException {

       // Set the desired capabilities for the iOS simulator

       XCUITestOptions options = new XCUITestOptions();

       options.setPlatformName("iOS");

       options.setAutomationName("XCUITest"); // Use XCUITest for iOS automation

       options.setDeviceName("iPhone 16 Plus"); // Change this if you're using a different simulator

       options.setPlatformVersion("18.0"); // Your iOS version

       options.setApp("/Users/sushmakannedari/Library/Developer/Xcode/DerivedData/TestApp-drwfzxxnlrpirqhhppcktmmkzdgy/Build/Products/Debug-iphonesimulator/TestApp.app");

       options.setNoReset(true); // Prevents resetting the app state between sessions

       // Appium server URL

       URL appiumServerURL = new URL("http://127.0.0.1:4723"); // Update the URL if Appium runs elsewhere

       // Initialize the iOSDriver

       driver = new IOSDriver(appiumServerURL, options);

   }

   @Test

   public void computeSumTest() {

       // Step 1: Enter value in TextField A using Appium 2.0 syntax

       driver.findElement(AppiumBy.id("IntegerA")).sendKeys(5 + "");

       // Step 2: Enter value in TextField B using Appium 2.0 syntax

       driver.findElement(AppiumBy.id("IntegerB")).sendKeys(10 + "");

       // Step 3: Click on 'Compute Sum' using Appium 2.0 syntax

       driver.findElement(AppiumBy.id("ComputeSumButton")).click();

       // Step 4: Get the result and compare with expected value using Appium 2.0 syntax

       String answer = driver.findElement(AppiumBy.id("Answer")).getText();

       Assert.assertEquals(answer, 15 + "", "Expected and Actual Result didn't match!");

       // Print success message

       System.out.println("Test completed successfully. The computed sum is: " + answer);

   }

}

Add this to both SampleIOS.java and SampleTest.java, after the @Test method:

import org.testng.annotations.AfterTest;       

      @AfterTest

      public void tearDown() {

          if (driver != null) {

              driver.quit();

          }

    }

driver.quit() ends the Appium session and releases the device. Skip it and the session stays open after the test finishes, which means your next test case cannot start — the device is still held by the last one. The null check keeps teardown from throwing when the session failed to open in the first place, so you see the real error from setUp() rather than a NullPointerException on top of it.

You can get this example code on our github page.

Android Test Case

After setting the valid Desired Capabilities, the next step is to pass them to the AndroidDriver class along with the Appium server URL (by default, it is https://127.0.0.1:4723/wd/hub).

The AndroidDriver is the primary class you will work with in your tests. Here’s how to set it up:

  1. Initialize AndroidDriver: Create an instance of AndroidDriver using the Desired Capabilities and the Appium server URL.
  2. Interact with UI Elements: Once the AndroidDriver instance is created, you can use it to interact with the various UI elements of the application.

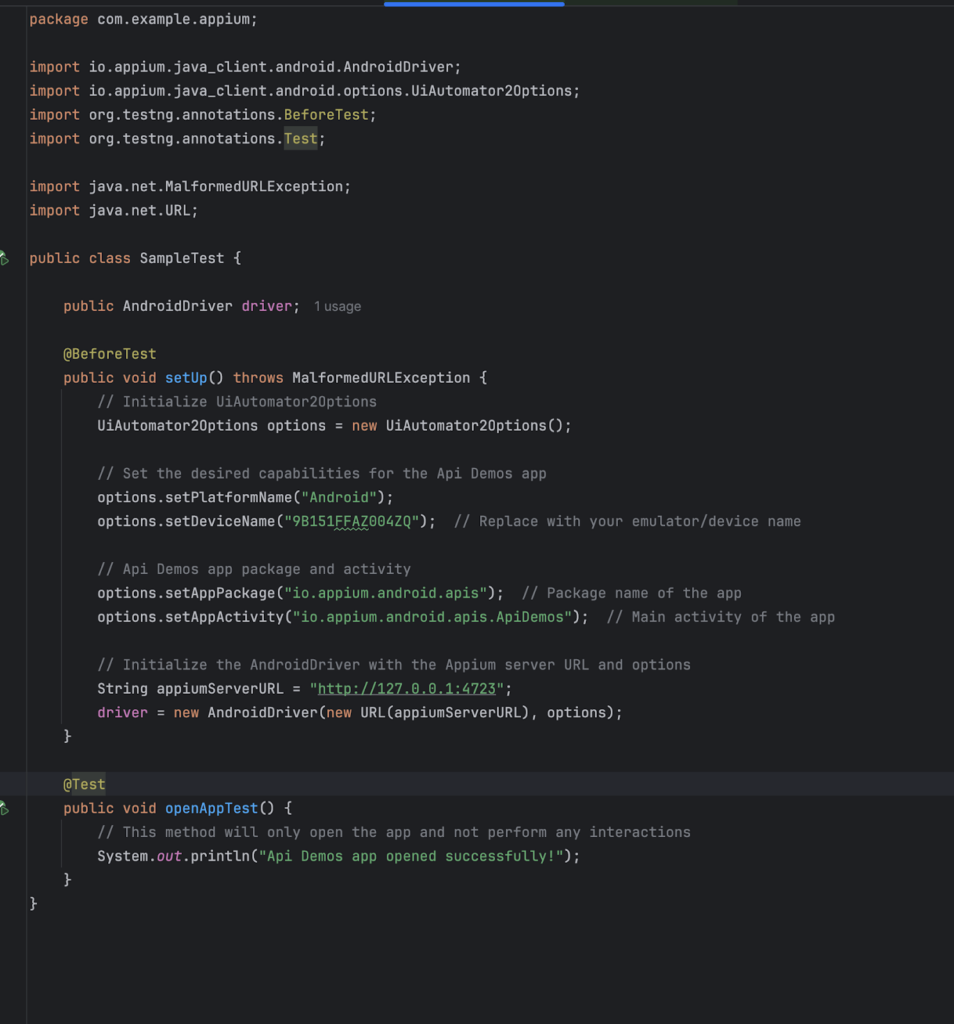
Here’s a code snippet demonstrating how to set this up:

Screenshot of a Java code snippet in IntelliJ IDEA demonstrating AndroidDriver initialization and setting desired capabilities using UiAutomator2Options in an Appium test. The test is configured to open the 'API Demos' app on an Android device. The code includes a setup method annotated with @BeforeTest and a test method annotated with @Test to open the app.
AndroidDriver initialization and Desired Capabilities.

Now let’s create the first sample Appium Test Case.

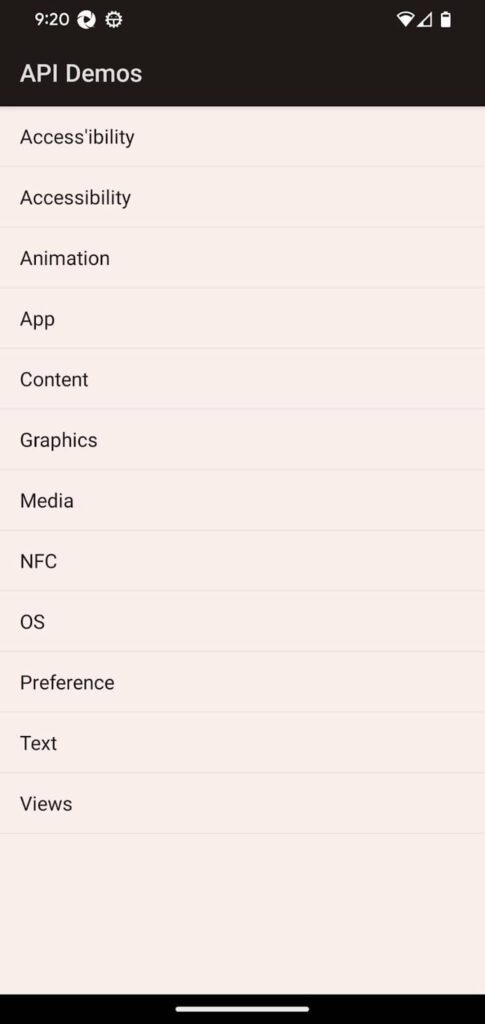
So let’s automate a simple scenario. In the below screen we want to click(tap) on the App Screen item from the list.

Screenshot of the main menu in the 'API Demos' app on an Android device. The menu displays various options such as Accessibility, Animation, App, Content, Graphics, Media, NFC, OS, Preference, Text, and Views
Android – API Demos App

After writing the test case, we need to add the Appium  logic to interact with the UI elements. In Appium, each element’s locator is essential for interaction. For example, if you want to tap on a button, you first need to find the locator of that button and then perform a click() action on it. We will explore locators in detail in a subsequent chapter.

For a deeper understanding of how to locate elements in Appium, you can refer to our blog on Appium Element Locator Strategies. This resource will provide you with various strategies and techniques for identifying UI elements effectively.

Choosing a locator, and finding it

Every interaction in a test case starts with finding an element, and the locator you pick decides how long that test keeps working. These are the strategies you will use most:

StrategyJavaWhen to use it
Accessibility IDAppiumBy.accessibilityId(“App”)Your default. Reads content-desc on Android and accessibility-id on iOS, so the same locator often works on both platforms.
IDAppiumBy.id(“IntegerA”)Strong when the app exposes stable IDs — resource-id on Android, name on iOS. This is what our iOS test case uses.
iOS Predicate StringAppiumBy.iOSNsPredicateString(“label == ‘Login'”)iOS only, and far more reliable than XPath when several elements share a label.
Android UiAutomatorAppiumBy.androidUIAutomator(“new UiSelector().text(\”Login\”)”)Android only. Useful for text matching and for scrolling an element into view.
Class nameAppiumBy.className(“android.widget.TextView”)Broad matches, usually with findElements rather than findElement.
XPathAppiumBy.xpath(“//android.widget.Button[@text=’Login’]”)A last resort. It works, but it is slow and breaks whenever the layout shifts.

As a rule, prefer accessibility ID, fall back to ID, then to a platform-specific strategy, and reach for XPath only when nothing else identifies the element. A path-based XPath tied to the view hierarchy will break on the next release even if the screen looks identical to the user.

To find these values in your own app, start the Appium server, open Appium Inspector, enter the same Desired Capabilities you use in your test, and start a session. Inspector mirrors the device screen and shows the element hierarchy — click any element and it displays the attributes you can use as a locator. You can also test a locator against the live screen there before you put it in your test case, which is much faster than running the whole test to find out it does not match.

This code will find the Login Screen textview locator and simply click on it:

driver.findElement(AppiumBy.accessibilityId("App"));

appScreen.click();

Now our First Appium Automation Script is ready to execute, below is the complete code:

package com.example.appium;

import io.appium.java_client.AppiumBy;

import io.appium.java_client.android.AndroidDriver;

import io.appium.java_client.android.options.UiAutomator2Options;

import org.openqa.selenium.WebElement;

import org.testng.annotations.BeforeTest;

import org.testng.annotations.Test;

import java.net.MalformedURLException;

import java.net.URL;

public class SampleTest {

   public AndroidDriver driver;

   @BeforeTest

   public void setUp() throws MalformedURLException {

       // Initialize UiAutomator2Options

       UiAutomator2Options options = new UiAutomator2Options();

       // Set the desired capabilities for the Api Demos app

       options.setPlatformName("Android");

       options.setDeviceName("9B151FFAZ004ZQ");  // Replace with your emulator/device name

       // Api Demos app package and activity

       options.setAppPackage("io.appium.android.apis");  // Package name of the app

       options.setAppActivity("io.appium.android.apis.ApiDemos");  // Main activity of the app

       // Initialize the AndroidDriver with the Appium server URL and options

       String appiumServerURL = "http://127.0.0.1:4723";

       driver = new AndroidDriver(new URL(appiumServerURL), options);

   }

   @Test

   public void openAppTest() {

       // Locate the "App" element using Accessibility ID and click it

       WebElement appScreen = driver.findElement(AppiumBy.accessibilityId("App"));

       // Click on the "App" element

       appScreen.click();

       System.out.println("Clicked on the App screen successfully!");

   }

}

Making Your Test Case Reliable With Waits

Both test cases above find their elements immediately after the session starts. That works on a fast emulator with a small app, but mobile screens rarely load at the same speed twice — an animation, a network call or a permission dialog can all delay the element you are looking for. When that happens you get a NoSuchElementException even though the app is working perfectly.

The instinct is to add a fixed pause:

•      Thread.sleep(5000);

Avoid this. A fixed pause costs you five seconds even when the element appears in one, and still fails when the element takes six. Use an explicit wait instead, which waits for a real condition and continues the moment it is met.

  • Add the wait to the setup method alongside the driver:
  • import org.openqa.selenium.support.ui.ExpectedConditions;
  • import org.openqa.selenium.support.ui.WebDriverWait;
  • import java.time.Duration;      
  • public WebDriverWait wait;
•      // at the end of setUp(), after the driver is created

•      wait = new WebDriverWait(driver, Duration.ofSeconds(10));

Then wait for the element to be ready before you act on it. Here is the Android test case from earlier, rewritten to wait for the App list item instead of assuming it is there:

@Test

•      public void openAppTest() {

•          WebElement appScreen = wait.until(

•                  ExpectedConditions.elementToBeClickable(

•                          AppiumBy.accessibilityId("App")));

•          appScreen.click();

•          System.out.println("Clicked on the App screen successfully!");

•      }

Appium does not sit for ten seconds here. It polls until the element becomes clickable and moves on straight away, using the full ten seconds only if it has to.

Which condition you use depends on what your test does next:

ConditionUse it when
elementToBeClickableYou are about to tap or click the element.
visibilityOfElementLocatedYou are about to read text from it or assert on it — as in our iOS test case, before calling getText() on the Answer field.
presenceOfElementLocatedThe element only needs to exist in the UI tree; it may not be on screen yet.
invisibilityOfElementLocatedA loading spinner or overlay needs to disappear before you continue.
textToBePresentInElementLocatedA label or status needs to update before you assert on it.

Running the Tests on Real Devices

Now you are ready to execute your test on a real device, so follow these steps:

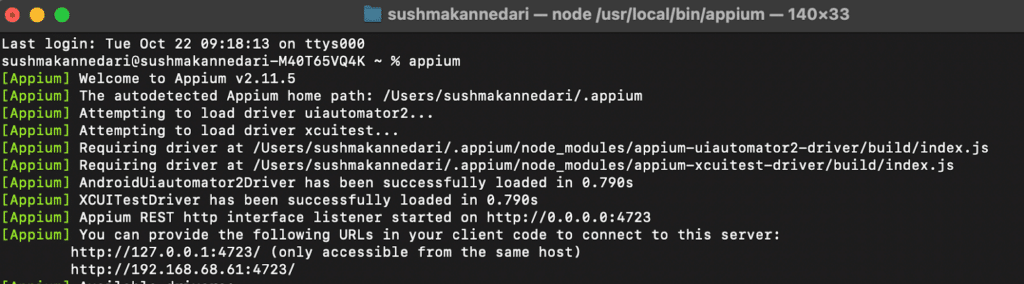
Launch your terminal and type “appium” and Start the Server.

Screenshot of a terminal window showing Appium server running on https://0.0.0.0:4723
Appium Server is Running on 0.0.0.0:4723

Connect your Android Mobile device to your computer and check that it is connected properly by executing the $ adb devices command. And also check the deviceName capability has the same name of the device which is showing up in the terminal.

Screenshot of a terminal window showing the result of the command adb devices, listing a connected Android device . The image confirms that the Android device is successfully connected to the system
Android device is connected.

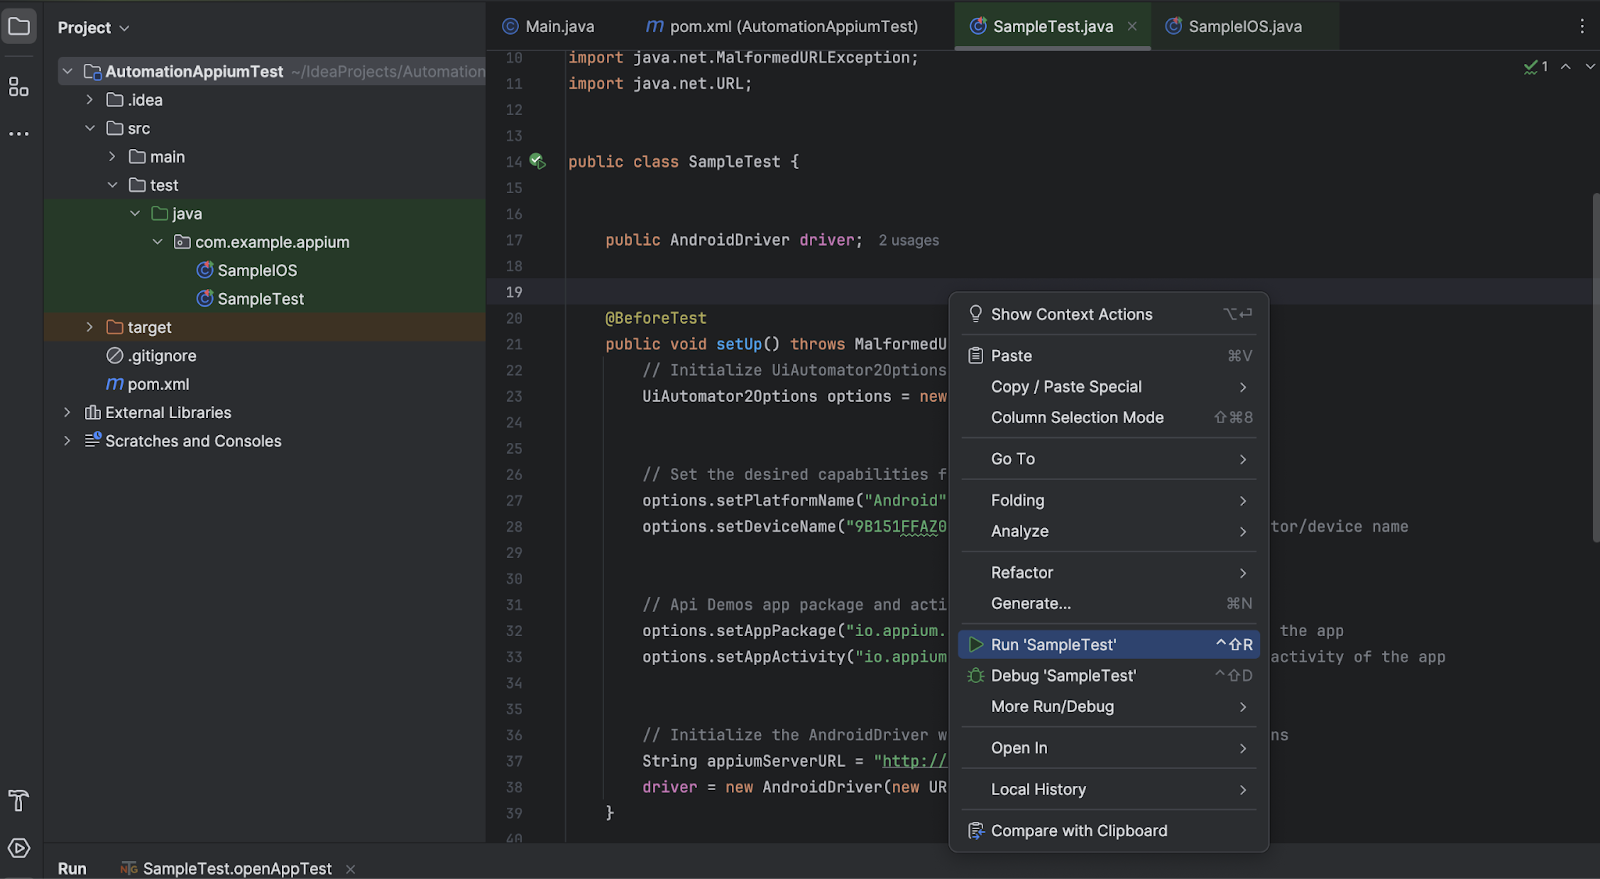
Please make sure that device screen is unlocked and that it’s connected properly. Now, move to intelliJ Idea and select the test case name > Right click on it > Run ‘firstTest()’

Screenshot of IntelliJ IDEA showing the Appium test case ready to be executed. The code editor displays the test class, and the right-click context menu is open, highlighting the option to 'Run SampleTest.' The project structure on the left shows the test files and directories
Run the test case

Running the test case outside your IDE

Right-clicking in IntelliJ is the quickest way to run a test case while you are writing it, but it is not how the test will run once it is part of a suite. From the project root you can run the same test with Maven:

•      mvn test

Maven compiles the project, TestNG picks up your @Test methods, and Appium creates the session exactly as before. To control which tests run and in what order, add a testng.xml suite file and point the Maven Surefire plugin at it — that is also what lets you group your Android and iOS test cases into separate suites.

Once mvn test works locally, the same command is what a CI job runs. Jenkins, GitHub Actions or any other pipeline can execute your Appium test cases on every commit, as long as the build agent can reach an Appium server and a device. That last requirement is the usual sticking point, and it is the main reason teams move mobile test execution to a device cloud rather than maintaining devices on a build machine.

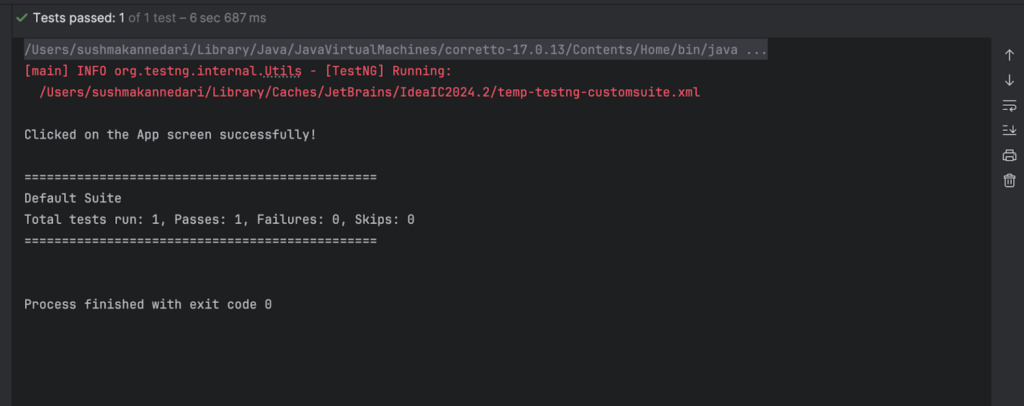
Observe the Test Result and confirm the navigation on your device. It was a simple test case but you’ve actually accomplished a lot! From here, you get to explore all the cool features that Appium offers.

Screenshot of the test result output in IntelliJ IDEA, showing that one test has passed. The log indicates that the app screen was clicked successfully. The default test suite ran with 1 test, 1 pass, 0 failures, and 0 skips, with the process finishing with exit code 0.

Running Your Test Case on a Device Cloud

Running over USB is the right way to write your first test case. It stops being practical the moment you need to check the same flow across OS versions, screen sizes and manufacturers, or run it from a build pipeline that has no phone plugged into it.

The test case itself does not change. What changes is where the session is created — instead of pointing the driver at your local Appium server, you point it at a cloud endpoint and add the capabilities that identify your account and the device you want:

  • Swap the server URL in setUp() from http://127.0.0.1:4723 to the cloud provider’s endpoint, including your credentials.
  • Set deviceName and platformVersion to the device you want from the provider’s device list rather than to your own hardware.
  • Point the app capability at the build you uploaded to the provider rather than at a local file path.

Your @Test methods, locators, waits and assertions all stay exactly as written. That portability is the main practical argument for keeping session setup in @BeforeTest and out of your test logic swapping execution environments becomes a configuration change rather than a rewrite.

Troubleshooting Your First Appium Test Case

Your first run will probably fail, and that is normal. Appium failures fall into three groups, and knowing which one you are looking at saves most of the debugging time: the session never opened, the session opened but Appium could not find your element, or Appium found it too early. Always read the Appium server log in your terminal first — it usually names the problem before your IDE does.

ErrorUsual causeHow to fix it
SessionNotCreatedExceptionA capability is wrong, the driver is not installed, or the device is not visible.Check deviceName against $ adb devices, confirm platformVersion matches the device, and confirm the UiAutomator2 or XCUITest driver is installed.
NoSuchElementException / ElementNotFoundExceptionThe locator does not match, or the screen had not finished loading.Re-check the locator in Appium Inspector against the live screen, then add an explicit wait as described above.
StaleElementReferenceExceptionThe screen refreshed after you found the element, so the reference is no longer valid.Find the element again after any navigation or screen change instead of reusing the earlier reference.
InvalidElementStateExceptionThe element exists but cannot take the action — it is disabled, covered, or behind the keyboard.Check whether it is enabled, and call driver.hideKeyboard() if the on-screen keyboard is covering it.
App not installed / path errorsThe app capability points at a file that is not there.Use an absolute path and confirm the extension matches the target — .apk for Android, .app for a simulator, .ipa for a real iOS device.
Port 4723 already in useAn Appium server is already running.Stop the existing server, or start this one on another port with appium –port and update the URL in your setUp() method.
adb device offlineThe USB connection dropped or was never authorised.Run adb kill-server && adb devices, reconnect the cable, and accept the USB debugging prompt on the device.
WebDriverAgent errors (iOS)Xcode signing, provisioning or device trust is not configured.Check the signing team and provisioning profile in Xcode, and trust the computer on the device.

Congratulations on successfully completing your first Appium test case on a real device. This concludes our three part series on writing your first Appium test case. Along the way you learned a little bit about desired capabilities, locators and assertions. All of this is a great grounding to continue your education into the world of Automated testing and Appium.

Frequently Asked Questions

What is an Appium test case?

An Appium test case is a set of automated instructions that drives a mobile app’s interface the way a user would — tapping, typing, swiping and scrolling — and then asserts that the app responded correctly. It runs against a real device, emulator or simulator through the Appium server.

What do you need before writing an Appium test case?

Appium with the UiAutomator2 driver for Android or the XCUITest driver for iOS, a JDK, an IDE such as IntelliJ IDEA, Android Studio or Xcode depending on your platform, a device or emulator, and the app build you want to test.

What are Desired Capabilities in Appium?

They are the key-value settings your test sends to the Appium server to start a session — which platform, which automation engine, which device, and which app. In Appium 2 and later, Appium-specific capabilities carry an appium: prefix, though the Java options builders add it for you.

Can one Appium test case run on both Android and iOS?

The test logic can be shared, but the session setup cannot. You need a different driver class and different capabilities for each platform, and usually different locators, which is why this guide writes SampleTest.java for Android and SampleIOS.java for iOS.

Why does my Appium test case fail with NoSuchElementException?

Usually one of two things: the locator does not match what is on screen, or the test looked for the element before the screen finished loading. Confirm the locator in Appium Inspector first, then add an explicit wait.

Do I need a real device to write my first Appium test case?

No — an emulator or simulator is enough to get a first test case running, and it is the faster way to learn. Validate anything release-critical on real devices, because gestures, performance and OEM-specific behaviour do not reproduce reliably on emulators.

Check out the rest of our Appium Test Case series: 

Your First Appium Test Case: Setting up the IDE

Your First Appium Test Case: Writing and Running 

To learn more, download our free eBook, Make the Move to Automation With Appium.
Appium eBook

Interested in Learning More?

Subscribe today to stay informed and get regular updates from Kobiton

Ready to accelerate delivery of
your mobile apps?

Request a Demo