

May 28, 2021
iOS Automation Testing: Best Practices & Top Frameworks

Adam Creamer
Read More
Up until now we have looked into basic Appium automation, such as finding and clicking on a button or typing text into a text field. However, “real world” mobile applications are more sophisticated and contain many complex UI elements that require user interactions such as double tap, long press, swipe left/right, pull up/down and even multi-touch actions.
Appium supports the following gestures:
Appium supports these gestures using the TouchActions class.
TouchAction touchAction = new TouchAction(driver);
Some of the supported methods are:
| Method Name | Purpose |
| Press(PointOption pressOptions) | Press action on the screen. |
| LongPress(LongPressOptions longPressOptions) | Press and hold the at the center of an element until the context menu event has fired. |
| Tap(PointOption tapOptions) | Tap on a position. |
| MoveTo(PointOption moveToOptions) | Moves current touch to a new position. |
| cancel() | Moves current touch to a new position. |
| perform() | Perform this chain of actions on the performsTouchActions. |
Official Appium API docs: Click Here.!
Before exploring each mentioned action we need to understand the significance of perform() as it plays a vital role. The Appium client simply records all the instructions and actions on the client side and stores the intermediate values in a local data structure. The perform() method is used to send all actions to the appium server – ss soon as perform() is called, the intermediate actions and instructions are converted to JSON and sent to the appium server, and then actual action is being performed. So for any gesture code the last method called would be perform()
Note: This is a common omission during development, forgetting to call perform() and wondering why your test isn’t working!
Appium fully supports native applications. So if the application is designed natively for the platform (iOS or Android), then you can easily find the unique selectors for automation, but there are case when you use cross-platform development technologies such as react native, ionic or xamarin framework. In this instance, sometime elements are not present for a particular screen or even a whole application.
For example, most of games are coded using the Unity3D platform rather than native coding, so there would not be a single element that can be located by any tool or even by the appium inspector. However we are not talking about game automation right now.
The main takeaway here is that if you are not able to get the selector for any element for any reason then only one survival option remains. Which is to get the x, y coordinates for that element.
NOTE: Please remember that you can only click on that element using appium.
Now the question is how can you get the x,y coordinate?
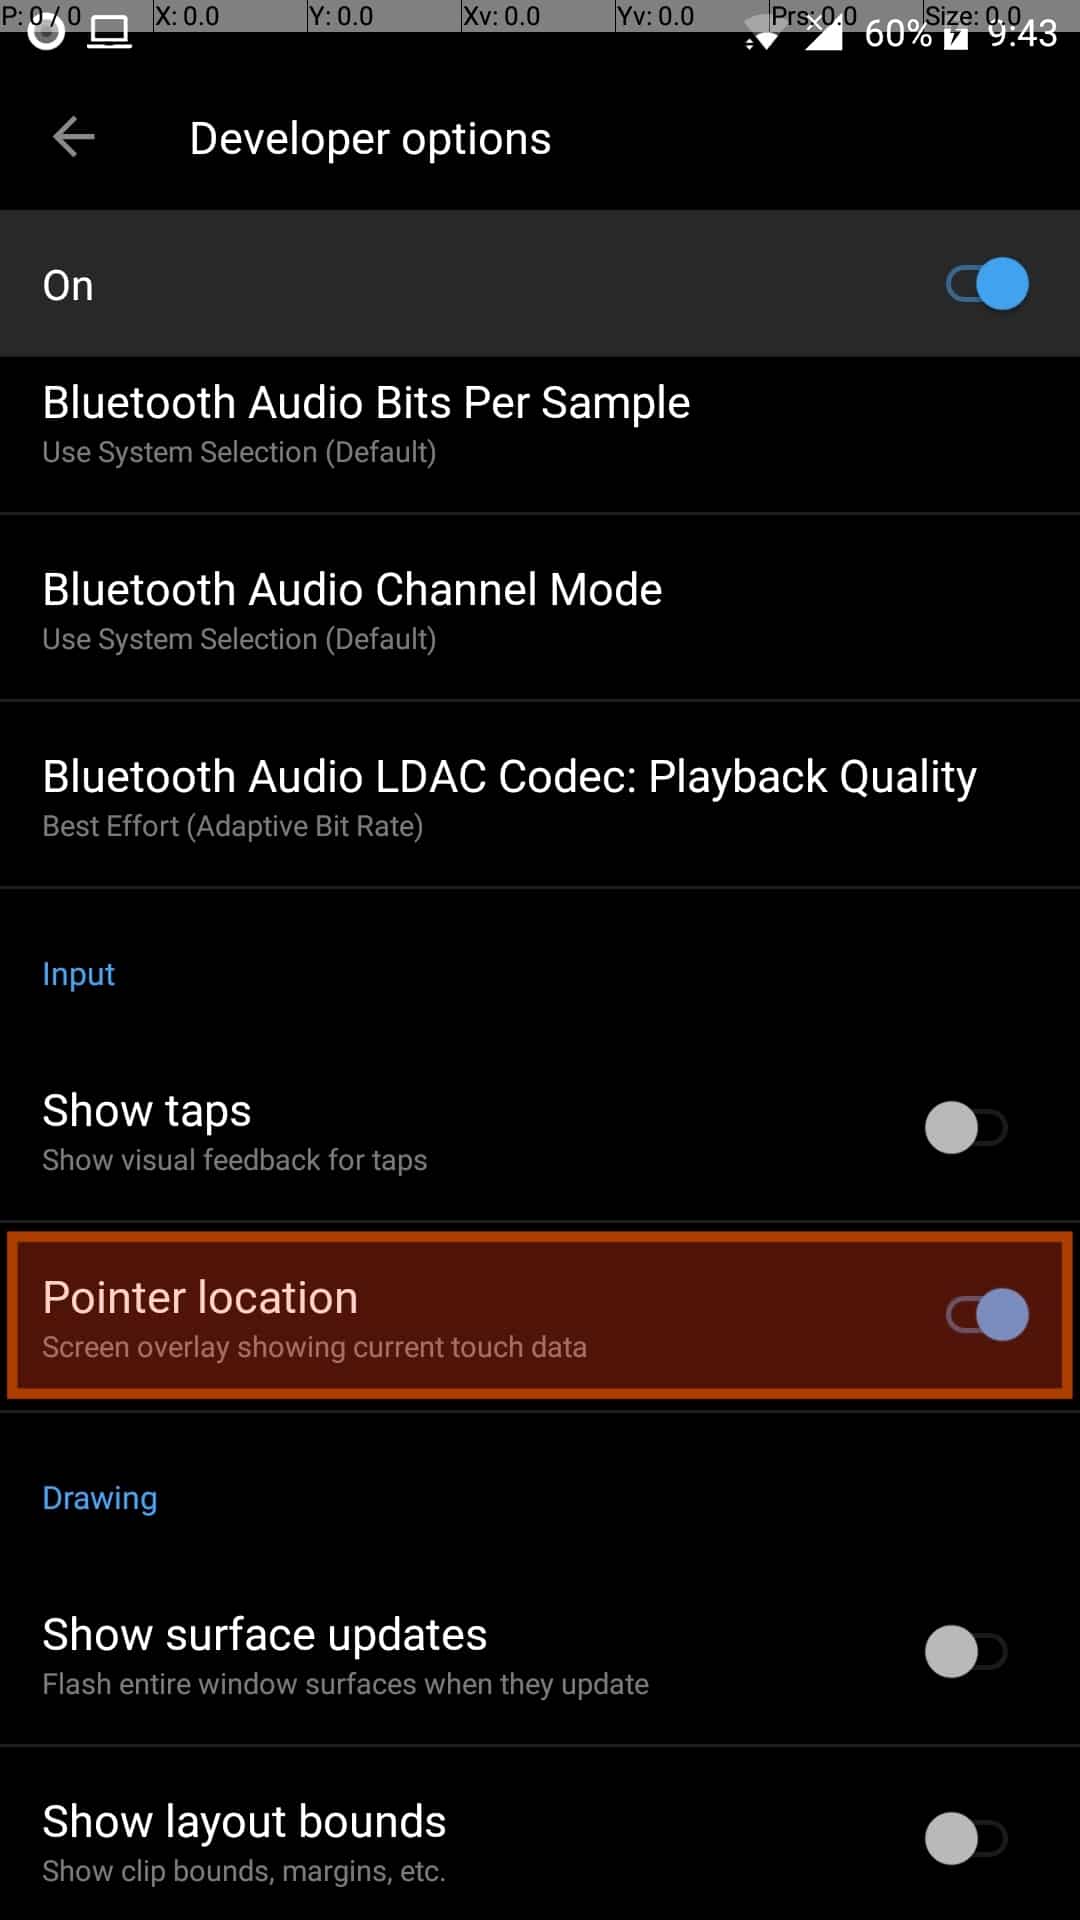
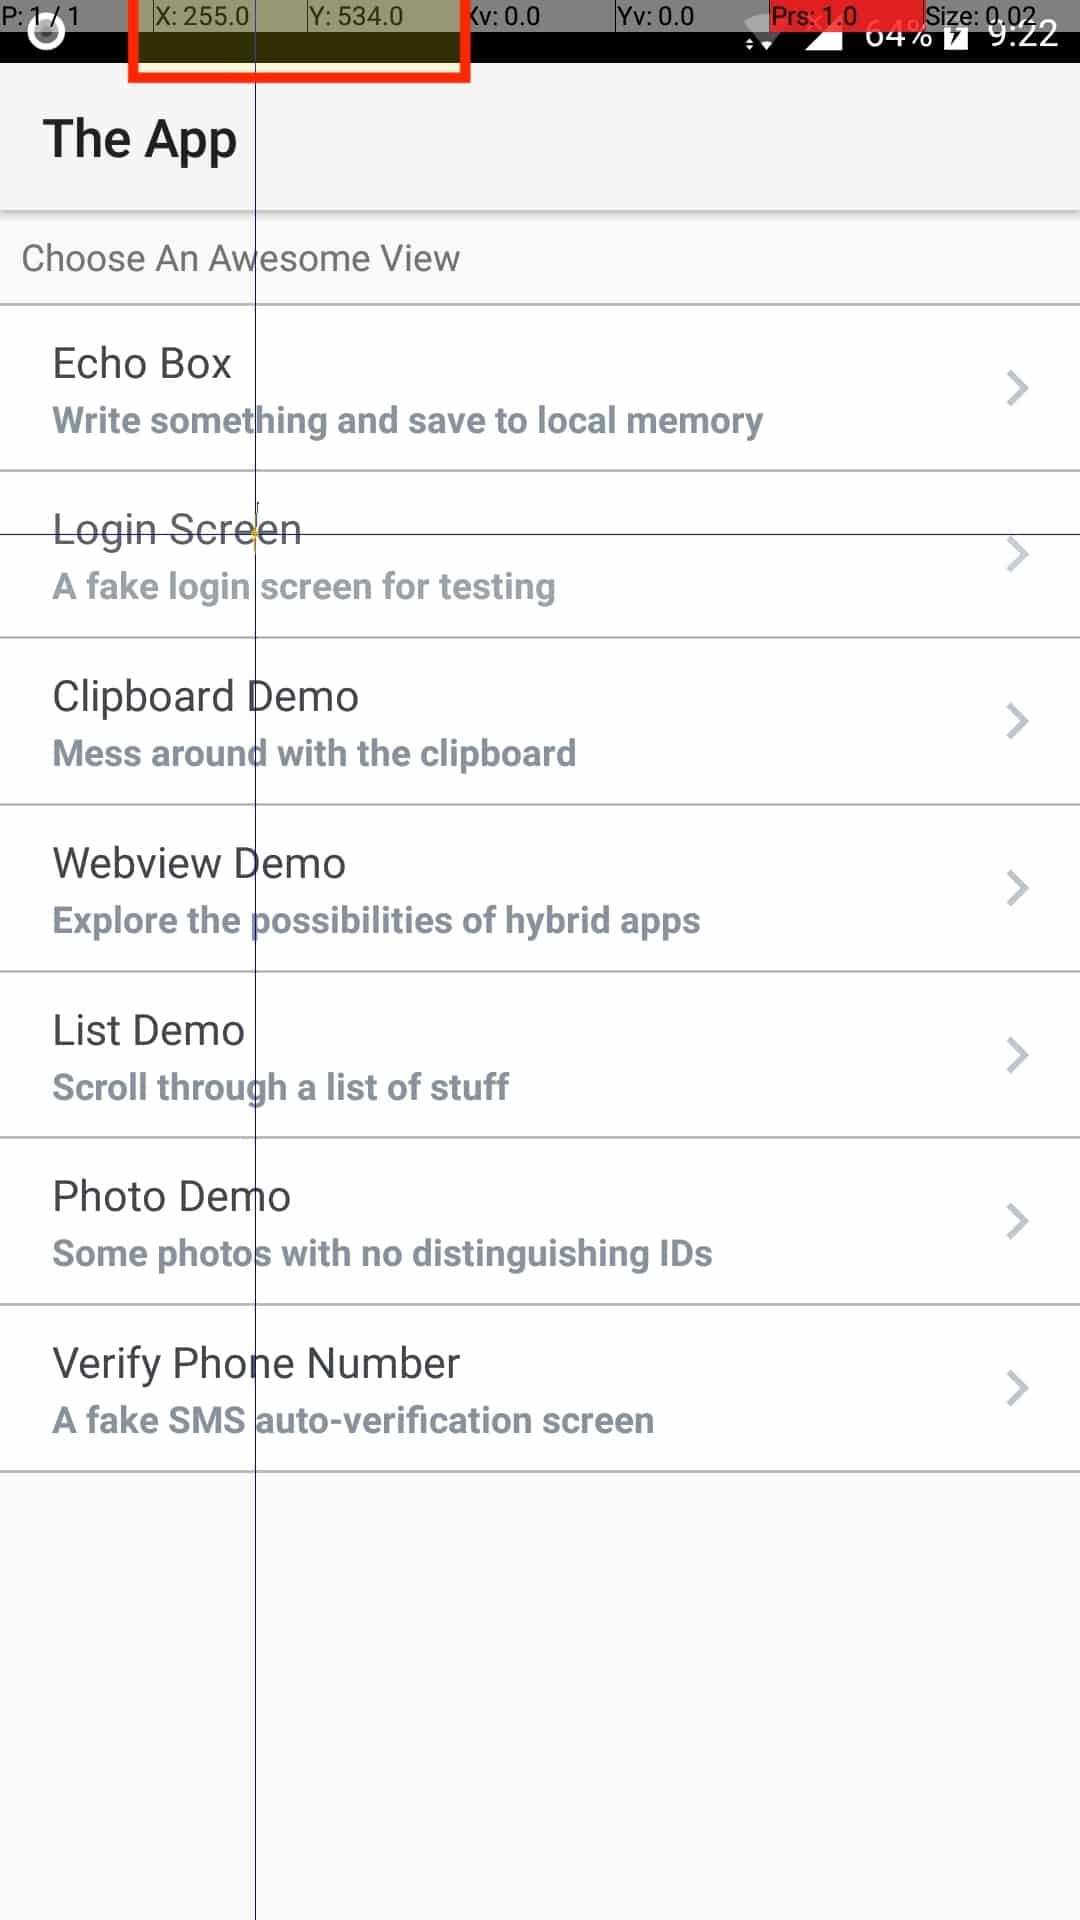
Getting the pointer location in Android:
Getting the pointer location in iOS:
iOS does not support the pointer location and there aren’t even any third party apps or tools which come to the rescue. Therefore you need to calculate it using screen resolution and a little bit of prediction. In case you don’t get success at first, you can use trial and error to get the needed location.
Now let’s look into each gesture one by one:
TouchAction touchAction = new TouchAction(driver);
touchAction.tap(tapOptions()
.withElement(element(androidElement)))
.perform()
NOTE: Here you can also put the wait along with the tap action, for example:
new TouchAction(driver)
.tap(tapOptions().withElement(element(androidElement)))
.waitAction(waitOptions(Duration.ofMillis(millis)))
.perform();
 TouchAction touchAction = new TouchAction(driver);
 touchAction.tap(PointOption.point(1280, 1013))
 .perform();
NOTE: Similar like Tap on element you can put the wait along with the tap action, for example:
 new TouchAction(driver)
.tap(tapOptions().withElement(element(androidElement)))
.waitAction(waitOptions(Duration.ofMillis(millis)))
.perform();
 TouchAction touchAction = new TouchAction(driver);
 touchAction.press(element(element))
.waitAction(waitOptions(ofSeconds(seconds)))
.release()
.perform();
TouchAction touchAction = new TouchAction(driver);
touchAction.press(point(x,y))
.waitAction(waitOptions(ofSeconds(seconds)))
.release()
.perform();
Before we look into the Horizontal swipe let’s understand how we can automate swipe actions generally.
Swiping is a combination of tapping + moving actions. Appium does not provide a direct method for swiping, so you need to combine a few methods in order to achieve swiping. For example if you want to perform swiping then first you have to press on a particular point and then specify the particular amount of time during which you want to perform the swiping action and at last you to move to another point – and don’t forget to call the release method which used to release all the actions. So it’s actually simple: first press -> wait(duration of swiping) -> move to (moveTo()) particular location.
You might be thinking why can’t we directly use moveTo() ?
If you recall, using the press method requires you to eventually call the release method. So we are basically mimicking a swipe by entering the press state, moving to a location, and THEN releasing.
Swiping can have an up/down/right/left direction so you need to apply the right logic and have to provide the x, y coordinates for the press() and moveTo() methods.
And also please note these appium methods to get the device screen measurements:
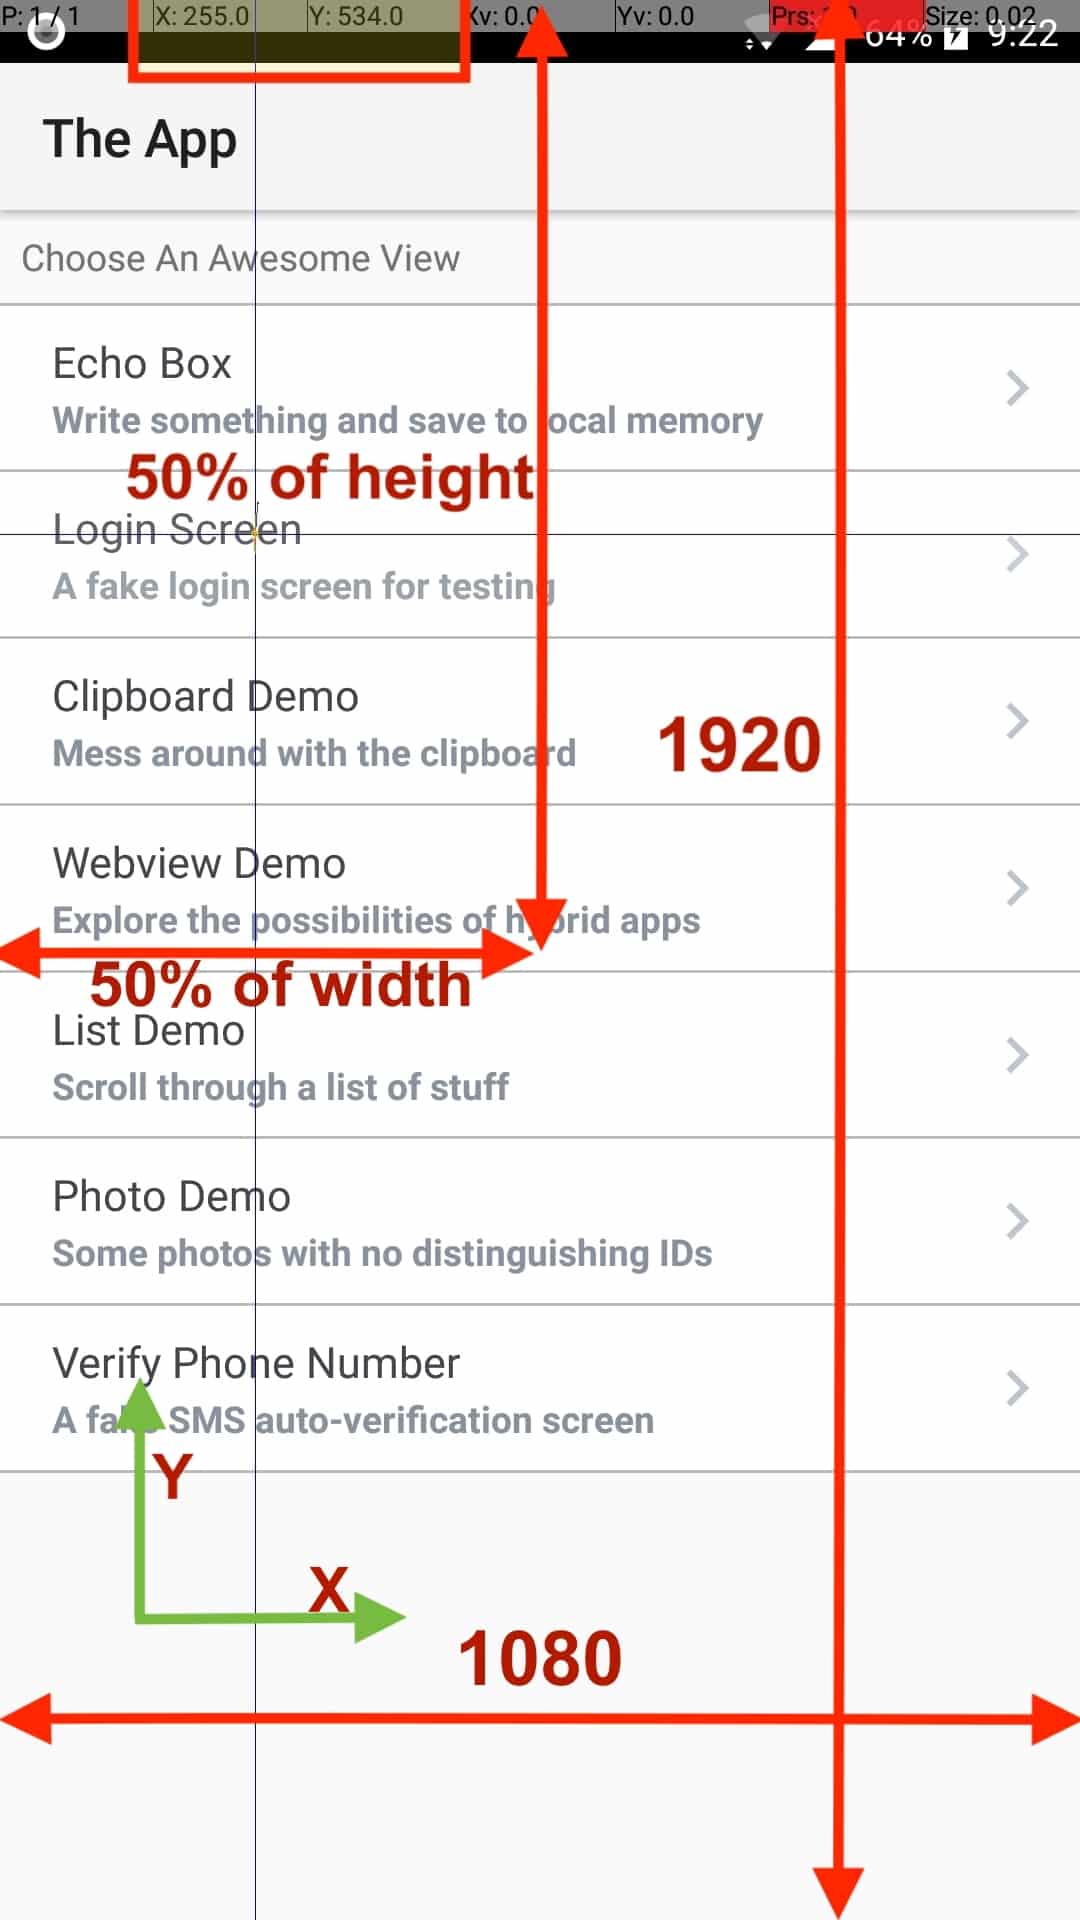
int heightOfScreen = driver.manage().window().getSize().getHeight();
int widthOfScreen = driver.manage().window().getSize().getWidth();
int middleHeightOfScreen = heightOfScreen/2;
// To get 50% of width
int x = widthOfScreen * 0.5;
// To get 50% of height
int y = heightOfScreen * 0.5;
Here Width → X and Height → Y coordinates.
Now let’s look into each swiping type.
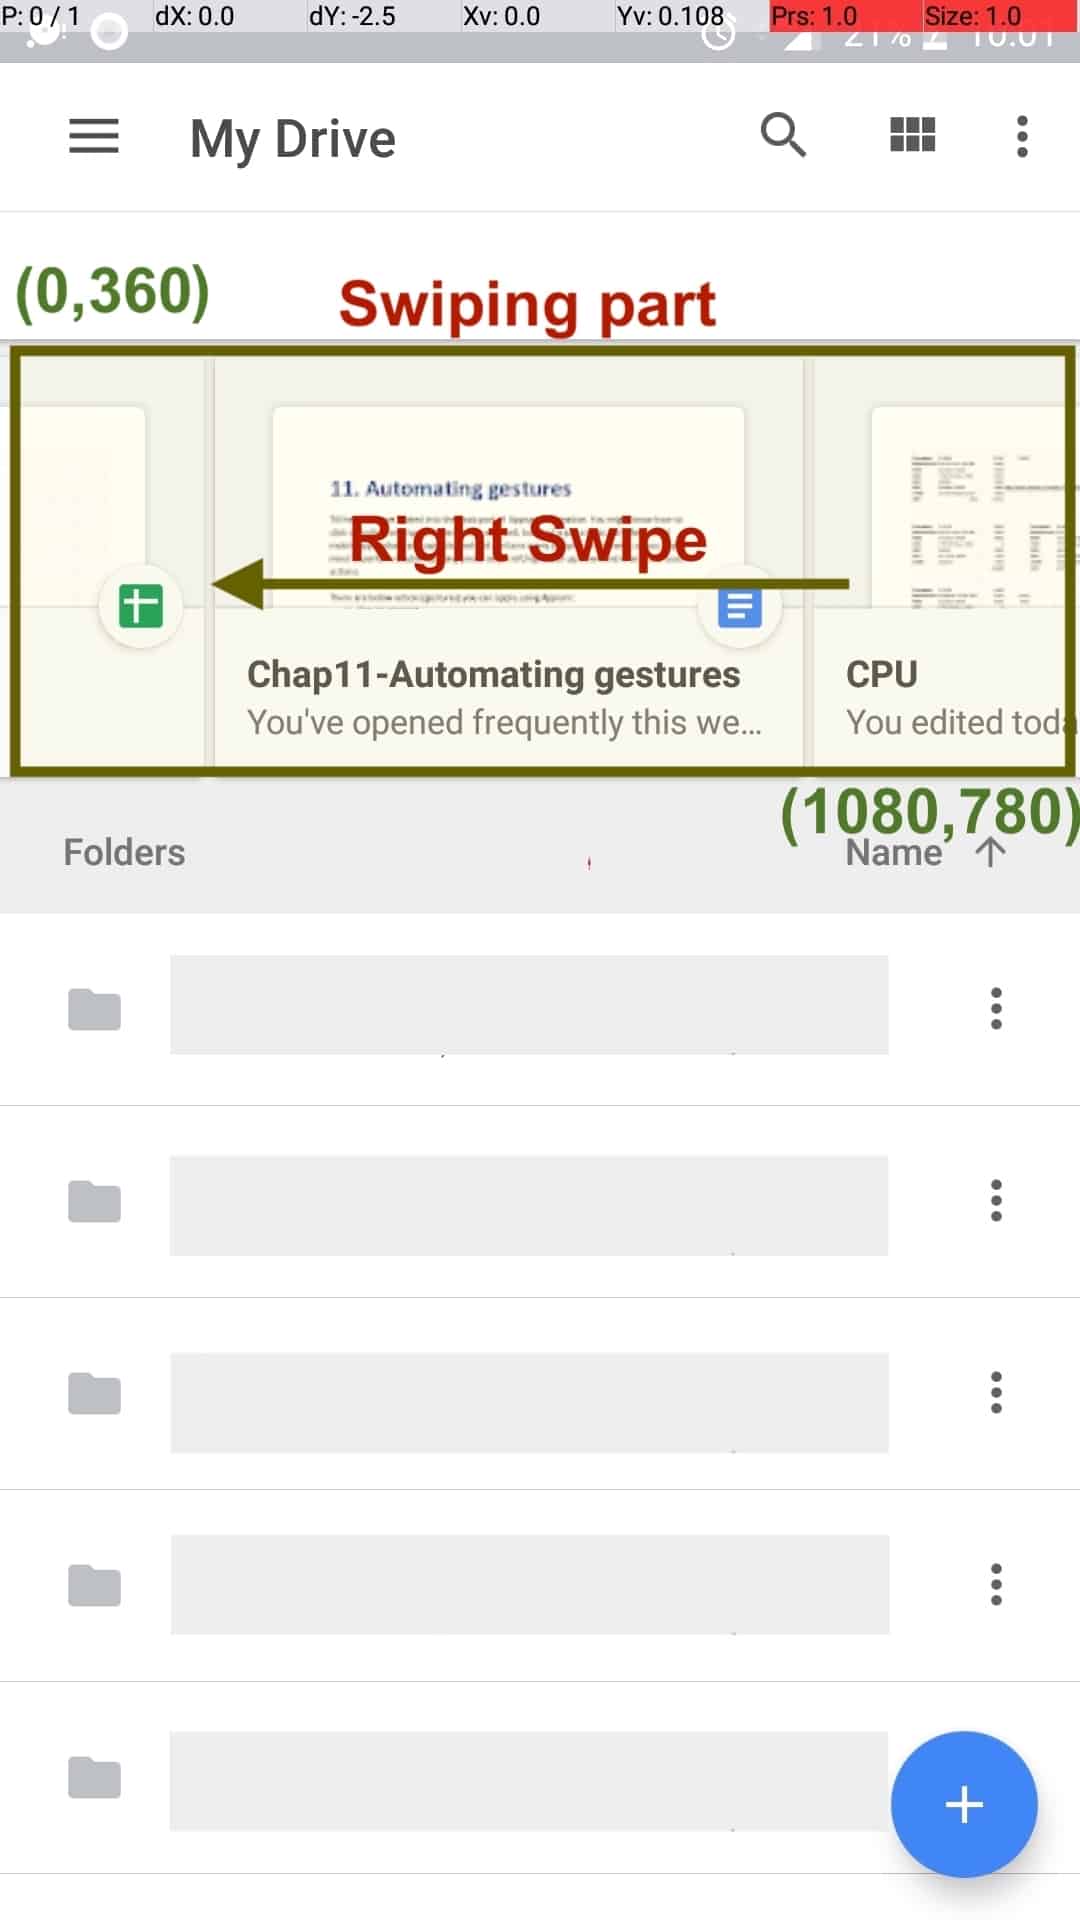
This is just one scenario for achieving a swipe gesture. Ideally first we need to make a decision as to what is the “right side of the screen”. We do this by considering 90% of the screen width. For example, if the screen resolution is 1920 x 1080, 1080 is the width of Screen and 90% of that width would equals to 972, so we have got our X coordinate for what we consider the “Right” side. In a similar manner we will need the X coordinate for the Left side and this time we can consider 10% of the width which would give us an X coordinate of about 108. So we have got X coordinates for Left and Right direction. For the Y coordinate we can choose any value as long as it falls in the swiping area – for example, let’s say our swiping area is between (0, 360) to (1080, 780), so you can choose any value for the Y coordinate in between 360 to 780.
NOTE: It is important that the Y coordinate have same value because we are focusing on only swiping (not scrolling) so only the X coordinate will change during the process and Y will remain constant. Ideally you should choose the half height of swiping area for Y coordinate.
Finally, you can perform the swipe gesture:
TouchAction swipe = new TouchAction(driver)
.press(PointOption.point(972,500))
.waitAction(waitOptions(ofMillis(800)))
.moveTo(PointOption.point(108,500))
.release()
.perform();
Same way if you want to swipe in the left direction you have to first press on the left side and move to the right side.
NOTE: This method works in a similar way on Android and iOS but the location differs according to Mobile device being used (given the swipe is dependent on coordinates which is dependent on screen resolution). Moreover on the iOS side you can’t find the location directly so you will need to use a trial and error approach.
TouchAction swipe = new TouchAction(driver)
.press(PointOption.point(540,1824))
.waitAction(waitOptions(ofMillis(800)))
.moveTo(PointOption.point(540,672))
.release()
.perform();
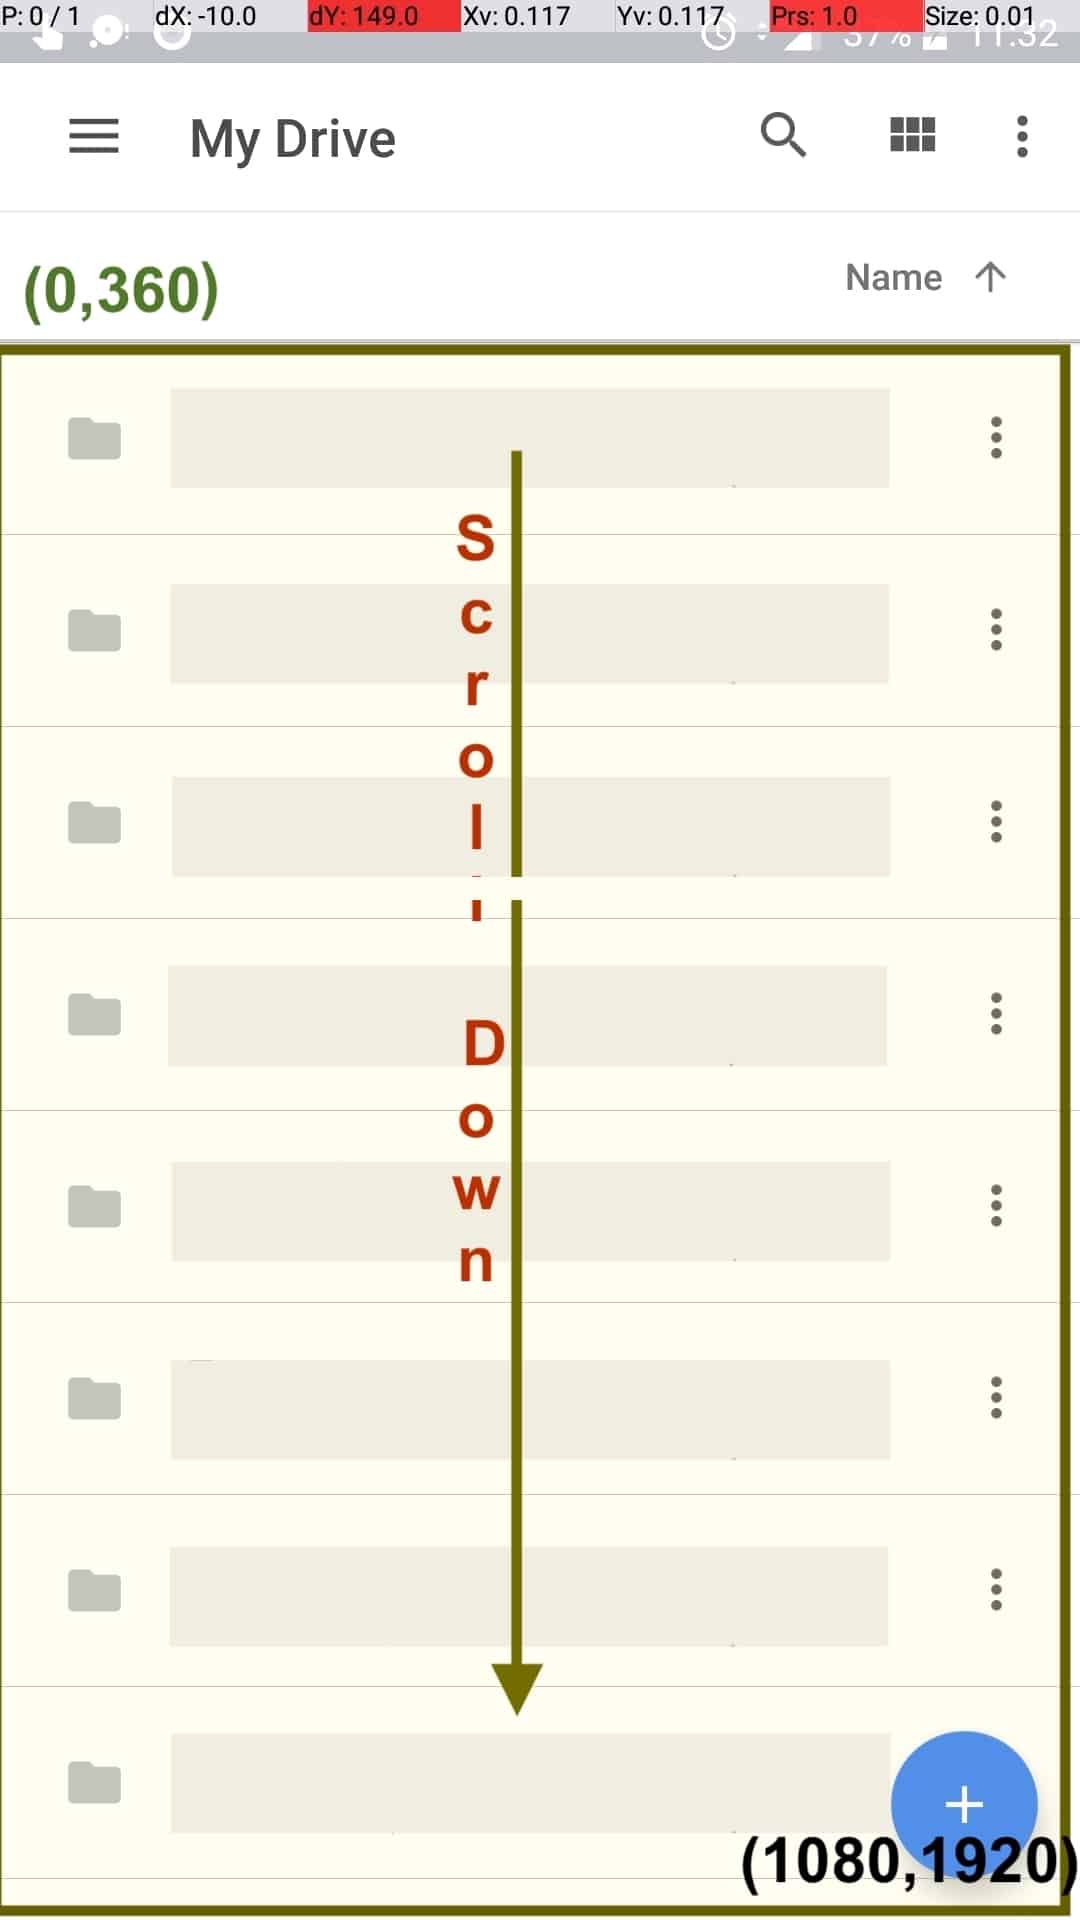
Scroll up will work the same but with different location points.
TouchAction swipe = new TouchAction(driver)
.press(ElementOption.element(element1))
.waitAction(waitOptions(ofSeconds(2)))
.moveTo(ElementOption.element(element2))
.release()
.perform();
As the name suggests it means multiple touches happening at the same time.For example on iOS if you want to move to the Main screen, you need to use 5 fingers and do a swipe.Multi Touch is handled by MultiTouchAction class. It has a add(TouchActions touchActions) method so in which we need to pass a TouchActions object.So let say you want to press on 5 different points at a time then first you need to create 5 TouchActions, but here the important thing is we are not having a perform method at the end. We just need to call the release method for the TouchAction object, and then pass those values into the add method of the MultiTouchAction class.You can perform Multi Touch for:
TouchAction touchActionOne = new TouchAction();
touchActionOne.press(PointOption.point(100, 100));
touchActionOne.release();
TouchAction touchActionTwo = new TouchAction();
touchActionTwo.press(PointOption.point(200, 200));
touchActionTwo.release();
MultiTouchAction action = new MultiTouchAction();
action.add(touchActionOne);
action.add(touchActionTwo);
action.perform();
TouchAction touchAction1 = new TouchAction(driver)
.tap(ElementOption.element(e1))
.release();
TouchAction touchAction2 = new TouchAction(driver)
.tap(ElementOption.element(e2))
.release();
MultiTouchAction action = new MultiTouchAction();
action.add(touchAction1);
action.add(touchAction2);
action.perform();
NOTE: As mentioned earlier only MultiTouchAction should call the perform() method at the end. For TouchActions perform() method should not be called otherwise instructions will be sent to Appium server and the click will happen before the Multi Touch action.In this chapter we have looked into the most used scenarios in the Appium world. These methods all work on both Android and iOS.More details about all the different TouchAction methods can be found on the official appium docs.https://appium.github.io/java-client/io/appium/java_client/TouchAction.html

