Mar 4, 2024
Everything You Need to Know about App Localization and Testing

Frank Moyer
Read More
Test automation design patterns are used extensively when programming and they generally offer a reusable solution to a known occurring problem. In many respects, they introduce a set of best practices into your code and usually result in more flexible and maintainable code.
Strictly speaking, design patterns are optional. There are many ways to code a solution. Your organization may enforce certain patterns precisely because of maintainability. Although optional, knowledge of various design patterns and knowing when to use them, will improve your skills in test automation design. And that’s what we’re going to do in this article.
Before we start, don’t forget to grab our free eBook, Make the Move to Automation With Appium.

The Page Object Model is a widely used object design pattern for structuring automation test code. Here, pages in the app are represented as Classes, and various UI elements of that pages are defined as variables. We already have gone through this technique in detail previously, so here we will discuss the abstract structure and explore how it can be implemented in a slightly different way or in a different programming language.
We use the Page Factory class to initialize the mobile(web for web application) elements that are defined in Page Object(PO) classes. PO classes containing the mobile elements needs to be initialized using the Page Factory before it can be used, and this can be achieved by simply calling the initElements function of PageFactory. In that method you need to initialize the AppiumFieldDecorator class by passing the Appium Driver and Implicit wait duration objects. PageFactory.initElements(new AppiumFieldDecorator(driver, Duration.ofSeconds(IMPLICIT_WAIT)), this); Or you can put the code in the constructor of the BasePO class. Page Factory will initialize every MobileElement(AndroidElement or IOSElement) variable with a reference to a relevant element on the actual mobile screen and this is achieved by using @FindBy annotations. This annotation allows us to not only retrieve the mobile element, but also information such as the locator identifying strategy name and the locator value for retrieving it:
@iOSFindBy(accessibility = “Toolbar Done Button”) IOSElement doneButtonOnKeyboard;
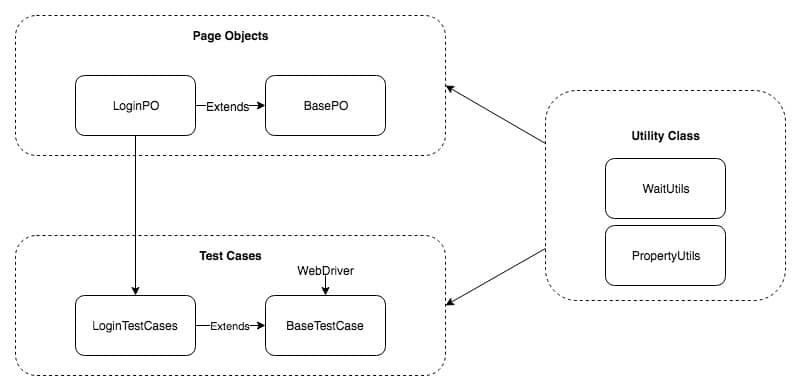
Whenever the above code is used, the driver object will find it on the current mobile screen and simulate the action. With this pattern, you will need to design a Page Object class according to the particular screen you wish to automate. For example, for the Login screen you can create a LoginPO class and can put all the UI element locators as variables iin the LoginPO class. And don’t forget that every PO class will extend the BasePO class where we are calling the PageFactory initElements method in the constructor. In the Page Object Pattern all the locators will be reside in the relevant Page Object Classes such as LoginPO, RegisterPO, DashboardPO etc.. and the method from that PO classes gets used by the Test Classes – and this is the main advantage to using the Page Object pattern as locators and tests are residing in different places. So whenever any UI locator is changed you just need to apply changes on the particular Page Object classes to fix the automation script. This is the primary reason why the Page Object pattern is so widely used in automation projects.
In the factory design pattern we have a super class with multiple subclasses and based on some input, we need to return a particular subclass. It is often used when a class cannot anticipate the type of objects it needs to create beforehand. Here, instantiation of a class is done from the factory class. So when we need to create the object based on particular input this pattern is used. So does it related to automation test design?This design pattern is best suited to when you are working with Android and iOS and both having the same accessibility id on iOS and content-desc in Android. So here the Factory class will create the relevant driver object (either Android or iOS) and always returns a newly created object or re-initialized one, so you don’t have to check the platform every time.
Example: We have implemented a factory class that creates a Driver object based on a specific input(platform name). This factory is very simple but it is perfect fit for our purpose. You can design the factory class and it’s methods for more complex applications.

As you can see above, we have created one method getDriver(String platfromType) on the DriverFactory class. So according to the platform type this method will return the particular AppiumDriver. This factory is used to instantiate AppiumDriver in tests based on the external parameter. AndroidDriver driver = new DriverFactory().getDriver(“Android”); driver.findElement(By.id(“username”)).sendKeys(“john”); driver.findElement(By.id(“password”)).sendKeys(“abc123”); driver.findElement(By.id(“login”)).click(); MobileElement profileIcon = (MobileElement) driver.findElement(By.id(“profileIcon”)); Assert.assertTrue(profileIcon.isDisplayed(), “Login was not successful.”);
The Facade pattern provides a simple interface to deal with complex code.In the facade pattern, as applied to test automation, we design the facade class which has methods that combine actions executed on different pages. It is best to understand by looking at a practical example:
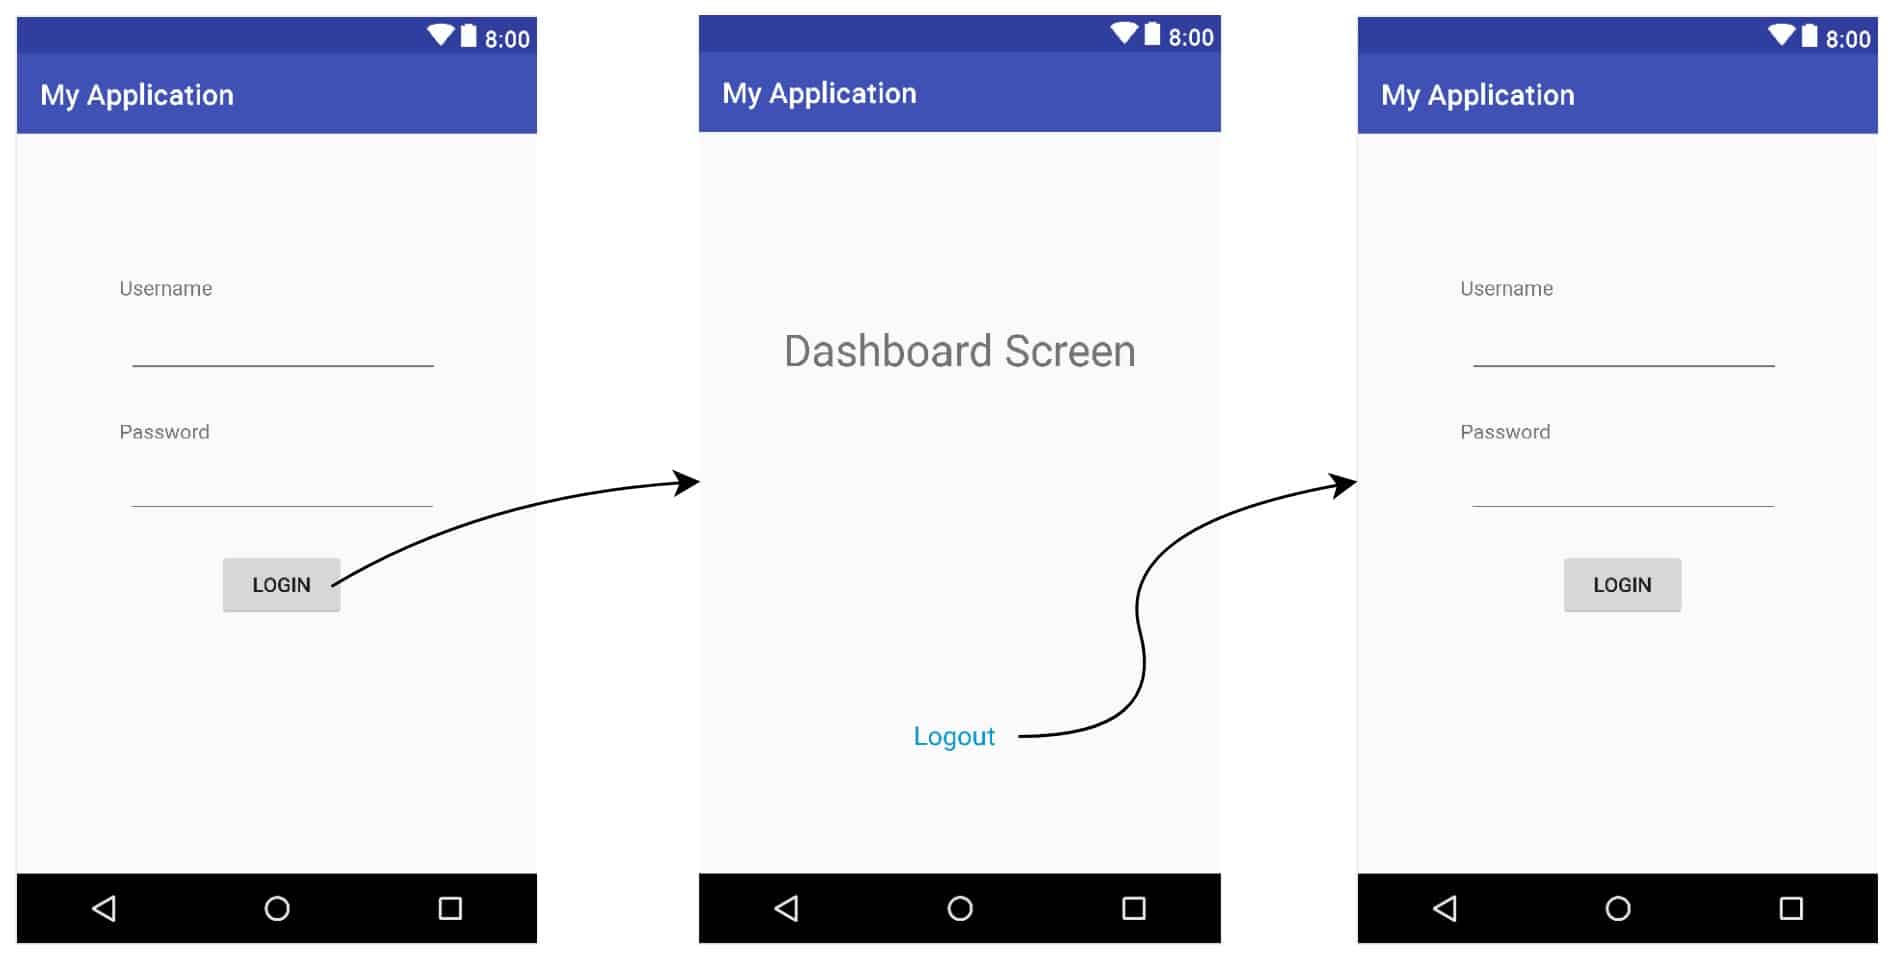
Here we are going to automate a simple workflow using the facade pattern, like first login to the application and move to the dashboard page, and from there logout. The Facade pattern is just an extension of the Page Object pattern, so basically in order to automate the above scenario we need to create page objects for different screens, so here we need to create 2 PO classes:
Now we need to create one additional class, LoginFacade, which contains the objects of PO classes and it also contains the business logic using those objects. So the advantage of facade is you don’t have to deal with the PO classes individually in your test script, you just need to use the facade class.
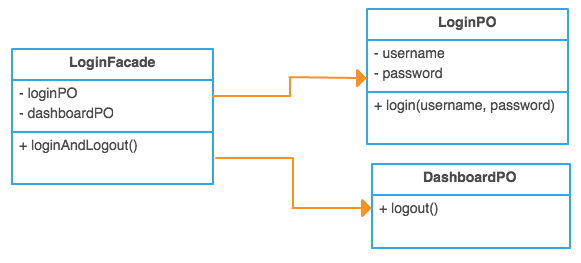
LoginPO – It contains the method of login to the application. DashboardPO – It contains logout() method. LoginFacade – It has LoginPO and DashboardPO objects defined and method loginAndLogout() also added, so you don’t have to call all PO methods, you just have to deal with Facade class methods which are internally calling PO methods. This type of automation framework is really useful when you are dealing with complex app and you have many POs defined. LoginFacade.java public class LoginFacade { private AppiumDriver driver; private LoginPO loginPO; private DashboardPO dashboardPO; public LoginPO getLoginPO() { if (loginPO == null) { loginPO = new LoginPO(driver); return loginPO; } else return loginPO; } public DashboardPO getDashboardPO() { if (dashboardPO == null) { dashboardPO = new DashboardPO(driver); return dashboardPO; } else return dashboardPO; } public void loginAndLogout(String username, String password) { getLoginPO().setUsernameTextField(username); getLoginPO().setPasswordTextField(password); getLoginPO().tapOnLoginButton(); getDashboardPO().tapOnLogoutTextView(); } }
So as you can see in above example you only have to use the loginAndLogout() method in order to do login and logout without depending on other PO classes. Now in case any workflow changes in your test cases you just need to change it in one place, and if you want to add some additional business logic, you can directly add them to the facade class. For large and complex applications, If you don’t use facade pattern then it’s totally fine, but you may face some complexity in your automation framework and your code may ultimately become unwieldy. You can find the complete project here.
A Singleton class means only one instance of it can exist at any time. But why would you need this? Well it is very useful in a case when you need to use the same object across the whole framework. A Singleton class returns the same instance every time you try to instantiate an instance of the class. Think of it providing global access to a single object, for example, the log file object. Creating a singleton class consists of:
{ public static SingletonClass singletonClass; private SingletonClass() { System.out.println(“Singleton Class object created.”); } public static SingletonClass getSingletonClass() { if (singletonClass == null) { singletonClass = new SingletonClass(); } return singletonClass; } public static void main(String[] args) { SingletonClass sc1 = SingletonClass.getSingletonClass(); SingletonClass sc2 = SingletonClass.getSingletonClass(); } }
{ public static SingletonAppiumDriver singletonAppiumDriver; private AppiumDriver appiumDriver; public String appiumURL = “https://127.0.0.1:4723/wd/hub”; private SingletonAppiumDriver() { appiumDriver = new IOSDriver(new URL(appiumURL), getDesiredCapabilitiesForIOS()); } private DesiredCapabilities getDesiredCapabilitiesForIOS() throws MalformedURLException { // set desired capabilities for iOS return desiredCapabilities; } public static SingletonAppiumDriver getSingletonAppiumDriver() throws MalformedURLException { if (singletonAppiumDriver == null) singletonAppiumDriver = new SingletonAppiumDriver(); return singletonAppiumDriver; } public AppiumDriver getAppiumDriver() { return appiumDriver; } } Using this Singleton class we can create test cases which will reuse the appiumdriver object instead of creating a new one every time. IOSTestCase: public class IOSTestCase { @Test public void sampleTestCase1() throws MalformedURLException { int a = 9; int b = 1; SingletonAppiumDriver singletonAppiumDriver = SingletonAppiumDriver.getSingletonAppiumDriver(); AppiumDriver driver = singletonAppiumDriver.getAppiumDriver(); driver.findElement(By.id(“IntegerA”)).sendKeys(a + “”); driver.findElement(By.id(“IntegerB”)).sendKeys(b + “”); driver.findElement(By.id(“ComputeSumButton”)).click(); String answer = driver.findElement(By.id(“Answer”)).getText(); Assert.assertEquals(answer, a + b + “”, “Expected and Actual Result didn’t match!”); } @Test public void sampleTestCase2() throws MalformedURLException { int a = 1; int b = 1; SingletonAppiumDriver singletonAppiumDriver = SingletonAppiumDriver.getSingletonAppiumDriver(); AppiumDriver driver = singletonAppiumDriver.getAppiumDriver(); driver.findElement(By.id(“IntegerA”)).sendKeys(a + “”); driver.findElement(By.id(“IntegerB”)).sendKeys(b + “”); driver.findElement(By.id(“ComputeSumButton”)).click(); String answer = driver.findElement(By.id(“Answer”)).getText(); Assert.assertEquals(answer, a + b + “”, “Expected and Actual Result didn’t match!”); } } You can see the full project here.
As you already know, the Page Object model is the the best framework to use on automation projects. However, it be simplified and made even more readable using the Fluent Page Object Model.In the fluent page object pattern every method which is responsible to perform an action returns “this” in order to implement chaining methods for the business logic of the test. But please note that doesn’t mean we never return the other screen PO class. Please refer to this example: LoginPO.java public class LoginPO extends BasePO
{ … … public LoginPO setUsernameTextField(String username) { usernameTextField.sendKeys(username); return this; } public LoginPO setPasswordTextField(String password) { passwordTextField.sendKeys(password); return this; } public DashboardPO tapOnLoginButton() { loginButton.click(); return new DashboardPO(driver); } … … } TestCases.java public class TestCases extends BaseTest { @Test public void testUserCanLoginAndLogout() { String username = “pratik”; String password = “test123”; LoginPO loginPO = new LoginPO(driver); loginPO.setUsernameTextField(username). setPasswordTextField(password). tapOnLoginButton(). tapOnLogoutTextView(); Assert.assertTrue(loginPO.isLoginPageDisplayed(), “Login Page did not appear after logout”); } }
In above example you can see that methods setUsernameTextField and setPasswordTextField are returning “this” while method tapOnLoginButton is returning the DashboardPO. So we are not forcing every method to return “this” object of it’s own class since it is not a practical approach. Once this is implemented, the chained method call is far more elegant: loginPO.setUsernameTextField(username). setPasswordTextField(password). tapOnLoginButton(). tapOnLogoutTextView(); You can find this example on our github page.
For those that are interested, there are many other design patterns. Most of these are used extensively in software development, but arguably less so in test case automation:
You can learn more about these patterns here. As we said on the onset, using design patterns is optional from a purely technical perspective and there are many ways to implement a solution. The more complex your environment, the more likely you are to benefit from the rigor imposed by design patterns.
Many people are new to test automation and can be intimidated by using design patterns. Our recommendation is to get comfortable with Appium and test automation first, and then slowly expand your knowledge by incorporating design patterns. Learn more at Kobiton.