

Feb 1, 2021
JMeter-Selenium Webdriver Integration

Adam Creamer
Read More
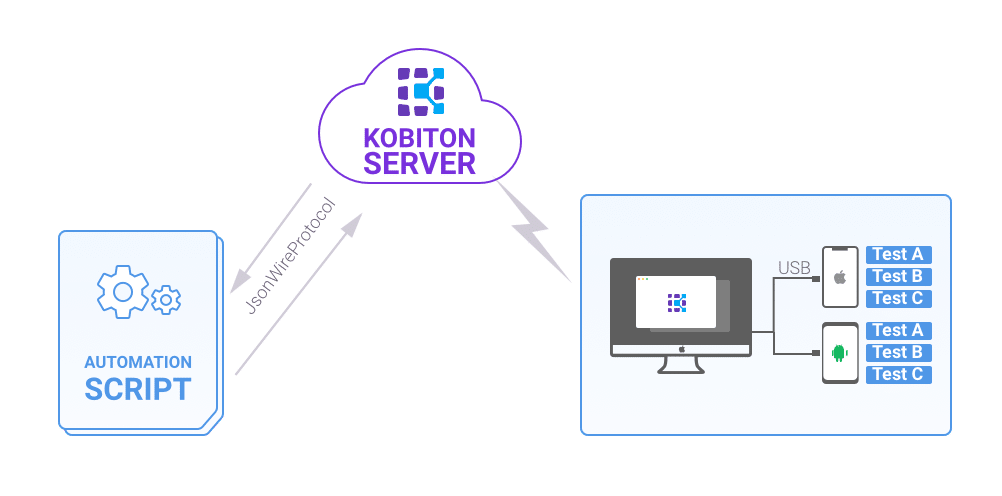

Parallel testing is one of the main features of the Kobiton Cloud service, giving users the ability to run concurrent tests. Instead of waiting for each test to execute individually, users can run multiple tests in parallel across various browser, device, and OS combinations. In this way, parallel testing will help you reduce the run time of your test suite, resulting in faster build times and quicker release cycles.
In this article, we will teach you how to run your own tests using Selenium/WebDriver and a testing library such as selenium-webdriver for Node. We will also examine how to integrate your local testing environment with commercial tools like Kobiton.
brew install node
In this tutorial, we will create a test case for the following scenario:
In this tutorial, we will use a sample test script provided in the Kobiton Sample Repository. Let’s download a sample script here.
cd ~/Documents/
git clone https://github.com/kobiton/samples.git
cd samples/javascript
npm install
Inside the project folder, we can see multiple-devices-test.js with the following contents:
import 'babel-polyfill'
import {assert} from 'chai'
import Promise from 'bluebird'
import parallel from 'mocha.parallel'
import {Builder, By, Key, until} from 'selenium-webdriver'
const kobitonServerUrl = 'https://api.kobiton.com/wd/hub'
const username = 'your Kobiton username'
const apiKey = 'your Kobiton api key'
let desiredCapabilities = [{
sessionName: 'Automation test session on first device',
sessionDescription: 'This is an example for Android web',
deviceOrientation: 'portrait',
captureScreenshots: true,
browserName: 'chrome',
deviceGroup: 'KOBITON',
deviceName: 'Galaxy S5',
platformName: 'Android'
}, {
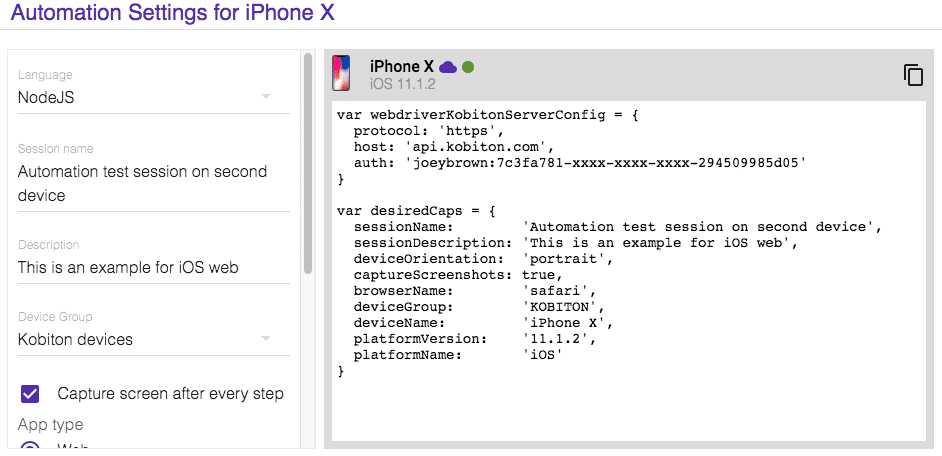
sessionName: 'Automation test session on second device',
sessionDescription: 'This is an example for iOS web',
deviceOrientation: 'portrait',
captureScreenshots: true,
browserName: 'safari',
deviceGroup: 'KOBITON',
deviceName: 'iPhone X',
platformName: 'iOS'
}]
let driver
const buildDriver = (_caps) => {
const caps = Object.assign({}, _caps)
caps.username = username
caps.accessKey = apiKey
return new Builder()
.usingServer(kobitonServerUrl)
.withCapabilities(caps)
.build()
}
parallel('Parallel Tests',() => {
it('should return the title that contains Kobiton on first device', async () => {
const driver = buildDriver(desiredCapabilities[0])
await run(driver)
})
it('should return the title that contains Kobiton on second device', async () => {
const driver = buildDriver(desiredCapabilities[1])
await run(driver)
})
async function run(driver) {
try {
await driver.get('https://www.google.com')
await driver.findElement(By.name('q')).sendKeys('Kobiton', Key.RETURN)
await driver.wait(until.titleContains('Kobiton'), 2000)
let msg = await driver.getTitle()
assert.include(msg, 'Kobiton')
}
finally {
if (driver != null) {
await driver.quit()
}
}
}
})
Now you can use this code to execute your tests with Kobiton Cloud service.
This sample test script uses several test frameworks and libraries, including Mocha, Chai, and selenium-webdriver.
Mocha – a JavaScript test framework for Node.js and the browser.
Chai – a BDD / TDD assertion library for Node and the browser.
Selenium WebDriver – Selenium is a browser automation library. Most often used for testing web-applications, Selenium may be used for any task that requires automating interaction with the browser.
We have two ways to get your username and API Key to replace the username and API Key in the multiple-devices-test.js file.
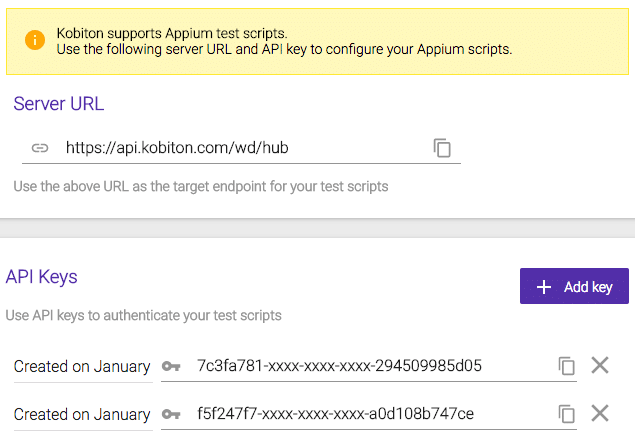
  const username = 'joeybrown'
  const apiKey = ‘7c3fa781-xxxx-xxxx-xxxx-294509985d05'
In this scenario, I chose one Android device (Galaxy S5) and one iOS device (iPhone X) to run tests in parallel. We need to edit these desiredCapabilities to indicate the target device you want to test.
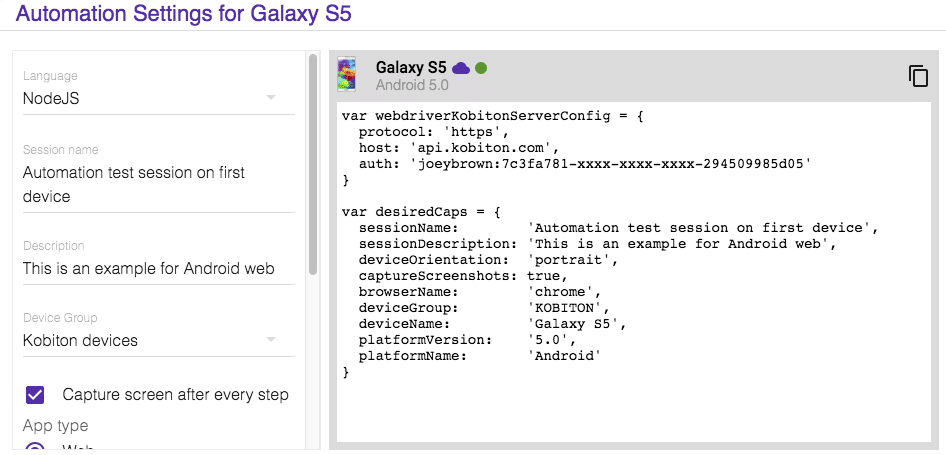
Edit the desiredCapabilities to indicate your target test device.
desiredCapabilities = [{
  sessionName:        'Automation test session on first device',
  sessionDescription: 'This is an example for Android web',
  deviceOrientation:  'portrait',
  captureScreenshots: true,
  browserName:        'chrome',
  deviceGroup:        'KOBITON',
  deviceName:         'Galaxy S5',
  platformName:       'Android'
  }, {
  sessionName:        'Automation test session on second device',
  sessionDescription: 'This is an example for iOS web',
  deviceOrientation:  'portrait',
  captureScreenshots: true,
  browserName:        'safari',
  deviceGroup:        'KOBITON',
  deviceName:         'iPhone X',
  platformName:       'iOS'
}]
Once you have everything set up, you can execute the test simply by running the following command:
npm run multiple-devices-test
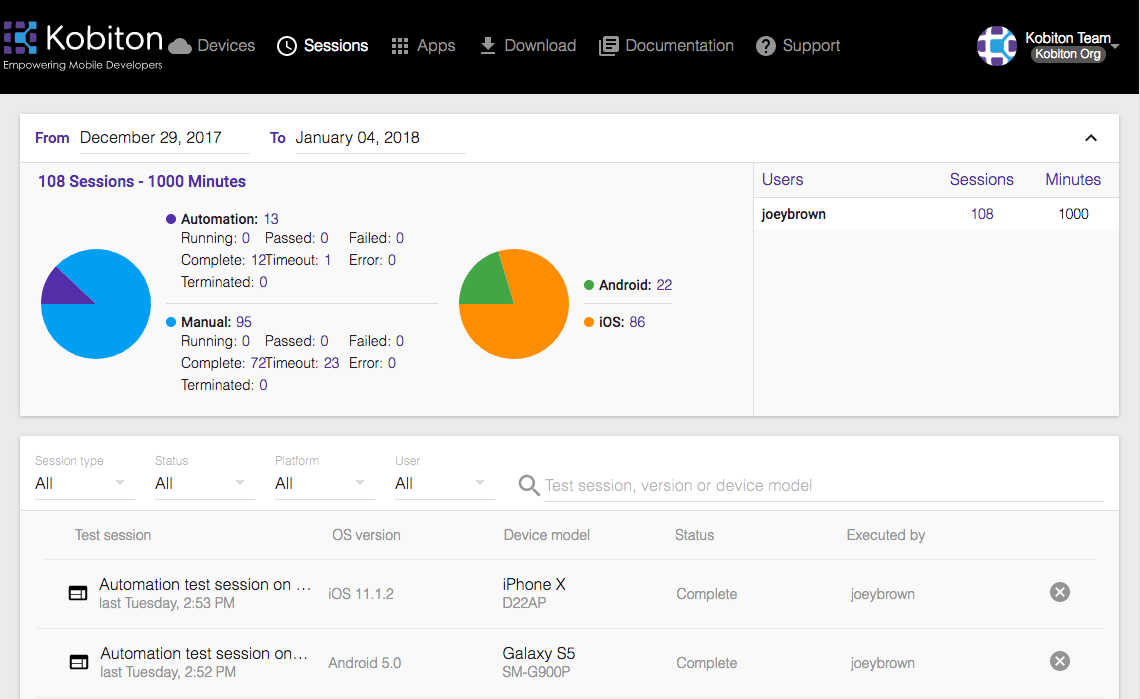
After the script is successfully executed in the Terminal, you can access https://portal.kobiton.com/sessions to examine the test results. You should now see two completed test sessions with near-identical timestamps, indicating that they were run in parallel to one another.
As you can see, running tests on remote servers isn’t much more difficult than running them locally. You just need to create your driver instance (as usual), but with a few more specific features, including the capabilities of the device you want to test on, the address of the server, and the user credentials you need (if any) to access it.
In addition, doing parallel testing with Selenium Webdriver has many benefits, such as a decrease in the execution time of the test suite and tighter feedback loops provided by your tests.
If you have a choice, always execute your parallel tests in the cloud. The benefits that you receive, i.e. logs (device log & appium log), videos and screenshots, all make you more efficient by helping you debug faster, allowing you to spend more time actually covering new functionality.
If you’re new to test automation or happy with inefficiency, you can execute tests one at a time. But if you consider yourself somewhat an expert looking to save time and energy, automate whatever tests you want and have them run in parallel. You can thank us later for the tip.
If you haven’t already, get started with Kobiton today by signing up for a free trial, and see just how productive your test automation operation can become.


