

Apr 25, 2020
Appium 1.17.0

Cara Suarez
Read More
Appium is platform-independent, so executing Appium scripts is largely consistent across all the major platforms (Linux, Mac, and Windows). Appium can significantly elevate your mobile testing with its cross-platform compatibility, scalability, and cost-efficiency. Additionally, platforms like Kobiton also makes Appium run faster.
In this article, we will discuss how can you setup and install Appium and its dependencies on different platforms.
Software required:
• Go to: https://java.sun.com/javase/downloads/index.jsp
• Select the appropriate JDK software and click Download
• The JDK software is installed on your computer, for example, at C:\Program Files\Java\jdk1.6.0_02. You can move the JDK software to another location if desired.
• Right click My Computer and select Properties.
• On the Advanced tab, select Environment Variables, and then edit JAVA_HOME to point to where the JDK software is located, like: C:\Program Files\Java\jdk1.6.0_02.
• You can check it by typing $ java -version command at the command prompt
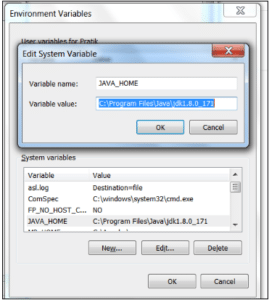
Figure-1: JAVA_HOME System Variable.
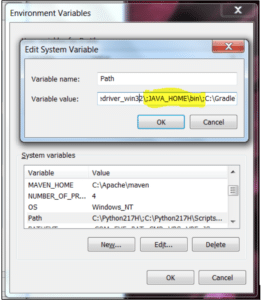
Figure-2: PATH System Variable.
• Go to: https://developer.android.com/studio/index.html
• Download and Install Android Studio
• Open Android Studio and then download the needed Android SDK files from Tools > Android > SDK Manager
• Right click My Computer and select Properties.
• On the Advanced tab, select Environment Variables, and then add ANDROID_HOME to point to where the Android SDK files is located, like: D:\Android\sdk\
• Verify it on the Command prompt using $ echo %ANDROID_HOME% command. Output must display the SDK path.
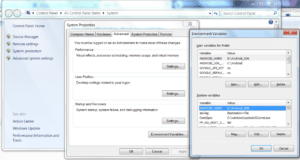
Figure-3: ANDROID_HOME System Variable.
Install Node.js from: https://nodejs.org/en/download/
You can verify installation by entering $ npm -v command at the command prompt and it will display the version.
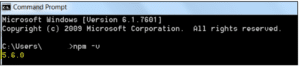
Figure-4: Node.js version
Go to the Appium github project and Download the relevant Appium Desktop .exe file.
Install it and Open Appium.exe file and start the server
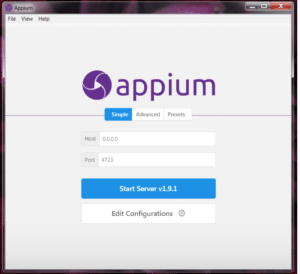
Figure-5: Appium Desktop Application
A Terminal should appear saying ‘The server is running’
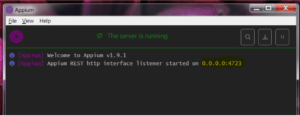
Figure-6: Appium Server is running on 0.0.0.0:4723
Please follow the above steps correctly in order to have a seamless Appium setup experience.
Software required:
Install the Java Development Kit Software from: https://java.sun.com/javase/downloads/index.jsp
Select the appropriate JDK software and click Download.
• Right click My Computer and select Properties.
• On the Advanced tab, select Environment Variables, and then edit JAVA_HOME to point to where the JDK software is located, like: C:\Program Files\Java\jdk1.6.0_02.
Install Android Studio from: https://developer.android.com/studio/index.html
Open Android Studio and then download the needed Android SDK files from Tools > Android > SDK Manager
We need to store Environment variables in .bash_profile file, so open Terminal and enter this command to open the bash_profile:
$ vi ~/.bash_profile
Now, you need to go into insert mode by pressing the `i` key from the keyboard, and write the following text at the end of the file.
export ANDROID_HOME=/Users/username/Library/Android/sdk
export ANDROID_SDK=$ANDROID_HOME
PATH=$PATH:$ANDROID_HOME/build-tools
PATH=$PATH:$ANDROID_HOME/platform-tools
PATH=$PATH:$ANDROID_HOME/tools
export PATH
export JAVA_HOME="`/System/Library/Frameworks/JavaVM.framework/Versions/Current/Commands/java_home`"
Press ESC key followed by :wq, which will save the .bash_profile file.
You can check that JAVA_HOME & ANDROID_HOME are properly set by executing commands $ java -version & $ echo $ANDROID_HOME Respectively.
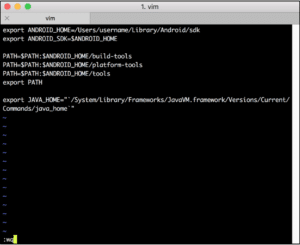
Figure-7: ANDROID_HOME & JAVA_HOME environment variables.
Install Node.js from: https://nodejs.org/en/download/
You can verify the installation by entering $ npm -v command at the command prompt and it will display the version.
Go to the Appium github page and download the relevant Appium Desktop .dmg file.
Install it and Open Appium and start the server
A Terminal should appear saying ‘The server is running’
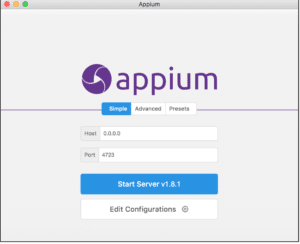
Figure-8: Appium Desktop Application
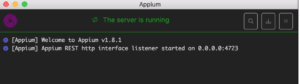
Figure-9: Appium Server is running on 0.0.0.0:4723
Install XCode: https://developer.apple.com/download/
Install Xcode Command line tools:
$ xcode-select --install
Install Brew(If it’s not installed already):
$ /usr/bin/ruby -e "$(curl -fsSL https://raw.githubusercontent.com/Homebrew/install/master/install)"
Install libimobiledevice:
$ brew install libimobiledevice --HEAD
Install ios-deploy:
$ npm install -g ios-deploy
Install carthage:
$ brew install carthage
NOTE: Now you are set to run your iOS Appium Script on Simulator
This is the most crucial and important step of Appium setup for iOS. If you don’t follow these steps correctly, then you might not be able to run the Appium Automation scripts on your real iOS devices.
There are 2 ways to configure project in Appium:
The easiest way to get up-and-running with Appium’s XCUITest support on iOS real devices is to use the automatic configuration strategy. There are two ways to do this:
Use the xcodeOrgId and xcodeSigningId desired capabilities:
{
  "xcodeOrgId": "<Team ID>",
  "xcodeSigningId": "iPhone Developer"
}
In Java, the code will look like:
desiredCapabilities.setCapability("xcodeOrgId", <<Team ID>>);
desiredCapabilities.setCapability("xcodeSigningId", "iPhone Developer");
NOTE: You can always come back to this article after you’ve progressed in your Appium knowledge a bit further and need to start testing on real iOS devices (as compared to Emulators).
or
Create a .xcconfig file somewhere on your file system and add the following to it
DEVELOPMENT_TEAM = <Team ID>
CODE_SIGN_IDENTITY = iPhone Developer
desiredCapabilities.setCapability("xcodeConfigFile", "path/to/.xcconfig")
In either case, the Team ID is a unique 10-character string generated by Apple that is assigned to your team. You can find your Team ID using your developer account. Sign in to www.developer.apple.com/account, and click Membership in the sidebar. Your Team ID appears in the Membership Information section under the team name. You can also find your team ID listed under the “Organizational Unit” field in your iPhone Developer certificate in your keychain.After this you need to set the desired capabilities and set the path to .xcconfig file:
NOTE: These are mutually exclusive strategies; use either the xcodeConfigFile capability or the combination of xcodeOrgId and xcodeSigningId. For more details you can visit this link.
There are many cases in which the basic automatic configuration is not enough. This usually has to do with code signing and the configuration of the project to be able to be run on the real device under test. This often happens when the development account being used is a “Free” one, in which case, it is not possible to create a wildcard provisioning profile, and will often not create one for the default application bundle.
Please follow these steps to Manually configure the WebDriverAgent XCode project.
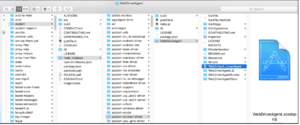
Figure-10: WebDriverAgent.xcodeproj Project in Finder window.
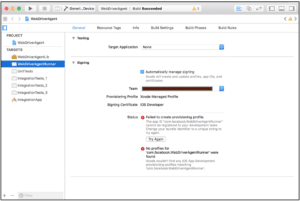
Figure-11: XCode: WebDriverAgentRunner Project in not able to find Provisioning profile.
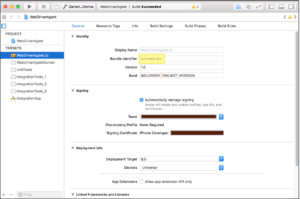
Figure-12: XCode: Change Bundle Id, Select and Select Valid Team Project\

Figure-13: XCode: Select Valid Provisioning Profile for WebDriverAgentRunner
Figure-14: XCode: Test the Project on connected iPhone device
NOTE: Please install Appium-Doctor (Node Utility) using npm, It will diagnose and fix common Node, iOS and Android configuration issues before starting Appium.
$ npm install -g appium-doctor
//then
$ appium-doctor
//it will give checklist of which things are okay and which are not
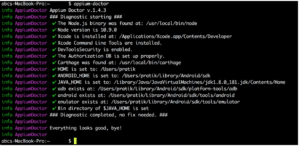
Figure-15: Appium Doctor Node Utility on iOS
Software required:
Install Java Development Kit Software from:
$ sudo apt-get update
$ sudo apt-get install default-jre
$ sudo apt-get install default-jdk
//to install oracle jdk
$ sudo add-apt-repository ppa:webupd8team/java
$ sudo apt-get update
$ sudo apt-get install oracle-java8-installer
In order to set JAVA_HOME on linux you need to edit the .bashrc and need to specify the path of java directory.
$ vi ~/.bashrc
export JAVA_HOME=/usr/lib/jvm/java-8-openjdk-amd64
export PATH=${PATH}:${JAVA_HOME}/bin
$ echo $JAVA_HOME
$ echo $PATH
NOTE: Use the command: $ which java to find out exact path to which java executable
If you have already installed remove it using commands:
$ sudo apt-get remove nodejs
$ sudo apt-get remove npm
$ cd /usr/local tar --strip-components 1 -xzf /home/username/Downloads/node-v8.2.1-linux-x64.tar.gz
$ which node //it should give you output like: usr/local/bin/node
$ node -v  //it should give you output v8.2.1 (or whichever version you have installed)
$ cd android-studio/bin
$ . studio.sh //To execute the studi.sh script
$ vi /.bashrc
export ANDROID_HOME=/home/user_name/Android/Sdk

export PATH=$PATH:/home/user_name/Android/Sdk/tools

export PATH=$PATH:/home/user_name/Android/Sdk/platform-tools
$ npm install -g appium
$ appium //To start the Appium server
$ npm install -g appium-doctor
//then
$ appium-doctor
//it will give checklist of which things are okay & which aren’t
$ npm install -g appium-doctor
//then $ appium-doctor
//it will give checklist of which things are okay & which aren’t
desiredCapabilities.setCapability("xcodeOrgId", <<Team ID>>);
desiredCapabilities.setCapability("xcodeSigningId", "iPhone Developer")


